Saturday, 31 August 2013

Felt Flower Birthday Cake


Time to celebrate!

EDITOR'S NOTE: Heather received so many prizes, the Sizzix giveaway has been postponed. But here's the good news... the giveaways will continue so there are more chances for you to win- and the other prizes have been amazing! Visit my blog for the latest updates! Thanks...

My 3D Sizzix flower dies are part of a big giveaway this weekend to celebrate fabric designer Heather Bailey's birthday month. The Sizzix giveaway starts at midnight, Sunday, September 1. Go here to see how the giveaway starts and to enter your comments. Be sure and tell Heather I said to stop by :-)

I decided to make a birthday cake for Heather using some new burlap matboard I received from my friends at Crescent Cardboard, wool felt, and my Sizzix flower dies. The felt just cuts like butter and it is so much fun to arrange the pieces in different colors and combinations. You can also add decorative hand stitching to really make them pop.


Visit my blog for instructions on how I created this cake.


Have a safe and happy holiday weekend... at least it is a holiday weekend here in the US! We are traveling to NY and doing a little camping.

Christmas cards using the Leafy tree die and TI with Pan Pastels


Hello!

Today I am sharing a Christmas card. You know Christmas is only a few months away which means that it is time to start thinking of Christmas cards so that it is not a mad dash closer to the time.

Also, I would like to showcase how the dies, textured impression folders and stamps all work together.


I always recommend to STAMP + DIE CUT + EMBOSS. Meaning that that is the natural order although for some techniques you may want to change that a bit! Still as a rule of thumb, if you would like just two techniques would be STAMP + DIE CUT; DIE CUT + EMBOSS; STAMP + EMBOSS.

So, I started by die cutting six pieces of white card. I like Inspire me Snow White (270 gsm thick but not too much, perfect for embossing).


Then I placed the die cut and place it inside of the TI folder and emboss using my Big Shot. As with any embossed piece of card, there is two sides and two different effects.


Using Sofft tools I applied the colours I chose from the Pan Pastels.


Then I attached the panels to a folded card, trimming the ends.


Then I die cut and emboss an Embosslit Charm tag  (658618 Sizzix Embosslits Die - Charm, Emerald). This Charm coordinates perfectly with the Winter Charms set of stamps and Framelits ( 658620 Sizzix Framelits Die Set 9PK w/Stamps - Charms, Winter).

And stamped the tree in the centre of the Charm. And then I assembled all together!


I hope you liked it!

Friday, 30 August 2013

Canvas cut-outs in Swindon, UK!


Hi again friends!
I'm back here to share another project inspired by Sizzix products. This time I've got  for you grungy, splashy layout which was made during the "Tea for 2" mixed-media class in Swindon, UK. It was my firs t time in UK and I was fortunate to teach a lovely group of 30 talented ladies - and we had so much fun!


Here you can see some photos from our classroom. We were super busy for the whole 2 days... And I can only say - these ladies were awesome!!!


 Part of the class was cutting out floral elements from new my Prima Elementals - Resist Canvas Sheet - they were perfect elements to build the dimension, fill the gaps in the cluster of embellishments and add some special "touches" to the project!
Here is one of the " in progress" photos - before the resist canvas was coloured. Can you see beautiful rose leaves created with 658523 - Sizzix Bigz Die - Arbor from Flora Grande Collection?


And here is the finished project - colored, distressed, ready to go! Other dies suggestions for this kind of project would be : 658524 - Sizzix Bigz Die - Classique from Flora Grande Collection and 657713 - Sizzix Bigz Die - Flowering Plant.


And now I'm home again, unpacking and getting ready for the new projects and adventures. I hope you will have a great, creative week!
hugs
Finn 

Paper Button Embellishments


Hi Everyone! this is Anna.
I love using my Bigshot and any die, but my Sizzlits Decorative Strip Die - Sew Cute (by Prima Marketing Inc.) is among my favourite die. Couldn't wait to try my machine at making paper buttons.
Have a look at some of the cute buttons I made using this die. Here's my card:

cafe creativo - sizzix big shot - card - wrapping buttons (1)

cafe creativo - sizzix big shot - card - wrapping buttons (2)

This is just one of the possibilities for using the paper buttons. So fun and colorful and perfect to wrap twine around on gift:

cafe creativo - sizzix big shot - card - wrapping buttons (3)

cafe creativo - sizzix big shot - card - wrapping buttons (4)

Don’t these little cuties look like real buttons! :)
I hope you enjoyed my project today. Have a great week, see you next Friday!

Items used:

cardstocks
patterned papers
fabric
gold acrylic paint
twine
paper doily
glimmer mist
buttons
sequins
tissue paper
foam board tape, glue

**************************************
Flag_of_Italy Per le amiche italiane! :)
Ciao! Sono Anna e vorrei condividere con voi alcuni lavori.
Chi mi segue già da un po' sa che mi piace molto usare la mia Bigshot e le fustelle Sizzix, ma la Sizzlits Decorative Strip Die - Sew Cute (by Prima Marketing Inc.) è tra le mie preferite del momento. Non vedevo l'ora di fare un po' di bottoni di carta per abbellire i miei lavori.

Nelle foto sopra, date un'occhiata ad alcuni progettini che ho fatto con questa simpatica fustella!
Ho realizzato innanzitutto una card di compleanno. Sono partita da una base di cartoncino bianco, dove ho spruzzato qualche goccia di colore. Ho poi incollato mezzo centrino di carta da pasticceria e un centrino tagliato con la fustella Sizzlits Vintage Doily. Qualche striscia di carta fantasia, la striscia con il "sentiment", infine i bottoni di carta. Uno l'ho incollato sopra ad un fiore di stoffa fustellato. Per dare rilievo ho incollato i bottoni di carta con scotch biadesivo spessorato... così sembrano quasi veri!

Questa è solo una delle possibilità per usare i bottoni di carta. Un'altra idea divertente e colorata e quella di infilare i bottoni in un po' di spago e avvolgerlo intorno ad un pacchetto regalo! Molto semplice, no?!

Vi sono piaciute queste idee??? Spero proprio di sì! Ci vediamo, sempre qui, venerdì prossimo!
Felice Estate creativa!

Materiali:

cartoncini colorati vari
carte fantasia
ritaglio di stoffa chiara
cordoncino bicolore
centrino di carta
glimmer mist
bottoni
paiettes
carta velina
scotch biadesivo spessorato, colla...

Thursday, 29 August 2013

Layout "Coffee, Love, Addict"


This is a layout on my coffee addiction inspired by the new Sizzix embossing folders!
I used them as soon as I received them!

Supply list:

Papers: Basic Grey, Lilybee Design, Color Conspiracy
Glitter paper: American Crafts
Cardstock: American Crafts
Alphabets: American Crafts, Jillibean Soup
Frames: Crate Paper
Wood embellishments: Studio Calico
Masking Tape: Lovely Tape
Sticker Basic Grey
Chipboards: Studio Calico
Stamps: Hero Arts, Glitz Design, 7Gypsies
Ink: Chalk Prima
Others: Ribbon

Dies:

657212 Sizzix Movers and Shapers magnetic die 2PK-mini hearts set
658380 Sizzix Textured Impressions Embossing-Folders 2PK- Coffee Set
658002 Sizzix Sizzlits Decorative Strip Die- Lace and circles

Start by choosing pastel coloured pattern papers and a background with soft patterns (here it is my pretty hearts paper).

Use the coffee embossing folder with a white cardstock: a perfect match for my theme!
I also stamped a cup pattern (Hero Arts) and cut it up.

Cut a lace border with your Big Shot, small hearts out of golden paper, choose some wooden hearts, two Pola frames and some little bubble chipboards.

Gather and glue all these elements around your picture.

Glue the golden hearts with 3D adhesives to make them stand out more.

Add your title using three different fonts.


Add some masking tape strips and your lay-out is done!


Page "Coffee, Love, Addict"

Une page sur mon addiction pour le café largement inspirée par les nouvelles plaques à embosser Sizzix !
A peine reçu, aussitot scrappées !

Matériel :

Papiers : Basic Grey, Lilybee Design, Color Conspiracy
Papier paillettes : American Crafts
Cardstock : American Crafts
Alphabets : American Crafts, Jillibean Soup
Cadres : Crate Paper
Embellissements en bois : Studio Calico
Masking Tape :Lovely Tape
Autocollant : Basic Grey
Chipboards : Studio Calico
Tampons : Hero Arts, Glitz Design, 7Gypsies
Encre : Chalk Prima
Divers : Ruban

Dies utilisés :

657212 Sizzix Movers and Shapers magnetic die 2PK-mini hearts set
658380 Sizzix Textured Impressions Embossing-Folders 2PK- Coffee Set
658002 Sizzix Sizzlits Decorative Strip Die- Lace and circles

Commencez par choisir des imprimés dans les tons pastels et un fond de page aux motifs discrets ici mon joli papier à coeurs.

Embossez sur du cardstock blanc la plaque "café", juste idéale pour ma thématique !
Dans la même idée, tamponnez et découpez un tampon tasse de la marque Hero Arts.

Découpez une frise dentellée à l'aide de votre Big Shot, des petits coeurs dans du papier doré, sélectionnez des coeurs en bois, deux cadres pola, des petites bulles chipboards.

Assemblez tous ces éléments autour de votre photo.

Afin qu'ils ressortent bien, montez les coeurs dorés en 3D à l'aide d'adhésifs.

Complétez avec votre titre en jouant sur trois typo différentes.

Ajoutez quelques bandes de masking tape et votre page est terminée !


Karine

Dinosaurs ready to roar!


Where has this week disappeared? I am no further on with the baby mat - and the baby shows no signs of arriving yet - but the beginning of term is next week! So the P.E. bag and towel are now complete for my grandson (I'm hoping he won't need an apron for a couple of weeks)
 
I used the  Sizzix Bigz L Die - T-Rex, Dinosaur - 658637 - and I cut 2 complete dinosaurs out of 2 different fabrics ( with fusible web applied to the wrong side). I then mixed and matched the bodies and limbs and fused them to the towel and the denim for the P.E. bag (17" x 28").
I also cut out his initials from the same fabrics and fused them in place as well.
I used a zig-zag stitch for the dinosaurs and a straight stitch for the initials.
 
 
The bag was folded in half with right sides together, and stitched along the bottom and the side, leaving and opening for the ribbon or cord, and then the raw edges neatened with a zig-zag stitch.

The top edge was turned under twice and stitched in place and a ribbon threaded through the top.
At last something completed! now for Eve's butterfly PE bag and towel.
The baby won't mind it's play mat being completed late will it!!
Enjoy the week.
Angela


Wednesday, 28 August 2013

So simple!


I love the new collection from the wonderful Brenda Walton, it is so classy and versatile. Some of the Bigz dies are inspired but I was immediately drawn to the large Sizzlits in the collection as there is so much inspiration packed into every square millimetre which means great value and versatility.

Debi and I have been using the dies for upcoming Create and Craft shows (Saturday 31st August at 10am and 4pm with yours truly  where I will be demonstrating just how great these dies are. As a sneak preview here is a simple card which I will hopefully be demonstrating live at some point on the shows.

Simple is beautiful as I never tire of saying and never more so than here. I combined plain white, ivory and cream card stock from Inspire Me Papers which is top quality and beautiful to work with. The die used was a Sizzlits die Holiday Greenery by Brenda Walton 658731.


To begin I printed the legend "Thank you" onto a white card blank (18 x 13cm) using my PC, or, if you prefer you could use a favourite rubber stamp. Next I attached a strip of cream card across the base (18 x 7cm) before die cutting all the elements I needed from ivory card.


I used the tools from my Susan's Garden tool kit to add a little dimension to the leaves and petals. For a little more information on how to use this fantastic kit, follow this link. As you can see from the third picture below, they certainly bring the shapes to life.


Next, I attached the elements along the border between the white and cream card using a combination of 3D foam pads and PVA glue. Finally, I used adhesive pearls and gems to add a little bling. A combination of sizes and shades works really well.


I'm sure you will agree that even though the colours and techniques used are very simple, the effect is stunning. My secret?.....Sizzix of course!


Mixed-Media Cover For Album


Hi All!

Daria is here. 
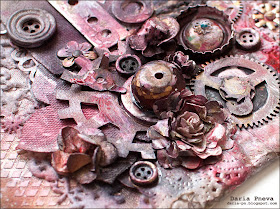
Today I would like to share a mixed-media cover for my new album. I started create album about me and I needed a cover. I used different cute things that I found at home (such as washers, bottle caps, parts of old clocks and etc.) and of course different dies.
I used Lace die to create more layers. I used Flowers dies to create beautiful flowers. And I used Gear die to create chipboard gear.
Also I used sprays, gesso, textured paste, alcohol inks, felt ribbon, resist canvas and etc.

Items used:
Big Shot Machine (657900)
Sizzix Sizzlits Decorative Strip Die - Flower Garden w/Scallops (657708)
Sizzix Sizzlits Die - Flower, Rose 3-D (658504)
Sizzix Thinlits Die Set 3PK - Flowering Quince (658410)
Sizzix Bigz Die - Gadget Gears (656636)


Have a nice day!

Daria.


Всем привет!

Сегодня я с обложкой для моего нового альбома. Альбом будет обо мне. И для кого как не для себя можно постараться и сделать что-то эдакое. Поэтому я решила сделать обложку в стиле микс-медиа, с использованием всяких штучек, что нашла дома и в строительном магазине (такие как шайбы, пластины, детали старых часов, крышки от бутылок и т.д.). Ну  и конечно не обошлось без ножей Sizzix.
Так же я использовала спреи, гессо, текстурную пасту, фетровую ленту, холст, пуговицы и т.д. В общем творила от души! :)

Материалы Sizzix:
Big Shot Machine (657900)
Sizzix Sizzlits Decorative Strip Die - Flower Garden w/Scallops (657708)
Sizzix Sizzlits Die - Flower, Rose 3-D (658504)
Sizzix Thinlits Die Set 3PK - Flowering Quince (658410)
Sizzix Bigz Die - Gadget Gears (656636)

Дарья.