Today I want to share an easy way but in a long post to make your own shaped easel cards.
I will let you on a little secret, I never done an easel card until this morning, in fact a few months ago I said to myself I would never make one because I saw all my friends make the most gorgeous ones and I didn't think I could add anything to the trend.
But, usual me, I thought it would be nice to show how to use Sizzix dies to make one simple one. So here it is.
Start by scoring a card in half (5.5") that measures at least 11 inches long.
Position the folded card on top of the Baroque die (Mover & Shaper). Make sure that the scored edge is inside of one of the edged of the blade and secure it in place with low tack tape.
Once you die cut it, you will get this folded card which is great on its own!
Score now the front of the card in half, but it doesn't need to be exact in half.
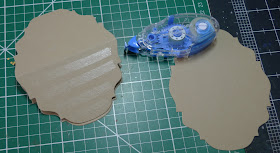
Die cut a plain one single sheet using the Baroque die. Apply glue to only the bottom part of the scored card and attach the single die cut on top. I recommend to use wet glue as that is the stronger bond, but the tape runner (from Stix2) ais a good option for speed and practice.
This is how it should look like, an easel card.
To decorate the card, I decorate the card I die cut the Mini Baroque (Magnetic Mover & Shaper) die inside of the Baroque die. That way you get two pieces the main plaque and the frame around it.
To fit in the frame inside of the card, you will need to trim off the top of one of ends. Then attach to the inside of the card.
Use the main bit of the Mini Baroque die cut and emboss it using a Texture Impressions folder, I used one from the Vine & Flower set.
I distress the edges using Tim Holtz Brushed Corduroy distress ink pad (available through Personal Impressions stockists). Then I die cut the heart using Pete Hughe's Frame Heart with Crown and the scroll using Card and Phrases set.
I die cut the Ticket using Tim Holtz Magnetic Mover & Shapers, then I stamped the message using one of my Big Sentiments stamps (available through Personal Impressions stockists)
Place the ticket inside of the embossing folder and place it where the scroll goes around the message.
Because I wanted the embossed effect all around the message I placed a second time on the folder. Now, if you do this without the next step you would flatten the embossing done in the previous step.
This step is very important, you need to put the top cutting plate halfway, only over the top of the area for the new embossing.
See? the emboss pattern goes all around and all it is embossed beautifully, not flattened at all.
I also die cut the hearts using the Cards and Phrases 2 to make them as stoppers so that the easel card stay standing up.
And this is the finished card.
The side, so that you can see the heart as stopper.
The back.
And, like all easel cards, they fold completely flat for postage.


Beautiful card Paula..you will have to make more!
ReplyDeleteHugs,
Helena Danielsx
thank you, beautiful card, well done.
ReplyDeletehugs
Crafty Pearl
Just got here from Pinterest. These cards have always looked confusing to me. Thanks for your very clear instructions. I'll be making some soon thanks to you!
ReplyDeleteTHIS IS A BEAUTIFUL CARD THANK YOU FOR SHOWING US HOW TO MAKE IT >THANK YOU FOR NOT BEING SELFLESSGOD BLESS YOU.TENNESSEE, smiley face
Deletevery good ideas and very well explained thank you very much
ReplyDeleteGreat card
ReplyDeleteLove your way of doing this lovely card thank you x
ReplyDelete