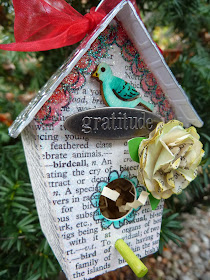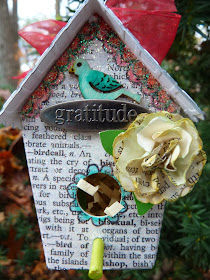
Brrr....the weather is finally getting chilly. Before you know it, Christmas will be here! I like to make a few handcrafted ornaments every year for my tree. Here's one for this season.
I used my ScoreBoard Birdhouse die to make this project from matboard. Crafting with thick material like this (up to 1/16") makes the projects you make so sturdy and able to hold up for years. I figure if I am going to the trouble of making something, I want it to last a while. Sizzix is the only company that makes dies specially designed to cut and score thick board like this. Have you tried a ScoreBoard die yet? Did you know you can also emboss matboard? Check out the fabulous metal roof!
Sizzix Supplies:
658451 Birdhouse, 3D
657114 Flower, Layers #9
658455 Basketweave and Honeycomb set
656491 Matboard pack- cream
Other Supplies:
Adhesive backed metal tape (I found this in a home improvement store in the US), text paper, bamboo skewer, metal embellishment, wooden bird from Prima, black permanent marker, Copic markers, crystal glitter, spray adhesive, glitter
- Coat a piece of matboard with spray adhesive and cover with dictionary paper. Lay the paper on the matboard so the direction of the text matches up with the front of the birdhouse.
- Remove adhesive backing from tape and place over matboard where the roof will be cut (rectangle with scalloped edges). TIP- Here's how I lay this out: place my paper and tape right side down on the die and lay the matboard piece on top, then cut) Check die for reference.
- Die cut birdhouse, bottom and roof. Add text and doodles with markers and color in.
- Coat Birdhouse and bottom with spray adhesive, then sprinkle on a layer of glitter, smoothing over with your fingers to make sure all areas are covered.
- Emboss roof with Basketweave embossing folder. Isn't this cool?
- Use markers to color wooden bird.
- Cut a piece of bamboo skewer to 1 1/2" and color with ink. Punch a hole below the open circle on the birdhouse and insert the skewer.
- Die cut 6-8 layers of the smallest flower on the die. Punch a hole in the center and secure all layers with a brad. Scrunch and ink petals. Cut leaves and glue under flower.
- Place embellishments on birdhouse and secure with glue.
- Punch a hole in the middle of the birdhouse roof and insert a wire hanger. Twist the wire around a pencil for a fun effect, then bend into a hanger shape.
- Add glue or strong double stick tape to the two tabs on top of the birdhouse and press roof into place.
- Hang on your Christmas tree!
Thanks for stopping by- see you next time...


This is yet another fab project Eileen; every day the team produce lovely things. The roof is brilliant too; you make it so hard to resist buying the dies and embossing folders etc :-)
ReplyDeleteThanks Diane! Good to hear the projects you like the projects- the bloggers are doing their job :-) Thanks for your lovely comment! Eileen
DeleteSooo cute!!
ReplyDeleteReally LOVE this Birdhouse ♥
Anne Kristine- do you have one? You need it! :-) Eileen
Delete