Tuesday, 30 April 2013

Cool glasses...


Hi everybody...hope you all had a great week....today I have a layout to show you with pictures of our little grandchild Aurora.


Supply list:
655268 Sizzix Big Shot machine
658572 Sizzix Movers & Shapers Die - Postage Stamp Frame
658568 Sizzix Movers & Shapers Magnetic Die Set 3PK - Sized Rectangles
658506 Sizzix Sizzlits Die - Vintage Doily 
658334 Sizzix Sizzlits Die - Flights of Fancy
658337 Sizzix Sizzlits Alphabet Set 12 Dies - Antiqua Capital Letters

Papers: Maja Design, Manila kraft cardstock
Stamps: Stampers Anonymous Tim Holtz collection
Inks: Archival Ink - Jet Black, Distress ink Pad - Dusty Concord, Walnut Stain, Distress Stain - Picked Rasberry, Dusty Concord, Perfect Pearls - Pink Gumball
Other: Seam Binding Ribbon, Cheese cloth

How to do: 


Distress Manila kraft cardstock with Distress Stain - Picked Rasberry, Dusty Concord, Perfect Pearls - Pink Gumball and water. 
Die  cut the frame with Sizzix Movers & Shapers Die - Postage Stamp Frame and Sizzix Movers & Shapers Magnetic Die Set 3PK - Sized Rectangles
Color the Seam Binding Ribbon with Distress Stain - Picked Rasberry, Dusty Concord and water. Let it dry. 
Stamp some text on the patterned paper here and there. Sew or glue Cheese cloth to the paper. 
Die cut letters and distress the letters with Distress ink Pad - Dusty Concord.
Die cut Vintage Doily and Butterflies. 
Glue the elements to the layout. Glue the frame to the layout with 3D foam.
  

 Thanks for stopping by...see you next week :o))
Anne Kristine


Hei alle sammen...i dag har jeg en layout å vise dere med bilder av vårt barnebarn Aurora.

Materialer:
655268 Sizzix Big Shot machine
658572 Sizzix Movers & Shapers Die - Postage Stamp Frame
658568 Sizzix Movers & Shapers Magnetic Die Set 3PK - Sized Rectangles
658506 Sizzix Sizzlits Die - Vintage Doily 
658334 Sizzix Sizzlits Die - Flights of Fancy
658337 Sizzix Sizzlits Alphabet Set 12 Dies - Antiqua Capital Letters

Mønsterark: Maja Design, Manila kraft cardstock
Stempler: Stampers Anonymous Tim Holtz collection
Inks: Archival Ink - Jet Black, Distress ink Pad - Dusty Concord, Walnut Stain, Distress Stain - Picked Rasberry, Dusty Concord, Perfect Pearls - Pink Gumball
Annet: Seam Binding bånd, osteklut.

Beskrivelse:

Distress Manila kraft cardstock med Distress Stain - Picked Rasberry, Dusty Concord, Perfect Pearls - Pink Gumball og vann.
Stans ut rammen med Sizzix Movers & Shapers Die - Postage Stamp Frame og Sizzix Movers & Shapers Magnetic Die Set 3PK - Sized Rectangles
Farg Seam Binding bånd med Distress Stain - Picked Rasberry, Dusty Concord og vann. La det tørke.
Stemple tekst på mønsterarket her og der. Sy eller lim fast osteklut på mønsterarket.
Stans ut og distress bokstaver med Distress ink Pad - Dusty Concord.
Stans ut Vintage Doily og sommerfuglene.
Lim elementene til layout'en. Lim fast rammen med 3D puter.
 
Takk for at du stikker innom her og vi ses neste uke :o))
Anne Kristine  


Have a beautiful day


Happy Tuesday everyone
Today I have 2 new projects for Sizzix blog. I will show you a card and a sweet little tea cup.


Items used:
Border,Label,Medallion and Key 658953
Tags, sentiments 658612
Decorative accent and label 658955
Tea cup by brenda Walton 658351
Doily-doily border 659058
Supply list:
Paper: Nostalgia by Jen Alison, Off white cardstock
Teacup used Graphic45 A Ladies Diary
Ink: Distress ink from Ranger. Vintage photo-
Stamp: IO clearstamp
Ribbon, glossy accent,3D foam, flowers and half pearls
How to make:
1. Start by cutting a piece off white cardstock 26x 14,5 cm, fold half so create a base 13x14,5 cm
2. Cut a piece patterned paper 12,5 x14 cm, glue to the center
3. Die cut a different sorts of shapes using 658612, 658955, 658953. Glue the shapes to the card using 3d foam.
4. decorate using glossy accent, flowers and pearls.


I hope you injoyed my projects today. have a beautiful day. See you next Tuesday
Pia

Hej allesammen
I dag har jeg to projekter at vise en tekop og et kort
Dies jeg har brugt:
Border,Label,Medallion and Key 658953
Tags, sentiments 658612
Decorative accent and label 658955
Tea cup by brenda Walton 658351
Doily-doily border 659058
Andre materialer:
Papir: Nostalgia by Jen Alison, Off white cardstock
Te kop har jeg brugt Graphic45 A Ladies Diary
Sværte: Distress ink from Ranger. Vintage photo-
Stempel: IO clearstamp
Bånd, glossy accent, halvperler og blomster
Sådan gør du:
1. Start med at skære et stykke off white karton på26x 14,5 cm, fold på midten så dit kort bliver 13x14,5 cm
2. skær mønstret papir12,5 x14 cm, lim til midten af kort basen
3. Udstands de forskellige dies ved at bruge 658612, 658955, 658953. Lim dem til kort ved at bruge 3D foam.
4. dekorer med glossy accent,blomster  og  halvperler

Jeg håber dette har givet dig inspiration. Vi ses næste tirsdag. Du må have en dejlig dag
Pia

Monday, 29 April 2013

A page from my Smash Book


This year I'm having a lot of fun with my Smash Book. I make a page every Monday about something that happened to me the previous week. Sometimes I put motivational quotes, my thoughts ... and sometimes, as on this page, a few pictures of a special day.

And to put those photos in a fun way, nothing better than these Instant Frames Framelits designed by Paula Pascual. I love them!


Supply list:

Here you have a quick video where you can see how I put this page together from start to finish and you also get a peek into my other pages. Enjoy!


And here are some photos of my page. I love the look of those tiny little instant frame in the envelope. So cute!


Happy Monday!

...................................
Este año me lo estoy pasando en grande con mi Smash Book. Hago una página cada lunes sobre algo que me ha pasado la semana anterior. A veces pongo frases motivadoras, mis pensamientos... y a veces, como en esta página, unas cuantas fotos de un día especial.

Y para ponerlas de una manera divertida nada mejor que estos marcos diseñados por Paula Pascual. ¡Me encantan!

Materiales:

Hoy os dejo un vídeo de cómo hago la página de principio a fin y también veis un poco cómo son mis otras páginas. ¡Que lo disfrutéis!

Y también tenéis unas cuantas fotos de mi página terminada. Me encantan esos pequeños marcos saliendo del sobre. ¡Monísimos!

¡Feliz lunes!


english paper piecing - on the move


Last week I promised I'd show you what I take when I'm travelling to english paper piece with.

Many people are wary about taking scissors and needles on a plane because of the heightened security restrictions these days, but as long as you know what you can take and what you can't you'll soon be happily stitching away in the mile high sewing club!

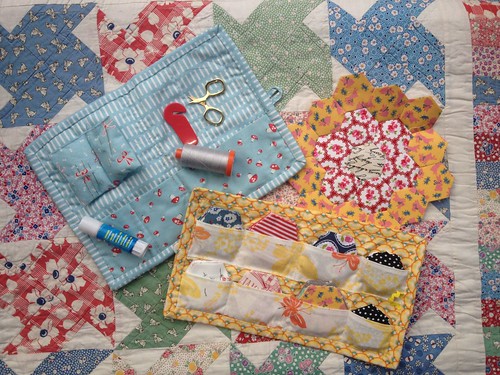
travelling EEP kit

Scissors - you can see from the photo mine have a very short blade. From handle to tip they're about 2" (the cutting part actually measures about 1/2"). These particular scissors are called little gems and they're 100% safe for flight. They're also very sharp - they do cut thread with no problems at all, despite their tiny size!

The TSA states that scissors with a blades less than 4" are allowed but British flights are sometimes stricter, and I've been told different things by different security staff when I've flown, so in my opinion - get the smallest you can possibly find. Nail scissors are ok too.

If you're still not sure then pack a thread cutter - it's a concealed blade that is completely safe for flights and can picked up quite cheaply (mine is the red plastic thing in the picture and cost £1 from a quilt show). Clover make a lovely one that can worn as a pendant, it's more expensive but does look nice (and it works really well).

Needles - these are fine for flying. You can take as many as you like to be quite honest! I think you might get some issues if you were taking super long thick needles, but regular hand sewing needles are no problem.

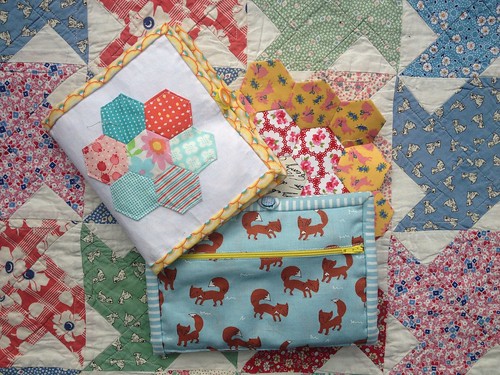
I then take a glue stick for help when I baste my hexagons, and some thread. I try to pack as light as possible and take 2 little sewing kits with me (both were made by a friend of mine and I've used them so much!) One is especially for my papers and fabrics and one is for my tools. You should be realistic - on a flight how much sewing will you actually do? Don't pack a massive bag full of bits, take enough to keep you busy, possibly a little too much, but don't go silly. I have packed enough to make five full double ringed flowers. It might take me the outward and return journey to make those, because at some point I'll have a nap, watch a film and read a book or magazine. Space is tight on a plane, and you can always pack extra in your suitcase for whilst you're away and the return trip.

travelling EEP kit


Sunday, 28 April 2013

Proud Mum by Gerry van Gent


Happy Sunday everyone!
Today I`d love to share with you a layout I created about me.
Being a mum is one of the greatest things that happened in my life.
So I decided to create a layout about how proud I am being a mum.
And yes, Mother's Day is just around the corner :-)
657000 Sizzix Big Shot Machine
658000 Sizzix Sizzlits Decorative Strip Die - Decorative Hearts
658252 Sizzix Sizzlits Decorative Strip Die - Cobblestones
656917 Sizzix Sizzlits Decorative Strip Die - Chip Block Alphabet
*  *  *
To create this layout I used only decorative strip dies.
What I usually do to make my background is to stamp and mask.
This time I decided not to get messy with mediums but 
to use dies instead. 
I used white cardstock for all the die-cuts. 
In this way they pop and they draw attention right away :-)
Isn`t this Decorative Hearts strip die simply adorable?
And so perfect for making a project for your mum or your loved one!
After die-cutting it once I cut & used three of the hearts separately.
I`m so in love with the Cobblestones strip die -
no wonder you can see me using it often.
For this layout I die-cut the strip die only once and it was more than enough to 
decorate all over the page. I cut it into pieces with different sizes.

Other Products I used:
Prima Marketing - Divine paper collection
Prima Marketing - metal trinket
Prima Marketing - stamps
*  *  *


I hope you enjoyed my project today!
Have a sunny Sunday!
Gerry

Birthday Card


Hi there!

What are you up to this weekend? 
I am being creative this weekend. I made a birthday card to inspire you.
It is for my little niece who is turning five. Cute dies from Sizzix and cute papers from Maja Design.


659110 Sizzix Thinlits Die Set 5PK – For the Record 2, Tailored

See you all next Sunday!

Camilla

**************************************

Hej på er!

Vad har ni för er denna helg?
Jag har haft en kreativ helg och har skapat ett födelsedagskort som jag ville visa er.
Det är till min lilla systerdotter som fyller fem. Gulliga dies från Sizzix och söta papper från Maja Design


Saturday, 27 April 2013

Cherry Blossom Shadowbox


I live near Washington, DC and the cherry blossoms have just bloomed. I made a 3D shadowbox that keeps the flowers alive all year long.
Supplies:
657379  Sizzix ScoreBoards XL Die - Index Card Folder
658052  Sizzix Movers & Shapers Magnetic Die Set 2PK - Heart & Label Set
657119  Sizzix Bigz Die - Leaves
657114  Sizzix Bigz Die - Flower Layers #9
657721  Sizzix Bigz Die - Borders & Hydrangeas

Other:
washi tape, twig, pink and white tissue paper, 2 thin strong magnets, craft foam, acrylic block, ribbon, white stamp pad, white lace scraps, glue, American Crafts- Dear Lizzy 5th and Frolic Pretty Parkway Scrapbooking Paper

Cut the die from pink matboard and trim off the flaps as shown.
Center and trace the label shape three times into a larger shape design. Place the folder in the Base Tray. Run it through the Big Shot three times and cut the window opening.
Die cut craft fun foam using the Borders & Hydrangeas die into two strips. Adhere evenly on acrylic block. Stamp chevrons with white ink all over the outside of the folder.
Place two opposing magnets along the edges of the box so they line up. Run a line of washi tape over the magnet and along the edge as shown.
 Die cut a stack of tissue paper flowers using the smallest flower from the Flower, Layers #9 die. Put a brad in the center of the flower to secure layers. Scrunch all of the petals into the middle and fluff up. Lay the branch where desired and add flowers and leaves to the arrangement. Adhere all elements securely to box.
 

Stamp "spring" on corner of box and stamp a bird die on white cardstock and trim. Add to box. Tie on a piece of pink seam binding to top of box. Add pearl embellishment to knot of seam binding. Glue lace trim to bottom of box. 

Enjoy spring, my friends!

Friday, 26 April 2013

Freestyle Journaling with Sizzix!


Hi again!
I've got a serious hoarding problem when it comes to my paper leftovers, especially - pretty papers and Sizzix cut-outs I have left from previous projects. I simply can't get rid of them!
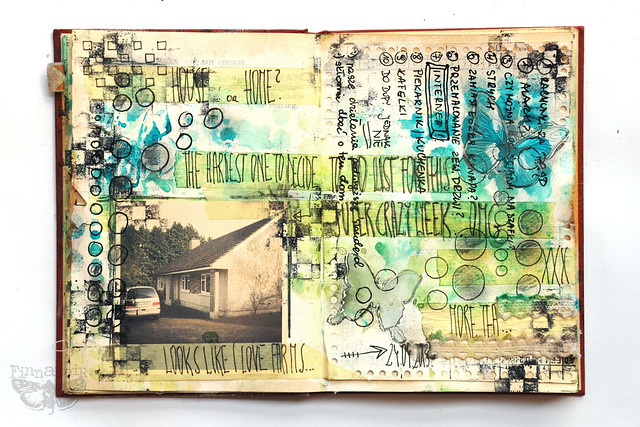
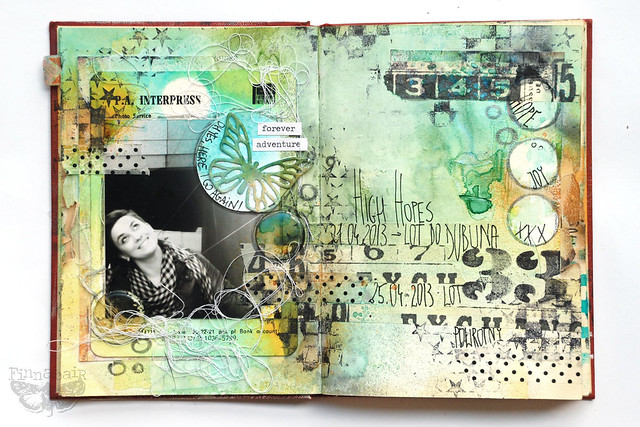
What can I do with them then, except of putting them in a safe place for "later"? I use them for my journal pages - they are perfect add -ons to the background, beautiful details hidden in between the layers! Here are 2 pages of my journal  - I used great Paula Pascual butterflies and some Movers and Shapers from Tim Holtz to create them!

Journey 01
Journey 02


The whole idea of the pages in these journal are some paper leftovers for the texture, some gesso, colorful sprays, pencil and black pen... but just look -  these cute butterflies are really a perfect embellishing element!


And don't forget about a bit of stamping with Movers and Shapers too - Tim Holtz Numbers together with Jet Black Archival ink worked just perfectly!


Finally - here is a full list of products for you:
- 658290 - Sizzix Framelits Die Set 5PK w/Stamps - Butterflies #4
- 657841 - Sizzix Movers & Shapers Magnetic Die Set 11PK - Cargo Stencil Number Set
- 657209 - Sizzix Movers & Shapers Magnetic Die Set 2PK - Mini Butterflies Set
- Prima Marketing - Epoxy Stickers - Sunrise-Sunset Collection
- Prima Marketing - Sunrise-Sunset Collection - 6x6 checked stencil, checked stamp
- Ranger Archival Ink - Jet Black, Glossy Accents
- Dylussions - Stencil by Dyan Reaveley
- Luminarte - Primary Elements Pigments
- other: thread, pencil, black pen, masking tape, gesso

I wish you a ll a great, creative week!
See you soon!
Finn

A baby boy minibook


Hi Everyone!
this is Anna with a sweet new project, using different sorts of Sizzix dies! I have had soooo much fun working on this minibook! I made this mini book that recorded from the baby's birth of my cousin to one years old.  My idea was to leave places for them to add the photos themselves.
When I saw the puppy die, I knew I wanted to use it for cover of mini!
It became a project that will remain in memories, though it was very simple...

Anna Drai - Sizzix - mini album boy (1)

Anna Drai - Sizzix - mini album boy (2)
Items used:
for the cover:
felt: green lime, brown, red
tint felt: light blue
pressboard
fabric: light blue and white
cardstock: white, black, light blue, brown, orange
scrap of patterned papers
scrap of fabric: orange, green
bakery twine blue and white
green ribbon
buttons
eyelets, ring closures through
sewing machine, yarn

Anna Drai - Sizzix - mini album boy (4)

How to make:

1- Cut two pieces of green felt measuring 20x20 cm. Sew around the edge with brown yarn.
2- Cut a square of orange fabric measuring 7x7 cm, a square of tulle fabric and a square of light blue felt 9x9 cm. Layer the squares and sew in the bottom of front cover, to the right. Sew the green fabric 13x6 cm in the bottom. Sew the green ribbon’s “ruffles”: continue creating ruffles and sewing over them until your ribbon is the length you want it. Adhere the ruffle in the bottom.
3- Die cut: dog's body from brown felt, the eyes and the nose from the black and white cardstock, the eyebrows from the brown cardstock, the dog collar from the blue cardstock, the heart from the red felt. Distress the edge with black and brown ink. Attach the dog above green fabric, in the front of cover.
4- Cut two large pieces of fabric measuring 25x25 cm. Cut also two pieces of pressboard 20x20 cm. Place them on the back side of your fabric. Place a piece of double-sided adhesive on each corner of the square of pressboard.  Fold the fabric creating a 90 degree angle. Proceed to adding another strip of adhesive on the four sides of the squares and fold the fabric.
5- Attach any felt covers above the pressboard covers. Use a hole punch to create two holes into the covers of minibook. Add the eyelets.
6- Stamp three banners and cut out. Cut out also two banner from the patterned paper. Make two holes for any banner and insert the twine. Adhere the banners at the top right corner of cover, tying into a bow, glue a orange button.
7- Cut out a flower from the white cardstock. Adhere a half piece of flower to create a cloud. Design a cloud and layerwith a white button.
8- Print the name of baby and cut out the name with the scallop square. Adhere above the square of orange fabric. Add the little heart.
9- Cut out and create two rolled roses (658504). Apply above the ruffle. The cover of mini book is finish.
10- Make the pages of mini book with white and light blue cardstock and decorate them with color mist and paper doilies. Accent the pages with some embellishments. Cut out 12 round tabs for any month of baby.
11- Insert the loose leaf ring closures through the holes in the pages and covers to hold the book together.

Anna Drai - Sizzix - mini album boy (2)b

Anna Drai - Sizzix - mini album boy (3)
I hope you liked my mini album!
I wish you a crazy creative weekend - see you soon on the blog!

**************************************
Flag_of_Italy Per le amiche italiane! :)

Ciao!
Ecco un nuovo appuntamento con Anna. Oggi sono qui con voi con un nuovo progetto, dove ho usato diverse fustelle Sizzix, comprese le nuove roselline! E' stato mooolto divertente lavorare su questo mini album! Ho realizzato questo mini per la nascita del bambino di mio cugino, in modo da documentare il suo primo anno di vita. La mia idea è stata quella di lasciare l'interno libero, con il posto per le foto che potranno aggiungere loro stessi.
Quando ho visto la fustella con il cagnolino, ho pensato che l'avrei usata sicuramente per la copertina di un minialbum! E' molto adatta per progetti dedicati ai bambini :)

Materiali per la copertina:

Big Shot Machine (655268)
Sizzix Accessory - Cutting Pad, Extended, 1 Pair (655267)
Sizzix Accessory - Solo Platform & Shim (Light Blues) (657155)
Sizzix Bigz Die - Dog, Puppy (657687)
Sizzix Bigz Die - Tiny Tabs & Tags (657188)
Sizzix Framelits Die Set 6PK w/Stamps – Banners (658289)
Sizzix Framelits Die Set 6PK - Squares, Scallop (657566)
Sizzix Sizzlits Decorative Strip Die - Tattered Flower Garland (657824)
Sizzix Sizzlits Die - Flower, Rose 3-D (658504)
feltro spesso: verde chiaro, marrone, rosso
feltro sottile: azzurro
cartone pressato
stoffa: a quadretti bianco e celeste
cartoncino: bianco, celeste, nero, marrone, arancione
ritagli di carte patterned
ritagli di stoffe fantasia: arancione, verde
bakery twine bianco e celeste
nastro verde alto
bottoni
occhielli e anelli apribili
macchina da cucire, filo

Procedimento:

1 - Tagliare due pezzi di feltro verde di misura 20x20 cm. Cucire in modo irregolare lungo i margini con il filo marrone, facendo un paio di giri.
2 - Tagliare un quadrato di stoffa arancione a pois di misura 7x7 cm, un quadrato di tulle e un quadrato di feltro celeste di cm 9x9. Sovrapporre i quadrati e cucire il tutto nella parte inferiore della copertina, verso destra. Cucire un striscia di tessuto verde 13x6 cm nella parte inferiore. Cucire il nastro verde formando un "volant": piegare il nastro a mano a mano, creando i volant e cucire a macchina fino a quando il nastro raggiunge la lunghezza desiderata. Incollare la ruche così creata in basso, per simulare l'erba.
3 - Con la macchina Sizzix tagliare: il corpo del cane dal feltro marrone, gli occhi e il naso dal cartoncino bianco e nero, le sopracciglia dal cartoncino marrone, il collare dal cartoncino azzurro, il cuore dal feltro rosso. Sporcare i bordi con inchiostro nero e marrone. Incollare le varie parti e applicare il cagnolino sopra il tessuto verde, sul fronte della copertina. Illuminare le guance con acrilico arancione diluito e piccoli glitter, se volete.
4 - Tagliate due pezzi di stoffa di misura 25x25 cm. Tagliare anche due pezzi di cartone pressato di 20x20 cm. Disporli sul retro di ogni quadrato di tessuto. Posizionare un pezzo di nastro biadesivo su ogni angolo del quadrato di cartone pressato. Piegare il tessuto creando un angolo di 90 gradi. Aggiungere un'altra striscia di biadesivo sui quattro lati dei due quadrati e piegare il tessuto per far aderire.
5 - Con la colla a caldo incollare le copertine di feltro sopra le copertine di cartone. Utilizzare un punzone per creare due fori nelle copertine del mini album. Inserire gli occhielli metallici.
6 - Timbrare tre bandierine e ritagliare con i Framelits. Tagliare anche altre due bandierine dalla carta fantasia. Praticare due fori per ogni bandierina e inserire lo spago. Incollare le bandierine in alto a destra della copertina, facendo un fiocco a sinistra e incollando un bottone arancione a destra.
7 - Tagliare un fiore dal cartoncino bianco. Incollare metà fiore per creare una nuvola. Sovrapporvi una nuvola disegnata col pennarello nero e il bottone bianco.
8 - Stampare il titolo e tagliare con un Framelits il quadrato con bordo scallop. Incollare sopra il quadrato di tessuto arancione. Aggiungere il cuoricino celeste.
9 - Tagliare e creare due rose arrotolate con la fustella 658504. Applicare le rose sopra il nastro arricciato. La copertina del mini album è così terminata.
10 - Creare le pagine del mini album con cartoncini bianchi e celesti e decorarle con glimmer mist spruzzati su centrini di carta. Illuminare le pagine con alcune paillettes e abbellimenti a piacere, quali cuori, tag, fiori, bottoni... Tagliare poi 12 etichette rotonde per segnare i mesi del bambino.
11 - Inserire gli anelli metallici attraverso i buchi di pagine e copertine per rilegare il mini album.

Spero che vi sia piaciuto il mio mini album!
Vi auguro un fine settimana (magari con ponte!) allegro e creativo.
A presto