Saturday, 30 November 2013

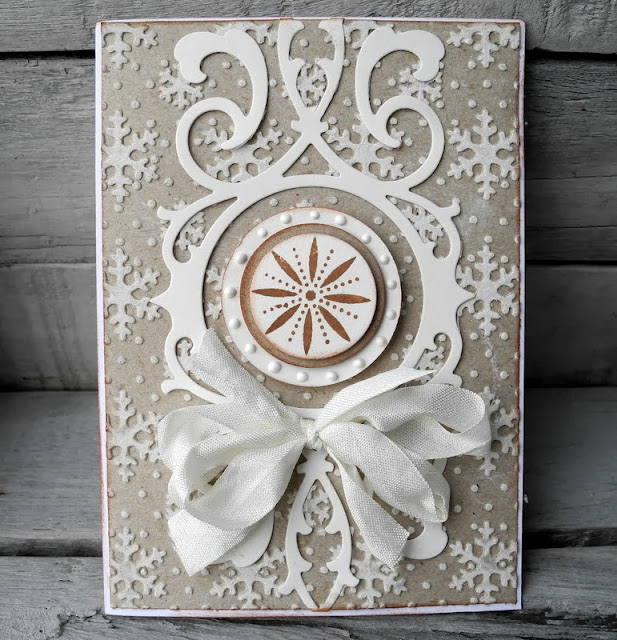
Christmas Card mix and match


Christmas is coming so it is time for a quick Christmas card.


I always leave it to the last minute, if the last day for Christmas post is the 20th, I will make them franticly on the 19th. Seriously. Never learn.

For thise one I thought it would be a good idea to use elements from different sets from The Winter Moments collection:


I just then layered on a white card (6 x 6 inches) and one I was happy with the position I glue the bits to the front of the card.


Well, now, I really should make a start on those Christmas cards...

Vintage Christmas Picture Wheel Ornament


Hi there! I can't believe it's almost December... time to really get started on some Christmas projects!! Today I have a great project to share by Connie Mercer who is on the Darkroom Door Creative Team. Connie has created some vintage style Christmas ornaments using the Sizzix Picture Wheel Die and Darkroom Door Dear Santa Montage images and stamps. Check it out:
 
 
Details from Connie: 
 I used the Darkroom Door Dear Santa Montage sheet and Stitched Christmas Rubber Stamps for the sentiments. The die is by Sizzix called Picture Wheel.  The Santa images from the Dear Santa Montage sheet are perfect for this.  You will need to trim down a little and then tape or glue them to the back of the picture wheel cut out.
 
 
After you have the images in, back it with a circle of burlap. 
I stamped out the sentiment and added embellishments, to complete the ornaments.
 
Supplies used:
 
These are really fun to make~
enjoy!!!

Friday, 29 November 2013

Altering with Sizzix Sizzlits - Brenda Walton - Winter Collection


Hi, how are you doing? Are you ready for some of new Winter-Christmas inspirations?
I hope so!
In the last days I was working on an altered project for my home. Some time ago I bought a nice doe figure on one of after Christmas sales somewhere in Warsaw. I loved the shape - but I hated the colour! It was sparkly silver, far too shiny for me... 
This year I decided it is high time to change my doe into nice looking home decor matching my living room or dining room - what can be easier? Especially if you have some paint and beautiful designs of dies to choose from?


First I painted my doe with acrylic paints - and I used the same paints to paint white cardstock which I intended to use for my cut-outs too! When it was dry I could start the transformation!
I used 2 dies do get a bunch of nice elements for my composition:
- 658731 - Sizzix Sizzlits Die - Holiday Greenery
- 658735 - Sizzix Sizzlits Decorative Strip Die - Winter Florals

I cut out the flowers, leaves and piecesof decorative strip which together with Prima roses and Mechanicals helped me to create a composition on my doe.


After gluing all the elements on the figure I sprayed the floral compostion with a bit of delicate, shimmering mist to get perfectly matching colours. I dried it all with my heating tool and added my final touches - a bit of Liquid Pearls dots on the flowers, leaves and doe's tale, some pearl pins, crystals and a metal tag on the chain.
My project was ready for display!

I hope you like my idea - Sizzix cut outs are just great for creating dimensional compositions!
Sending love

Finn

Christmas Medallion Ornament


Hi Everyone! This is Anna.
Today I made this decorative medallion. It's ornament! It's a very satisfying, relatively simple project and super charming. The ornament is a big ornament, about a 16 cm diameter...
 
cafe creativo - Anna Drai - sizzix big shot - christmas tree (1)
 
cafe creativo - Anna Drai - sizzix big shot - christmas tree (2)
 
This would be the perfect gift for friends or anyone else on your list ;)
Let me show you how it’s done!
 
Items used:
white cardstock
floral patterned paper: My Mind's Eye - Miss Caroline Howdy Doody - Like Wildflower
glitter paper, red and green: (DCWV - The Christmas & Winter Combo Glitter Cardstock Matstack)
red polka dot fabric
harness bell
green ribbon
bakery twine red and white
pom pom
needle and thread
glue, hot glue
 
I used the Sizzix Bigz Die - Snowflake Medallions, 3-D (658739) to cut the medallion from the patterned paper, and assembled it per the instructions; then attached it with hot glue as well.
Embellish with fabric rosette, flower star, snowflake, twine, ribbon, harness bell, pom pom...
I used a small hole in the top of the ornament to tie a piece of twine through it for hanging.
 
I hope you can try this easy project, and do please attempt your own variation. Who knows what kind of masterpiece you will come up with? :)
 
cafe creativo - Anna Drai - sizzix big shot - christmas tree (3)

**************************************
Flag_of_Italy Per le amiche italiane! :)
Ciao! Ecco un nuovo appuntamento con Anna.
Oggi vi mostro un nuovo home decor: un “medaglione” decorativo. E' una decorazione natalizia, di circa 16 cm di diametro, per cui può andare bene anche come fuoriporta, ma se lo immaginate con altre carte e colori potrà essere adatta per qualunque festa od occasione.
E' un progetto che dà molta soddisfazione, perchè è relativamente semplice da fare, ma di un certo effetto.
Potrebbe essere il regalo perfetto per le amiche o per chiunque altro avete sulla vostra lista dei regali natalizi ;) 
Lasciate quindi che vi mostri come si fa...
 
Materiali:
cartoncino bianco
carta fantasia: My Mind's Eye - Miss Caroline Howdy Doody - Like Wildflower
carta glitter, rosso e verde: (DCWV - The Christmas & Winter Combo Glitter Cardstock Matstack)
tessuto a pois rossi
campanellino
nastro verde
spago rosso e bianco
pom pom
ago e filo
colla, colla a caldo
 
Procedimento:
Ho usato la fustella Sizzix Bigz Die - Snowflake Medallions, 3-D (658739) per tagliare il medaglione dalla carta fantasia, assemblato secondo le istruzioni, poi incollato con la colla a caldo.
Abbellire con: coccarda di stoffa, fiore a stella, fiocco di neve... Ho aggiunto una scritta stampata e tagliata come un festone.
Ho usato uno dei fori nella parte superiore per far passare un pezzo di spago per appendere la decorazione. Per finire ho aggiunto nastro, campanellino e pom pom.

Spero che possiate trovare una piccola ispirazione in questo semplice progetto, cercando di realizzare la vostra variante personale. Chissà che capolavori usciranno fuori! :)

Thursday, 28 November 2013

Lovely card !

Hi everyone!

Cards are back with a new creation with seasonal colours.

Supply list:

Papers: Basic Grey, Jenni Bowlin Studio
Die-cuts: Basic Grey
Wood Embellishments: Studio Calico
Enamel Dots: My Mind's Eye
Stamps: Florilèges Design, Craft Origine
Inks: Prima Chalk Farmer Jeans, Rusty Keys
Spray inks: Mister Huey's Clay
Masking Tape
Others: Bristol

Dies:

658777 Sizzix Texture Trades Embossing Folders 3PK-Outline label Set
659378 Sizzix Framelits Die Set 6PK/stamps Snowman Blueprint
658779 Sizzix Texture Trades Embossing Folders 2PK-Snowflake pattern & plaid set

This is a 19x12 cm card for the sole purpose of pleasing!

Start by cutting a 19x24cm rectangle and fold it in half to obtain the structure.

Emboss a white Bristol paper piece with your Big Shot and the chosen embossing folder.
Then mat your paper piece with little flowers blue pattern paper.

Cut out an embossed label.

I also used a Tim Holtz stamp to create a label. It is printed with orange ink (Prima Chalk Rusty Keys) then cut out.

Feathers” die cuts and stamps are added as embellishments.

Complete with wood accents. Splash your card with Mister Huey's Clay spray ink as a finishing touch.


See you next Thursday!

Karine

Bonjour tout le monde !

C'est le retour des cartes avec une nouvelle création aux couleurs de saison.

Matériel :

Papiers : Basic Grey, Jenni Bowlin Studio
Die-cuts : Basic Grey
Embellissements en bois : Studio Calico
Enamel Dots : My Mind's Eye
Tampons : Florilèges Design, Craft Origine
Encres : Prima Chalk Farmer Jeans, Rusty Keys
Encre en spray : Mister Huey's Couleur Clay
Masking Tape
Divers : Bristol

Dies utilisés :

658777 Sizzix Texture Trades Embossing Folders 3PK-Outline label Set
659378 Sizzix Framelits Die Set 6PK/stamps Snowman Blueprint
658779 Sizzix Texture Trades Embossing Folders 2PK-Snowflake pattern & plaid set

Une petite carte au format 19x12cm juste pour faire plaisir !

Commencez par découper un rectangle de 19x24cm qu'il vous suffira de plier en deux pour obtenir la structure.

Embossez ensuite une fiche bristol à l'aide de votre Big Shot et de la plaque à embosser sélectionnée.
Mattez ensuite votre papier sur un imprimé bleu à petites fleurs.

Découpez ensuite une étiquette embossée.

J'ai ensuite utilisé un tampon Tim Holtz afin de confectionner une étiquette, celui-ci est imprimé en orange ( Prima Chalk Rusty Keys) puis découpé.

Des die-cuts plumes ainsi que des tampons sont rajoutés en guise de décoration.

Complétez ensuite avec des décorations en bois. Eclaboussez pour terminer votre carte avec l'encre en spray Mister Huey's couleur Clay.

A jeudi !


Karine

Quick quilt almost finished!


I hope you enjoyed the quilt hop last week - I loved all the projects - and will be planning some Christmas stockings like Katy's - for next year!
With only 4 weeks to Christmas I am beginning to think I have to become very organised - and make a list of presents to buy and those to make (yes I still think I have time to make a couple of gifts.
This weekend I'm at the Quilt show at the Bath and West Show Ground in Shepton Mallet demonstrating the Big Shot and Bigz Dies alongside Cotton Patch -

and I have a few ideas for quick Christmas makes and gifts - so if you're in the area and can make it come along and see us. It's also not too late to get yourself a great Christmas present - or give someone who loves you a great gift idea.
Once you have one of our lovely Big shot machines you can then have a wish list of dies you would like for future gifts - how easy and useful is that- no more ornaments that you will have to dust!!! or chocolates that you shouldn't really be eating!!
Now to the quick quilt -
As you saw last week I cut lots of 5" squares with Bigz die 657626 and decided the quickest way to make the quilt was to lay them out in a diagonal pattern ( random always takes me ages to plan!!)
I used the following number of squares from each fabric  (I'll label them A-G for ease) which will create a quilt 10 x 11 squares.
A = 10, B =14, C = 7, D = 10, E = 9, F=10, G= 10 and from the peach fabric I cut 40.
From the remains of the fat quarters I cut 2" stripes using die 657633 - these are for the borders.
Here is the pieced top - and because the pieces are so precise - I sewed them without pinning! and so this only took me 2 hours to stitch together. When pressing the seams I ironed the seam allowances in opposite directions on alternate rows so that they would butt together neatly when joining the rows.
I added a 3" border, cut with the long strip die - 657634 -( which is 2 1/2" finished width) from the peach fabric and added that.
So the quilt is 50" x 55" finished size.
To complete the quilt you will need a backing and wadding to fit and then when layered and quilted - you just need to add the binding

Hobbycrafts NEC


Hello.

Today I want to share a post with you showing some of the samples I made for Hobbycrafts at the NEC at the beginning of the month.  Unfortunatly since then I have been really poorly with the flu and being 8 months pregnant it has knocked me for six!  However I am at last better and here to share my projects.

I was on the Aceville stand at the NEC and really did have a fabulous time meeting so many lovely people.  I got to work with some lovely Christmas dies by Brenda Walton.

I adore this Woodland Deer Decorative Strip, it is so sweet and just called out to decorate a jar!  I am planning on making a few more of these as Christmas gifts!


Another of my favourites was the Holiday Greenery, which I used to make this framed picture.  I love the way you can build as big a project as you like just by using this one die.


And finally here is a card I made using the Sizzlits Poinsettia Die


Well, that is all from me.  Maybe by the time I post again I might have some baby news!! 

Katie 


Wednesday, 27 November 2013

Festive Font Fun!


This week I wanted to create some really simple Christmas cards which were inspired by a Father's day card that I saw Somewhere or other and I 'kind of' adapted the idea for this weeks blog. Isn't it amazing how we take in inspiration and ideas which pop up when least expected?

I know that once December arrives we will be bombarded with Christmas tunes which is just fine by me, I can't wait to get my Christmas classics on the CD player. Would I feel differently if I worked in a shop or supermarket listening to the same CD on repeat 8 hours a day....YES! I love 'em and I thought I would steal a few choice lyrical phrases today.


I wanted to use my favourite BLOCK TALK alphabet by Tim Holtz which has all the uppercase letters and numbers on a single Bigz XL die, that's right, a single die! It's a die that you will go back to time and time again because the letters are tall and thin which means that you can fit some pretty big words on a card/tag/ layout,

I started by attaching an  A4 Double sided tape sheet (from the clever people at Stix2) to the back of a sheet of stiff white card this is a great way to add and adhesive layer to your die cuts but I want the adhesive on the front and not the rear this time. I trimmed rectangles to size to fit over the individual letters that I needed (tape sheet side against the die) and ran it all through my trusty Big Shot. Next, I placed the letters on my cutting mat against the place with the measurements and noted that the word 'MERRY' measures approximately 4 x 8cm.


At this point I turned to my PC and created a document in Publisher I drew a rectangle measuring 148.5 x 105mm (A6) as a guide for the front of my card. I also drew a rectangle measuring 40 x 80mm which represents the word 'MERRY' I then created a couple of text boxes with rest of the text and manipulated them to fit in the large rectangle. Once I had everything in place I flipped it through 90 degrees and set it in the top left hand corner before deleting the large rectangle. I sent the document to print placing an A5 sheet of stiff white card in the feed tray.


Once the card was printed I scored and folded down the centre. Next, I cut strips of double sided 3D foam pads and attached them to the rear of each die cut letter prior to mounting them onto the base card, I drew a faint guide line to help with accurate placement.


When the letters where in place I set about carefully removing the backing to the adhesive sheet on the front of each letter using the point of a craft knife. Finally I sprinkled my chosen glitter onto the face of each letter before shaking off the excess. You are probably wondering why I didn't just cut glitter card? Well, I have lots of gorgeous glitter in cool and unusual colours and I don't have the glitter card to match so it's another way that die cutting becomes a great problem solving tool.


As you can see I finished the card with a white bow and adhesive gem.


I couldn't stop at one card though.....


Family


Hi All!

Today I would like to show a layout which I made for one of my friends. This layout talks about the good times spent in the country with the big family.


I made a lot of layers using small pieces of papers and of course cut outs which I created using Big Shot Machine and different dies.

Items:
Big Shot Machine (657900)


Have a nice day!


Всем привет!

Сегодня я хочу показать страничку, которую сделала для моих друзей. Эта страничка рассказывает о хорошо проведенном времени на даче, всей огромной дружной семьей.
В этой страничке я создала множество слоев с помощью разных кусочков бумажек, а так же с помощью вырубок, которые я сделала с помощью Big Shot.

Материалы:
Big Shot Machine (657900)

Хорошего дня!

Tuesday, 26 November 2013

Winter card


Hi everyone.
Hope you all had a great week, today I will show you 2 Winter cards using the same dies


Items used:
Sizzix Texture Fades Embossing Folders 2PK - Snowflake Pattern & Plaid Set (658779)
Sizzix Thinlits Die Set 2PK - Decorative Border & Heart (658946)
Sizzix Framelits Die Set 9PK w/Stamps - Charms, Winter (658620)
Supply list:
Ink: Archival ink-Coffe-, hero arts-White-
Cardstock 2x 20x14cm make a cardbase 10x14 cm and 2x 9,8x13,8 cm to use in embossing folder
Ribbon and pontura paint White
 
 
Thanks for stopping by
Wish you a great and creative week
Pia
Hej alle
Jeg håber i alle har haft en dejlig uge , i dag vil jeg vise 2 kort hvor jeg har brugt Sizzix Texture Fades Embossing Folders 2PK - Snowflake Pattern & Plaid Set
Dies jeg har brugt:
Sizzix Texture Fades Embossing Folders 2PK - Snowflake Pattern & Plaid Set (658779)
Sizzix Thinlits Die Set 2PK - Decorative Border & Heart (658946)
Sizzix Framelits Die Set 9PK w/Stamps - Charms, Winter (658620)
Andre materialer:
Ink: Archival ink-Coffe-, hero arts-White-
Karton 2x 20x14cm lav en kortbase på10x14 cm og 2x 9,8x13,8 cm bruges i embossing folders
Bånd og pontura paint White
Tak fordi du kiggede forbi
Ønsker dig en dejlig og kreativ uge
Pia


Country Cottage


Hi everyone...hope you all had a great and creative week....today I have made a Country Cottage in Vintage style for you. It was really fun to make this tiny house....and you know...I love Vintage style.


Supply list:
657900 Sizzix Big Shot machine
658743 Sizzix Bigz XL Die - Country Cottage, 3-D

Papers: Maja Design, chipboard, old bookpaper
Inks: Distress ink Pad - Walnut Stain, Archival Ink - Jet Black
Other: Marabu - Structure Paste, Distress Glitter - Clear Rock Candy, Gesso, Glue n'seal 
Pearls, Seam Binding ribbon, tinsel, paper doilies

How to do:
Glue some old bookpaper to patterned paper her and there. Gentle paint some Gesso over. Let it dry.
Die cut the house with Sizzix Bigz XL Die - Country Cottage, 3-D
Do the same with the roof.
Die cut the ground in chipboard and paint it with Gesso.
Decorate the windows with paper doilies. Glue the house together.
Glue the house to the ground and let it dry.
Add some Structure Paste and Distress Glitter here and there. Paint Gesso here and there for snow effect. 


A little tip is to stamp text on textile...


Die cut parts of the house in patterned paper and you use it as a smal gift tag.


Thanks for stopping by and I wish you a great day!
Anne Kristine

♥♥♥♥♥♥
Hei alle sammen....håper du har hatt en fin og kreative uke....i dag har jeg laget et mini hus i vintage stil. Som dere vet elsker jeg denne stilen og det var virkelig moro å lage dette huset. 

Materialer:
657900 Sizzix Big Shot machine
658743 Sizzix Bigz XL Die - Country Cottage, 3-D

Papir: Maja Design, chipboard, gamle boksider.
Inks: Distress ink Pad - Walnut Stain, Archival Ink - Jet Black
Annet: Marabu - Structure Paste, Distress Glitter - Clear Rock Candy, Gesso, Glue n'seal 
perler, Seam Binding bånd, tinsel, kakeserviett

Beskrivelse:
Lim gamle boksider på mønsterark her og der. Mal forsiktig over med Gesso og la det tørke.
Stans ut huset med Sizzix Bigz XL Die - Country Cottage, 3-D
Gjør det samme med taket.
Stans ut grunden i chipboard og mal dette med Gesso
Dekorer vinduene med kakeserivett og lim sammen huset.
Lim huset fast til grunden og la det tørke.
Påfør Struktur Paste og Distress Glitter her og der. Mal med Gesso her og der for å skape snø effekt.
Pakkelapp:
Stans ut noe av huset som fint kan brukes til pakkelapp.

Takk for at du stikker innom her og ønsker deg en herlig dag.
Anne Kristine