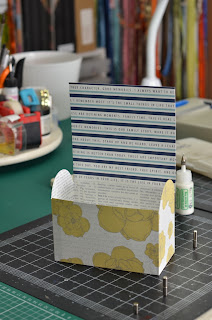
I will be perfectly honest. As much as I love this die and its possibilities, this idea was originated by Patricia Villa Boas, the Portugal distributor of Sizzix and the organizer of Chocolate Quente, the event where I taught this project. But with her permission granted, I can share it with all here. Beware it is a picture heavy post.
All measurements are in inches as it is easier for this project. the funny thing was that I originally did it all in inches, then thinking that in Portugal all would be in centimetres I translated the measurement, leaving in the UK the inches. First class, they wanted all measurements in inches so a quick change was needed. But of course, the next class was mostly in centimetres with a few inches people. By the end all measurements created a bit of a headache on my maths challenged brain!
So on we go!
You will need to begin with a full 12 x 12" piece of card. For the tutorial, I am using one of my favourite lines from Teresa Collins called Everyday Moments.
Cut the 12 x 12" in to two 6 x 12".
One of them trim 1 1/2" off the bottom -not including the white strip!)
Then score it at 3 3/4" from the left edge.
Score at 3" from the other score line - or at 6 3/4" from the left edge if it is any easier.
Take the other 6 x 12" and trim it in half (so that you get two 6 x 6"). Then die cut them using the Vintage Cabinet Card. I always put the front of the card facing down towards the foam, unless I need the die cut to be flipped.
Then, score both cabinet card (one at a time) from the inside corner towards the bottom of the die cut.
Do the same at the other side of the card.
Then, score the bottom by following the inner corners.
Cut the small bit between score line so that you can create a small bit to tuck in.
Then glue the bits to the scored bottom.
Like this. Remember to do the same to both die cut Vintage Cabinet Card.
Then, attach one of the card to the middle of the scored card.
Then attached the second die cut card.
Then glue the sides. I always use wet glue (Tacky Glue, PVA or Glossy Accents) as dry glue (any sort of tape) tends to dry out and eventually the whole things comes unstuck.
I use magnets to make sure that the glue bonds properly. But they are not essential, a good grip with your fingers will be ok!
Then add a line of your choice of strong wet glue along the back of the box.
And attach a piece of card that is 6 x 6". Let it dry completely before attempting to fold it.
Opened and closed. To close just tuck the top inside the box.
To add decorative elements, I die cut the strips from the Vintage Lace.
And I just attached one of the them to the front edge of the box. It will reinforce the box as well as make it it prettier.
Once finished it can be used to store the Texture Embossing folders or other stuff.
Also, you can made this box wider, just start with a card that instead of being 6 x 12" is say 8 x 12", 10 x 12" or even 12 x 12". You will still have to trim the 1 1/2" from the bottom and score it at 3 3/4" and 6 3/4". And the cover will have to be 8 x 6" or 10 x 6". However I do think that the covert may come undone more easily if the box is wider.
Anyway, just another idea on how to use the Vintage Cabinet card. Next week a tutorial on how to make a companion pot made with the Mini Cabinet Card.


It's a great project & I'm totally lifting the idea of using the magnets! Great timesaver! Thanks, Paula!
ReplyDeleteHow adorable!! And I think I can handle it :) Great photo tutorial!
ReplyDeleteThis is the cutest little box, I can't wait to start one .Thanks for taking your time and giving us such an awesome tutorrial .
ReplyDeleteWOW!!! This is an awesome idea.Thank you so much for the tutorial e inspiration.
ReplyDeleteThanks!
LIM :)
fab idea thanx for sharing xx jo xx
ReplyDeleteVery cute box, your tutorial is easy to follow. Thanks!
ReplyDeleteI'm interested in the tree too
ReplyDelete