Showing posts with label Decorative Strip Die. Show all posts

Sunday, 1 November 2015

Summer Layout by Gerry van Gent


Happy Sunday Sizzix friends!

I am sharing today with you a summer layout I created using 
as always gorgeous Sizzix products. I totally love the NEW 
Big Shot Starter Kit and for my post today I used the pretty
butterfly thinlits/bigz die from the kit - Love it!

Did you know that you can win this Starter kit?
You still have time until Friday 6th November 2015!!!
Check out this LINK and who knows maybe you'll be our winner!
660210 Thinlits Die Set 102PK Alphanumeric (1" Tall)
660222 Sizzix Thinlits Die Set Scribbles & Splat
660804 Sizzix Thinlits Die Set Happiness Phrases
658521 Sizzix Sizzlits Decorative Strip Die Venice
*        *        *

Don't you just love that cute butterfly from the Big Shot Starter Kit?
I decorated each butterfly with an Alphanumeric letter.


"Hello" word from Happiness Phrases dies set was
die cut twice - once from white cardstock and once
from pattern paper. I used the white die-cut word as a shadow.

For the middle butterfly I used the butterfly die from the bigz die
which is included in this amazing Big Shot Starter Kit,
combined of course with the matching Butterfly thinlits.
OTHER PRODUCTS I USED:
Glitz Design Pattern papers
Prima Marketing flowers, SIIC, embolus, mask
The Scrapbook Diaries Clear stamps
Tattered Angels Clear Stamps
*        *       *

Thank you for visiting us today!

Friday, 4 September 2015

Fall is here.....Pumkin Homedeko....


Hello there...

the first days of fall are already gone... it is getting colder,
leaves are falling..... and i am happy.

I am welcoming fall with new pumkin homedeko i have made with my BigShot Plus.

All you need to make your own:
Sizzlitz Deko-Strips (for example this one, or those [i took those...])
Sizzix Leaves (Ich hab das hier verwendet)
Papers of course
4 buttons for each pumkin
and wire...


Have a great weekend, Stephanie

Wednesday, 15 July 2015

Stamp n' Stencil


They say that we only use 10% of our brains, or 5% in my case as many would argue! Sometimes I feel the same about die-cutting. There is so much potential which remains untapped so I thought It would be nice to share a couple of techniques which I haven't used for ages.

I am using  the Bigz Heart Trio die. This is one of eight fabulous Bigz dies that have been designed for Sizzix by Echo Park which are perfect for a huge range of applications, I know that Angela, our textile guru is very excited about them!

I love the shapes of these hearts and they are so big and bold offering a blank canvas ready to be explored. I am using a selection of Distress inks as shown below and at this point I only have a sketchy idea of how they will turn out.


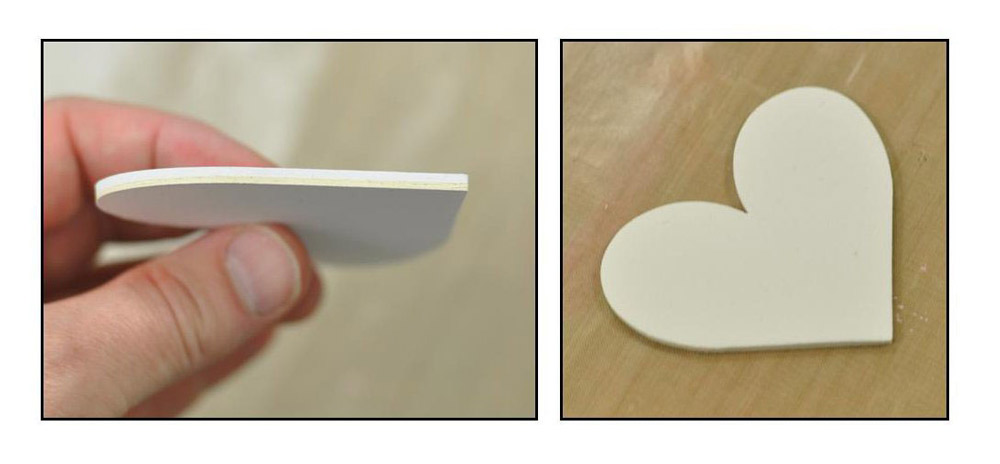
I attached some self adhesive foam to a square of mount board and Die-cut my shape... Aren't Bigz dies great!!!
I applied the ink pads directly onto the foam side of the die-cut shape before gently spritzing with clean water using a mister. Next, I pressed the shape face down onto a square of white card as one would do with a stamp.
 For my next technique I die-cut the same heart from paper and used the negative as a stencil. I placed the stencil onto white card and applied the same inks using foam applicators.
 I removed the stencil and lightly spritzed with clean water before drying with a heat tool. Next, I replaced the stencil and used a text stamp to add a little detail.
Finally, I die-cut a 3-D flower and some leafy foliage from white card before forming the flower and curling the leaves to add a little dimension. Click on the highlighted text to see the dies used.


Here are the finished cards. As you can see I have distressed the edges of the white card and attached each to a kraft base card secured with some suitably wonky stitching very kindly provided by our Angela although I feel I should point out that the 'wonky' stitching was by my request!

I applied PVA to the foliage and dipped it in gold glitter and I used a postmark sentiment stamp from the good people at Lily of the Valley (great set, very versatile!)

One card is for a wedding and the other for a special birthday girl. Hope they like 'em?


Friday, 12 June 2015

Decorative gift wrap


Hi Sizzix friends!


Today I want to show you how I’ve decorated a kraft paper bag to use as gift wrap. To make this decoration I’ve used the dies included in the Big Shot Plus Starter Kit and a Decorative Strip die designed by Doodlebug for Sizzix. 


In this case I’ve decided to combine the kraft colour with blues and whites. Normally I like to combine it with red but I felt this combination was more elegant which was perfect for the person who received this gift.


Here are some details:


I’ve fixed the flowers using a blue brad and curved the petals and the leaves to give some volume.


Once I’ve die-cut the decorative strip, I’ve embossed it using the embossing folder included in the Big Shot Plus kit.


It’s really easy to create a cute decoration for our gift wrapping, isn’t it?


I have used the following Sizzix products:


I hope you have enjoyed this decorative gift wrap. Thanks for your visit!


Have a creative and happy Friday!


--------------------------------------------------------------------------------------------------

¡Hola a todos!


Hoy quería enseñaros cómo he decorado una bolsa de papel kraft para utilizarla de envoltorio de regalo. Para esta decoración he utilizado los troqueles incluidos en la Big Shot Plus Starter Kit y la cenefa decorativa del troquel de Decorative Strip diseñado por Doodlebug para Sizzix.

En esta ocasión he optado por combinar el kraft con azules y blancos, Normalmente me gusta combinarlo con rojos y blanco pero en esta ocasión el azul le aportaba un toque elegante y dulce.

Algunos detalles: 

He fijado las flores con un brad de color azul y las he curvado así como las hojas para darle un poco de volumen.
Una vez troquelada la cenefa la he hecho el embossing con la carpeta (imposible decirle carpetilla) del kit. 

Es realmente sencillo realizar una decoración para decorar nuestros paquetes de regalo ¿no os parece?


He utilizado los siguientes productos Sizzix:


Espero que os haya gustado esta decoración para adornar nuestros regalos. ¡Gracias por la visita!


¡Feliz y creativo viernes!

Friday, 5 June 2015

Scrapbooking Layout: Nice Memories


Hi everyone, it’s Anna here today, sharing a layout with Sizzix item.
I love the new Sizzix Big Shot Plus starter Kit! Not only can you use these for box, tag, cards, but I’m going to show you how to use this kit into a dimensional embellishment for your layouts. In particular the big Textured impressions folder is ideal to create yourself your background pages!
 
cafe creativo - craft asylum - sizzix big shot plus starter kit - scrapbooking (1)
 
I chose my favourite "scrap" canvas which is A4 size and perfectly matching the Sizzix Big Shot Plus machine.
 
cafe creativo - craft asylum - sizzix big shot plus starter kit - scrapbooking (2)
 
I didn't use a patterned paper for the background, but I chose a white paper and I added a touch of yellow color thanks to a stamp.
My very first step was to emboss the stripe paper. I used the A4 Embossing Folder. I used also a strip of Craft Asylum patterned paper included in the Starter Kit.
With my Big Shot Plus I cut some nice shapes with dies: sprig and decorative strip scallop.
I added other small embellishments and title.
A simple and fast way to realize a pretty page of scrapbooking.

Hope you like it and I inspired you to create something pretty with your Big Shot Plus Starter Kit! Believe me, you won´t regret buying it! ;)

Thanks so much for visiting me today
 
Items used:
1 photo (cm 10x15)
cardstock: white, vanilla, glitter paper
patterned papers: Craft Asylum included in the Sizzix Big Shot Plus Starter Kit
embellishments: Prima
title: Prima
ink pad: Ranger
stamps
paper bag
thread
 
**************************************
Flag_of_Italy
Per le amiche italiane! :)

Ciao a tutti, sono Anna e sono qui oggi per condividere un layout creato con i prodotti Sizzix.

Il nuovo Sizzix Big Shot Plus Starter Kit mi piace tantissimo! La macchina e le fustelle incluse, non sono solo utili per creare scatoline, tag, biglietti, ma vi mostrerò come utilizzare questo kit anche per creare un abbellimento per le pagine scrap. In particolare la grande la mascherina per embossing è ciò che ci vuole per creare lo sfondo per le proprie pagine!
Ho scelto il mio formato "scrap" preferito del momento, che è l'A4 e manco a farlo apposta, corrisponde perfettamente alla nuova macchina Big Shot Plus.
Non ho usato una carta fantasia per lo sfondo, ma ho scelto un cartoncino bianco a cui ho aggiunto solo un tocco di colore giallo grazie ad un timbro, dove ho deciso di posizionare la foto.
Il primo passo è stato quello di embossare una striscia di carta bianca e per fare questo ho usato la mascherina formato A4. Ho anche usato una striscia di carta fantasia Craft Asylum, sempre inclusa nello Starter Kit.
Con la mia Big Shot Plus ho tagliato poi alcune forme con le fustelle: rametto, etichetta e striscia decorativa scallop.
Ho aggiunto poi sotto alla foto una bustina di carta dove ho inserito una tag per il journaling. Ho posizionato altri piccoli abbellimenti e tag qua e là. Per finire ho composto il titolo con gli adesivi.
 
Ecco dunque un modo semplice e veloce per realizzare una graziosa pagina scrap.
Spero che vi piaccia e che vi abbia ispirato a creare qualcosa di bello con il nuovo Big Shot Plus Starter Kit! Credetemi, non vi pentirete di acquistarlo! ;)

Grazie per la visita
 
Materiali:
Sizzix Big Shot Plus Starter Kit (White & Gray) (660515) (macchina formato A4+fustelle+carte)
1 foto (cm 10x15)
cartoncini: bianco, panna, glitter oro
carta fantasia: Craft Asylum inclusa nel Sizzix Big Shot Plus Starter Kit
abbellimenti: Prima
titolo: Prima
inchiostro tampone: Ranger
timbri
bustina di carta
filo

Saturday, 4 April 2015

Greeting Card with a quote and a die cutted Flower


Hey everyone,
it´s me again, Julia. My project for this weeks post is a beautiful greeting card with a black stamped quote on it. Framed in pink and embellished with a precious die cutted flower. I LOVE IT! 

But first, let me tell you what we need to make some cards like this:
Pink cardstock, blank cards, enamel dots, clear stamps with a quote (mine is from the American Crafts Dear Lizzy daydreamer collection), black inkpad


Sometimes I really love sitting at my crafttable and just make a bunch of cute flowers. It´s so meditative and of course I can get rid of aaaaaall my old scraps. Maybe that´s why I love die cutting so much! You can reuse your old paper scraps to make some really new and beautiful items, right? That´s so awesome. 

With one of these pretty flowers I created a greeting card. Simple but effective! :)


Have fun making this card. Hope to see you next week, when I have a new inspirational project for you! :) Happy easter, xo Julia

PS: Don´t forget to have a look at the SPRING FEVER SALE! There are a lot of beautiful Dies you definitely need. ;) 

--------------------------------

Hi ihr Lieben,
ich bin es wieder, die Julia

Aber zuerst einmal kommt hier die Liste der verwendeten Materialien
Pinker Cardstock, Kartenrohling, Enamel Dots, Clear Stamps mit Zitat o.Ä, (meiner ist aus der Daydreamer Kollektion von Dear Lizzy American Crafts), Stempelkissen in Schwarz

Manchmal überkommt es mich und ich fange an meine ganzen Papierschnipsel zusammen zu suchen und damit ein paar schöne Kleinigkeiten zu machen. Dank der Big Shot ist das auch super einfach. Aber nicht nur das, irgendwie ist das auch ein wenig wie meditieren… ;) Einfach machen, ohne nachzudenken. So sind einige dieser Blumen hier entstanden.

Mit einem dieser Blümchen habe ich eine Karte gebastelt. Relativ einfach gehalten, schlicht aber mit dem gewissen Etwas. :)

Ich wünsche euch ganz viel Spaß beim nach basteln und freue mich auf euch, wenn ich kommende Woche wieder mit einem neuen Projekt hier bin. Frohe Ostern ihr Lieben, xo Julia

PS: Verpasst nicht den SPRING FEVER SALE! Es gibt viele tolle Stanzen im Frühjahrsangebot, insbesondere wundervolle Blumen. ;) 

Saturday, 14 March 2015

Happy Spring Decoration with Mini Paper Rosettes


Hi everybody,
it´s me again - Julia. :) Hope you had a nice week and some sunny days? I am totally in the mood of decorating my home in beautiful spring colors and fresh handmade items. The first thing I have made was this beautiful paper wreath.


It is super easy and a fun to make. So here is my list of supplies:
Pattern Paper from Crate Paper Open Book Collection
Ribbon to hang it on the wall later
Glue and a Cardboard Ring to get your wreath in shape


For my paper wreath I needed 13 small and big Rosettes. I love this Decorative Strip Die because you get two different sizes immediately. :) Put them together and paint your cardboard ring white. I used some acrylic paint for that. Let it dry and place your ribbon on the back, so you can hang it on the wall later. Place the Mini Paper Rosettes on it, just as you like it. Fix it with some glue and wait a few minutes. I love how the result! I think of making some more. :)


Have you made some wreaths for your home decoration? Which Dies from Sizzix are you using for it? :) Have a nice day, Julia

---------------------------------------------

Ihr Lieben,
bei mir ist gefühlsmässig der Frühling eingezogen und ich würde am liebsten unser ganzes Häuschen mit bunten selbstgemachten Dingen dekorieren. Den Anfang macht derzeit ein wunderhübscher Kranz aus Mini Rosetten. Die sind so toll! Und es macht eine Menge Spaß sie auszustanzen, mein Mann hat fleissig geholfen. ;)

Also alles was ihr braucht sind folgende Dinge:
Pattern Paper von Crate Paper aus der Open Book Kollektion
Stoffband für die Halterung
Kleber und Pappe um euch einen Pappring als Grundlage zu gestalten

Für meinen Türkranz (der gar nicht an einer Tür hängt, weil ich keine Halterung dafür habe… :D ), habe ich jeweils 13 Rosetten in den zwei Größen ausgestanzt. Ich finde es absolut genial, dass die Stanze direkt zwei verschiedene Größen anbietet. So kommt man nicht nur schneller voran, sondern kann - je nach Projekt - sogar einfach mal schauen, welche Größe denn nun besser passen könnte. ;)

Den vorbereiteten Pappring habe ich mit weißer Acrylfarbe grundiert und das kurz antrocknen lassen. Auf der Rückseite habe ich mein Band dann befestigt und auf der Vorderseite die hübschen Papierrosetten gleichmässig verteilt. Und dann wurde auch schon geklebt, dass noch kurz trocknen lassen und fertig war meine kleine hübsche Dekoration! :) Ich glaube ich mache noch ein paar. Einfach um sie zu verschenken. ;)

Habt ihr auch schon Kränze gemacht für eure Dekoration zu Hause? Welche Stanzen von Sizzix habt ihr dafür benutzt? :) Habt einen schönen Tag, xo Julia