Hello everyone, it´s
Janna here. After last week´s
colorful scrapbooking page, I am back with a gold, silver and white color combination. It is definitely one of my favorite combinations as it adds an elegant touch to each project.
Material list:
655268 Sizzix Big Shot machine
655098 Sizzix Accessory - Extended Spacer Platform
657691 Sizzix Bigz Die - Heart, Stem & Leaves
657846 Sizzix Texture Fades Embossing Folders - Bubble & Honeycomb
656363 Sizzix Framelites Dies - Labels, Wavy
658552 Sizzix Sizzlits Decorative Stripes - Stacked Artful Words
cardstock: Bazzill, Stampin´Up
vellum: Stampin´Up, Dear Lizzy
journaling card: Skipping5
glitter foil: American Crafts
spray: Heidi Swapp
clip: Crate Paper
wood veneer: Studio Calico
other: masking tape, sewing machine, white thread, glue, photo, black pen, paint brush
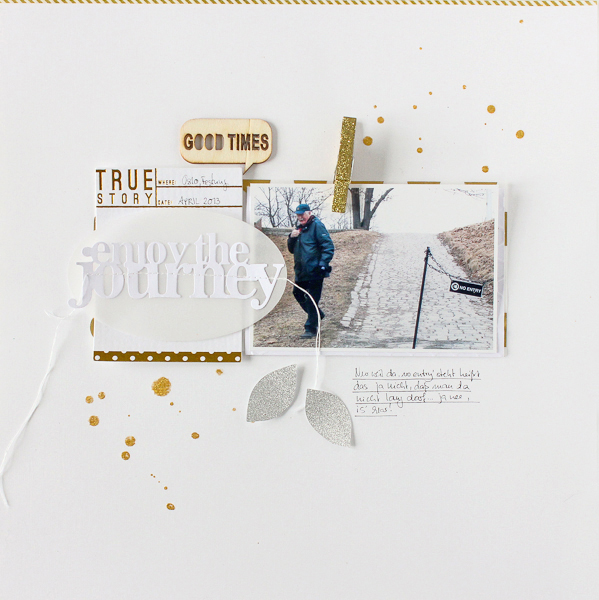
This clean and simple page can easily be recreated. Add a piece of masking tape on top of the page. Then use a paint brush and golden spray to add splatters. Let the splatter dry before you continue.
Cut a piece of gold dotted vellum and place it in the middle of your page. Then put a journaling card and a piece of white, embossed cardstock on top of the vellum. I used a honeycomb pattern to emboss the white cardstock. Instead of running it through my Big Shot, I pressed it very hard with my hands. Like this the pattern will be more decent.
Cut an oval out of vellum and glue the title on top of it. Add a bit of stitching, if you like (see photo above). The vellum will be adhered on top of the journaling card. The photo will be decorated with a clip. To make sure, it will stay in place, glue the photo on top of the white, embossed cardstock and add glue on the backside of the clip as well. Embellish the page with silver leaves and wood veneer and you are done!
I hope you enjoyed today´s inspiration. Take care and see you next thursday!
Janna
*****
Hallo ihr Lieben,
Janna hier. Nach der
bunten Scrapbooking-Seite der letzten Woche, habe ich heute ein Layout in der Farbkombination Gold, Silber und Weiß für euch. Dies ist definitiv eine meiner liebsten Kombinationen, da sie jedem Projekt Eleganz verleiht.
Materialliste:
655268 Sizzix Big Shot machine
655098 Sizzix Accessory - Extended Spacer Platform
657691 Sizzix Bigz Die - Heart, Stem & Leaves
657846 Sizzix Texture Fades Embossing Folders - Bubble & Honeycomb
656363 Sizzix Framelites Dies - Labels, Wavy
658552 Sizzix Sizzlits Decorative Stripes - Stacked Artful Words
Cardstock: Bazzill, Stampin´Up
Vellum: Stampin´Up, Dear Lizzy
Journaling-Karte: Skipping5
Glitzerfolie: American Crafts
Spray: Heidi Swapp
Clip: Crate Paper
Wood Veneer: Studio Calico
Anderes: masking tape, Nähmaschine, weißes Garn, Foto, Stift, Pinsel
Diese clean and simple Seite kann leicht nachgearbeitet werden. Zuerst wird ein Streifen Masking Tape am oberen Rand befestigt. Dann werden mit einem Pinsel und goldenem Spray Kleckse auf dem Layout verteilt.
Anschließend wird gold-gepunktetes Vellum zurechtgeschnitten und mittig auf dem Papier befestigt. Darauf wird eine Journaling-Karte geklebt und ein Stück weißer Cardstock, der vorher embossed wurde. Ich habe das Honeycomb-Muster zum Embossen verwendet, habe allerdings nicht die Bog Shot genutzt, sondern mit den Händen gedrückt. Auf diese Weise ist das Muster dezenter.
Aus Vellum wird ein Oval ausgestanzt, auf diesem wird dann der Titel befestigt. Als Akzent wird über den Titel genäht. Das Vellum wird anschließend auf der Journaling-Karte aufgeklebt. Das Foto wird mit einem Clip verziert. Damit sich das Foto nicht verschiebt, sollte es partiell mit Kleber versehen werden, ebenso die Unterseite des Clips. Zu guter Letzt wird die Scrapbooking-Seite noch mit silbernen Blättern und einem wood veneer embellished - das war´s!
Ich hoffe, euch hat die heutige Inspiration gefallen. Lasst es euch gut gehen, bis nächste Woche!
Janna