Showing posts with label base tray. Show all posts

Saturday, 8 March 2014

Darkroom Door & Sizzix Artist Trading Card Swap


 Hello!

Every month on the Darkroom Door blog we hold an Artist Trading Card swap. It's a great way for crafters to share a bit of their own artwork with other like minded crafters around the world and gain some new ideas and inspiration! Each month has a different theme. Recently one of the themes was 'Darkroom Door & Sizzix' where all the artists needed to use a Darkroom Door stamp or paper product combined with a Sizzix die or embossing folder.

It was so much fun watching the ATC's arrive in the mailbox and seeing what all the artists created! Each idea was different and the combinations of dies, stamps and embossing folders used gave us all some new great ideas on how they can be used.

Here are all of the ATC's that were created for this swap:


Created by Jenny Webster. A Darkroom Door Art de Fleur Photochip was cut using the Sizzix Movers & Shapers Magnetic Die Set Butterflies #658367 on a Sizzix Base tray.


Created by Rachel Greig (that's me!) using Darkroom Door Kimono Montage and Wordstrip, framed with the Sizzix Thinlits Scallop Polka Dot Frame Layers Die #659129


Created by Vicky Fernando using Sizzix Mini Flourish Alterations die #657205, Darkroom Door Wildflowers Vol 1 Rubber Stamps & the sentiment from Gothic Arches Rubber Stamp set.  

I'm sure you'll agree with me that the different ideas and artwork from all of these artists is amazing!  

If you are interested in participating in the ATC Swaps, please click here for all of the information! We'd love to have you take part!! It's a lot of fun :) 

Hope you have a creative weekend! Thanks for stopping by today! 

Thursday, 1 August 2013

Birthday Card "Monsieur"


Birthday Card "Monsieur"

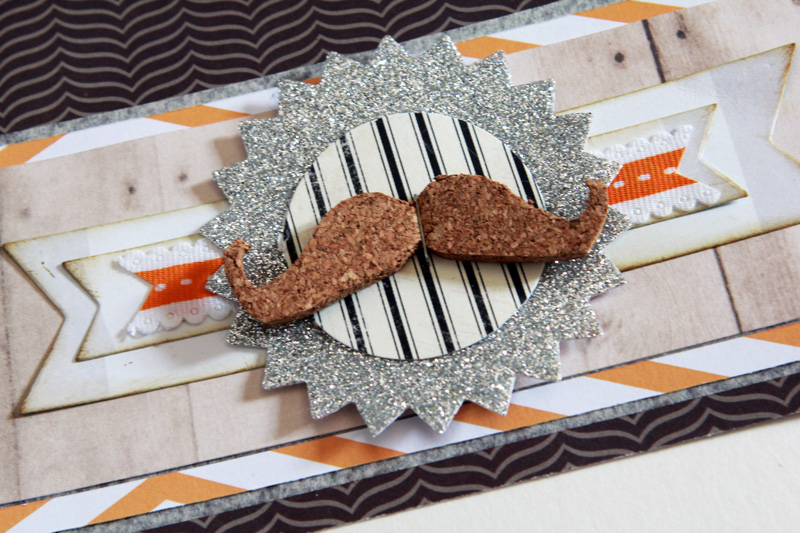
Today let me show you a card made for my DH! The moustache die is the perfect detail for this occasion!

Supply list:

Papers: Color Conspiracy, Basic Grey, I Lowe Scrap, Crate Paper
Ribbon: American Crafts
Glitter: Martha Stewart

Dies:

658690 Sizzix Framelits Die Set 4PK-Circles Zing zag
658562 Sizzix Movers & Shapers magnetic Die Set 2PK-Mini Mustache & pointed finger
657007 Sizzix Movers & Shapers accessory-Base Tray

Start by cutting a 12x30 cm rectangle in a masculine pattern paper. Fold it in half and round the top right corner with a punch.

Add a 6cm wide beige paper strip, some masking tape and orange little paper strips.

Glue a wide strip of double sided tape on a paper scrap. Sprinkle it with silver glitters and cut circles with the zig zag circle die.

Cut a moustache shape out of cork. Add a paper circle in-between and fasten the whole with a stapler.

Cut 4 little pennants with the banners die. Place them around your embellishment area; add a small piece of ribbon to complete the whole.


The ideal creation to offer your DH, right?

Karine

Carte d'anniversaire" Monsieur"

Aujourd'hui une petite carte destinée à Monsieur ! Le die Moustache est juste le détail idéal pour l'occasion !

Matériel :

Papiers :Color Conspiracy, Basic Grey, I Lowe Scrap, Crate Paper
Ruban : American Crafts
Paillettes : Martha Stewart

Dies utilisés :

658690 Sizzix Framelits Die Set 4PK-Circles Zing zag
658562 Sizzix Movers & Shapers magnetic Die Set 2PK-Mini Mustache & pointed finger
657007 Sizzix Movers & Shapers accessory-Base Tray
658696 Sizzix Framelits Die Set 8PK with stamps-Banners#2

Commencez par découper dans un imprimé masculin un rectangle de 12x30cm. Pliez en deux, arrondissez avec une perforatrice l'angle haut droit.

Ajoutez une bande de papier imprimé beige de 6cm de large, complétez avec du scotch de masquage et des bandelettes de papier orange.

Collez un large double face sur un brouillon, saupoudrez de paillettes argentées, découpez avec le die cercle zig zag.

Découpez également une moustache dans du liège, entre les deux ajoutez un rond de papier, fixez le tout à l'agrafeuse.

Découpez 4 petits fanions avec le die bannières. Assemblez autour de votre embellissement, ajoutez un petit morceau de ruban en complément.

Une page idéale pour offrir à Monsieur, n'est ce pas ?

Karine

Sunday, 21 July 2013

A Layout by Gerry van Gent


Happy Sunday Sizzix friends!

Today I 'm sharing with you my latest Sizzix project.

657900 Sizzix Big Shot
657007 Sizzix Bigz L Tray Base Tray
658369 Sizzix Die Pop 'n Cuts Magnetic Insert Butterfly Window
658449 Sizzix Die ScoreBoards XL Album, Garden Gate
658605 Sizzix Thinlits Die Set Doilies, Lovely
658506 Sizzix Sizzlits Vintage Doily
658951 Sizzix Thinlits Die Ornate Hanging Sign

The Garden Gate Album Die was used here to embellish the photo.
I die cut it by using corrugated cardboard and pattern paper at the same time.
In this way it pops and gives a beautiful dimension to your layout.
N.B. The wood grain pattern is from the paper collection!
The Pop 'n Cuts Butterfly Window Die was here used not
as a pop-up butterfly window but as an embellishment.
I die-cut it using two different pattern papers. After that I carefully
cut the butterflies out and sanded the edges.
Then I added in the middle of each butterfly a white rose as a final touch.
  
OTHER PRODUCTS USED:
Webster's Pages - "Family Traditions" paper collection
Webster's Pages - Birds Silhouettes
Imaginarium Designs - chipboard frame
*  *  *
Dutch Translation
657900 Sizzix Big Shot
657007 Sizzix Bigz L Tray Base Tray
658369 Sizzix Die Pop 'n Cuts Magnetic Insert Butterfly Window
658449 Sizzix Die ScoreBoards XL Album, Garden Gate
658605 Sizzix Thinlits Die Set Doilies, Lovely
658506 Sizzix Sizzlits Vintage Doily
658951 Sizzix Thinlits Die Ornate Hanging Sign
*  *  * 
Hallo Sizzix vrienden!
Vandaag wil ik mijn laatste Sizzix pagina met jullie delen.
*  *  * 
De Garden Gate Album Die  was hier als decoratie gebruikt.
Ik heb tegelijk golfkarton en patroon papier gestanst.
Op die manier geeft het hek een hele mooie dimensie.
N.B.  Het houtnerf patroon komt uit het patroon papier.
*  *  * 
De Pop 'n Cuts Butterfly Window Die was hier weer gebruikt 
als decoratie en niet als een 3D vlinder raam.
Ik heb uit twee verschillende patroon papieren het vlinder raam gestanst.
Daarna heb ik ze voorzichtig uitgeknipt en langs de randen distressed.
Als laatste heb ik een witte roos precies in het midden geplakt.
*  *  *  

I hope you enjoyed my layout today!
Have a great day!

Thursday, 23 May 2013

Live your life layout


Live your life layout

Here is a very fresh and colourful layout which is a kind of hymn to Mother Nature and spring time! I had fun working on a horizontal layout, a simple technique which always turns out great!

Supply list:

Papers, alphabets, stickers: Jenni Bowlin Studio
Wooden stars: Sodalicious
Versafine inks: black, spanish moss
Adirondack inks: clover
Stamps: Florilèges Design, Craft Origine, Art Stamp, Glitz Design, Technique Tuesday
Masking tape: Lovely Tape
Strass: Prima

657900 Sizzix Big Shot
657007 Sizzix Base tray
657212 Sizzix Movers & Shapers Magnetic Die Set 2PK-Mini hearts set
658002 Sizzix Sizzlits Decorative Strip Die- Lace & Circles
659111 Sizzix Thinlits Die Set 7PK-Hello Summer


I started by working on the background with three nature-patterned stamps, using different colours of ink.

Still in the nature theme, I cut out a heart shape out of cork. If you want to cut this kind of material, you’d better use the Bigz dies. Here I also used my tray base to cut this shape. The heart is glued with liquid adhesive and has a small green strass as an accent.

A small branch from the Hello Summer die is cut out of green patterned paper. Two little birds stamped in black complete the scene.

As a finishing touch, I added a lace paper border realized with the Laces &Circles die. I really like this particular die. It adds finesse to the creation.


So today’s creation is quite easy to realize but I really like it. What do you think?

Have a nice day!

Karine

Page Live your life

Une page toute fraiche et colorée comme un hymne à la nature et au printemps ! Je me suis amusée ici à travailler une mise en page horizontale, simple mais efficace !

Matériel :

Papiers, alphabets, autocollants : Jenni Bowlin Studio
Etoiles en bois : Sodalicious
Encres Versafine : noire, spanish moss
Encres Adirondack : clover
Tampons : Florilèges Design, Craft Orogine, Art Stamp, Glitz Design, Technique Tuesday
Scotch de masquage : Lovely Tape
Strass : Prima

Dies utilisés :
657900 Sizzix Big Shot
657007 Sizzix Base tray
657212 Sizzix Movers & Shapers Magnetic Die Set 2PK-Mini hearts set
658002 Sizzix Sizzlits Decorative Strip Die- Lace & Circles
659111 Sizzix Thinlits Die Set 7PK-Hello Summer

J'ai dans un premier retravaillé mon fond de page avec trois tampons nature avec des couleurs d'encres différentes.

Tout en restant dans l'esprit naturel, j'ai découpé une forme coeur dans du liège. Pour découper ce type de matière, prévoyez des Dies Bigz. J'ai ici eu besoin de ma Base Tray pour effectuer ma découpe. Le coeur est collé à la colle liquide et décoré d'un petit strass vert.

Une petite branche est découpée à l'aide du Die Hello Summer dans un imprimé vert, deux petits oiseaux imprimés en noir viennent compléter la scène.

J'ai terminé ma page en rajoutant une bordure de papier dentelle réalisé avec le die Laces &Circles. Une découpe que j'aime beaucoup et qui ajoute un peu de finesse à la création.

Une créa du jour toute simple mais qui me plait énormément, et vous ?

Je vous souhaite une très bonne journée !

Karine

Thursday, 25 April 2013

Mini book Love Spring


Mini Album Love Spring

Here is an excerpt of a mini book named "Love Spring" which I will be teaching all over France next June.
A very seasonal mini book since we will be using Spring pictures! It is a vintage though very coloured album with a vast number of details! A totally asymmetric structure, size 15x20 cms, with outdoorsy pictures. We’ll have children portraits mixed with nice pictures of garden and flowers. We will be working on materials such as cork, tulle and transparency. With regards to techniques, we’ll learn to use the Aladine Izink pigment inks and play with the Adirondack inks, and dry and hot embossing.
We will learn how to create unique textured backgrounds!

Supply List:

Papers, alphabets, stickers: Jenni Bowlin Studio
Wood stars: Sodalicious
Versafine inks: black, Spanish moss
Distress ink: Vintage photo
Adirondack inks: citrus, clover, watermelon
Izink inks: Aladine
Distress stain: Ranger
Stamps: Florilèges Design, Craft Origine, Art Stamp, Glitz Design
Masking tape: Lovely Tape
Others: tulle, cork, transparency, glitter

Dies:
657000 : Big Shot
657007: Base tray
658608 : Sizzix Framelits Die Set 4PK-Frame, Instant
658562 : Sizzix Movers & Shapers Magentic Die Set 2PK-Mini Mustache and pointed finger
657721 : Sizzix Bigz die-Borders & Hydrangeas
657212 : Sizzix Movers & Shapers Magentic Die Set 2PK-Mini Hearts Set
658518 : Sizzix Textured Impressions Embossing Folder 2PK-Pom-Poms & Roses Set
658290 : Sizzix Framelits Die Set 5PK with Stamps-Butterflies 4

Let’s start with the covers. Grab two basic cardboard pieces size 15x20 cms.
We’ll need some gesso, masks and butterfly dies to bring texture to the covers. Let’s use the beautiful Sizzix dies to cut our butterflies out of Bristol or scrap papers.
Feel free to use patterns other than butterflies like flowers, stars, geometric shapes…

For the front cover, I used three butterflies with different sizes and I aligned them on the right side.
I also simulated a butterfly flight using 4 butterfly dies. The dies are glued on the cover with a basic glue stick.

Do not hesitate to cut out extra butterflies so that you can use them as accents later on!

Generously apply some gesso on both covers. They need to be entirely covered. Let dry in the open or use your heatgun to speed up the drying process.

While the covers are drying, cut some accents out of cork with your Big Shot. You’ll need to use Bigz dies to cut out of material such as cork or cloth. I chose small flowers, hearts and a moustache to embellish a picture of Maxence! Create your own stock before starting the decoration of your mini book

Now it’s time to get back to your covers and tags.
Here I used one of my favourite products at the moment: the Izink pigment inks from the French brand Aladine! There are contained in small colourful glass bottles. The inks have bright or pearly shades and are highly pigmented. For this mini I selected pearly shades for a sublime result! You can work with different shades; the colours will easily mix on your tag for a unique result! Play with colours that will match the kit: green, yellow, blue and a touch of gold.


You can apply the colour directly on your gesso-covered background. Spray a bit of water then spread the colour with a roller or an old loyalty card. Mix the colours then stop when it suits you and let it dry!

I had fun embossing white paper as well. Let’s emboss a white Bristol piece of paper (size 10,5x13,5cms) with a floral pattern Sizzix embossing folder, and then glue it on a sky blue pattern paper. Then I added some colours on my layout with green and coral-coloured Adirondack inks.


To complete my mini book, I stamped a beautiful quote and added a Pola frame.

I hope you’ll be inspired by my mini book! Go ahead now, go take pictures of your children outdoors!

Karine

Mini Album Love Spring

Voici aujourd'hui un extrait d'un mini "Love Spring" que je vais proposer un peu partout en France durant le mois de Juin.
Un mini book de saison puisque je vous propose de scrapper des photos printanières ! Un album Vintage mais coloré aux 1001 détails ! Un format 15x20cm totalement déstructuré, destiné à des photos de plein air. Au programme des portraits d'enfants mixés à de jolies photos de jardin et de fleurs. Nous travaillerons les matières comme le liège, le tulle, le transparent. Côté techniques, nous apprivoiserons les pigments Izink d'Aladine, les encres Adirondack, l'embossage à sec et à chaud. Nous apprendrons à créer des fonds de page uniques et riches en textures !

Matériel :

Papiers, alphabets, autocollants : Jenni Bowlin Studio
Etoiles en bois : Sodalicious
Encres Versafine : noire, spanish moss
Encre Distress : Vintage photo
Encres Adirondack : citrus, clover, watermelon
Encres Izink : Aladine
Distress stain : Ranger
Tampons : Florilèges Design, Craft Orogine, Art Stamp, Glitz Design
Scotch de masquage : Lovely Tape
Divers : tulle, liège, transparent, paillettes

Dies utilisés :
Big Shot :
657007 : Base tray
658608
658562
657721
657212
658518
658290


Nous allons attaquer dans un premier temps les couvertures de l'album qui sont à la base de simples cartons au format 15x20cm.
Pour donner de la texture à nos couvertures, nous avons besoin de Gesso, de pochoirs, de découpes papillons. Les découpes papillons sont réalisées à parir de dies Sizzix, les formes sont découpées dans du bristol ou des chutes de papiers.
Vous pouvez bien entendu changer les papillons pour d'autres motifs : des fleurs, des formes géométriques, des étoiles...

Pour la couverture avant, j'ai utilisé 3 papillons de tailles différentes que j'ai aligné sur la droite. Pour la couverture j'ai simulé un envol de papillons j'ai utilisé 4 papillons. Les motifs sont collés sur les couvertures avec du simple bâton colle.

Je vous conseille de découper quelques papillons supplémentaires pour pouvoir les envisager plus tard en embellissements !

Appliquez du Gesso sur les deux couvertures. Soyez généreuse et recouvrez entièrement vos deux couvertures ! Laissez sécher à l'air libre ou activez le temps de séchage avec votre heat gun.

Pendant que vos fonds sèchent, découpez des décorations en liège avec votre Big Shot. Pour découper des matières comme celle-ci ou comme du tissu, choisissez impérativement des dies Bigz. J'ai opté ici pour des petites fleurs, des coeurs, et une moustache pour accompagner une photo de Maxence ! Prévoyez-vous le stock avant de commencer :)

Reprenez maintenant vos deux couvertures et vos tags.
J'ai utilisé ici un nouveau produit coup de coeur de la marque française Aladine, les Izink ! De petites bouteilles colorées en verre contenant des encres nacrées ou brillantes riches en pigments. Un compte goutte permet de doser facilement la couleur.

Le but est de colorer et faire ressortir nos motifs réalisés aux pochoirs et Gesso.
A vous de doser la couleur comme bon vous semble, plus vous ajouterez de l'eau plus l'encre sera claire ! J'ai opté pour des encres nacrées au rendu sublime ! Vous pouvez travailler une ou plusieurs couleurs, les couleurs se mixeront naturellement sur votre tag pour un rendu unique ! Jouez avec des couleurs assortis au kit à savoir du vert, jaune, bleu et quelques touches d'or.

Vous pouvez déposez la couleur directement sur votre fond recouvert de Gesso. Vaporisez légèrement d'eau et étalez votre couleur soit avec un rouleau soit une carte de fidélité. Mixez vos couleurs, arrêtez-vous et laissez sécher lorsque la couleur vous plait !

Je me suis également amusée à embosser du papier blanc. Un Bristol au format 10,5x13,5cm est embossé à sec avec un motif floral Sizzix , il sera ensuite matté avec le papier imprimé bleu ciel.J'ai coloré ma page avec des encres Adizondack vertes et corail.

Pour terminer mon album j'ai imprimé une jolie citation à l'aide d'un tampon, un cadre Pola vient ajouter une finition supplémentaire.

J'espère que mon mini vous aura inspiré ! Alors prenez vite votre appareil photo et allez photographiez vos enfants dans la nature !

Karine


Sunday, 10 March 2013

A "Siblings" Layout from Gerry


Happy Sunday Sizzix friends!
I have another layout to share with you today
using Sizzix die-cuts and embossing folders.
655268 Sizzix Big Shot Machine
657670 Sizzix Embossing Folders - Roses & Frame Set
657784 Sizzix Embossing Folders - Tree & Flower Frame Set
658252 Sizzix Sizzlits Decorative Strip Die - Cobblestones
658945 Sizzix Thinlits Die Set - Damask & Scallop Borders
658946 Sizzix Thinlits Die Set - Decorative Border & Heart
658063 Sizzix Sizzlits Die - Dragonflies
656917 Sizzix Sizzlits Dec. Strip Alphabet Die - Chip Block
657840 Sizzix Movers & Shapers Magnetic Die Set - Vintage
657007 Sizzix Movers & Shapers Accessory - Base Tray, L

My very first step was to frame the photo.
I combined these two embossing frames ...
When I embossed the frame I removed the rectangle 
and adhered the frame on top of my photo.
Roses & Frame Set
When I embossed the flower frame I fussy cut
very carefully he thin frame including the flourish.
Then I "wrapped" the frame with it.
Tree & Flower Frame Set

The dragonfly was die-cut twice - once using white cardstock
and once pattern paper. For my project I used the one from the 
white cardstock decorated with pieces of the pattern paper die-cut dragonfly.
Then it was treated with a few colours ink.

I actually didn`t use the dragonfly as a dragonfly but to  decorate 
the gorgeous heart from the new Thinlits Dies Collection.
For the heart I used two sorts of pattern paper. The last layer (the dark one)
was painted with Transparent Crackle Paint.

The camera was first cut out of corrugated cardboard and after that 
once again I used two different pattern papers to dress it up. 
I used a swirly stamp to decorate on the right side and I added pearl drops.
I also painted the dark pattern paper with transparent Crackle Paint.

Other Products I used:
"Lyric" Collection - Prima Marketing
Embellishments, Flowers, Stamps - Prima Marketing

Dutch Translation


Vandaag heb ik weer een scrapbook pagina om te laten zien
waar ik Sizzix stansen en embossing folders heb gebruikt.

655268 Sizzix Big Shot Machine
657670 Sizzix Embossing Folders - Roses & Frame Set
657784 Sizzix Embossing Folders - Tree & Flower Frame Set
658252 Sizzix Sizzlits Decorative Strip Die - Cobblestones
658945 Sizzix Thinlits Die Set - Damask & Scallop Borders
658946 Sizzix Thinlits Die Set - Decorative Border & Heart
658063 Sizzix Sizzlits Die - Dragonflies
656917 Sizzix Sizzlits Dec. Strip Alphabet Die - Chip Block
657840 Sizzix Movers & Shapers Magnetic Die Set - Vintage
657007 Sizzix Movers & Shapers Accessory - Base Tray, L

* * *
Mijn eerste stap was om een lijstje voor de foto te creëren.
Ik heb deze twee reliëf lijstjes gecombineerd.
Toen heb ik het lijstje in reliëf gemaakt en heb ik de rechthoek uitgeknipt
en het lijstje op de foto geplakt.
Roses & Frame Set
Ik heb het reliëf bloemenframe voorzichtig uitgeknipt - inclusief de bloemen!
Daarna heb ik het frame om het andere reliëf frame gewikkeld.
Tree & Flower Frame Set
 * * *
Om de libel te stansen heb ik witte cardstock gebruikt en
patroon papier. Ik heb de libel uit de witte cardstock gebruikt
voor mijn pagina en versierd met het patroon papier.
Vervolgens bewerkt met inkt.
* * * 

Eigenlijk heb ik de libel gebruikt om het hart van het
 nieuwste Thinlits Dies Collection te versieren.
Ik heb weer twee verschillende soorten patroon papier
gebruikt. Op het donkere papier heb ik doorzichtig "crackle" verf gebruikt.
* * *
Het fototoestel was gestanst eerst uit golfkarton en vervolgens
versierd met patroon papier. De rechter kant heb ik gestempeld en
versierd met Pearl Drops. De donkere patroon papier is met doorzichtig 
Crackle Paint geverfd.

* * *
Hope you enjoyed my project today!
Wishing you as always creative Sunday!