Thursday 31 May 2012

Sizzix Blog Hop with Finn


Hi there friends - it is next day of our Blog Hop!!! Today i want to invite you to my blog... I've got something to share with you! 


Have you seen the projects of my DT friends? If not, here are the links for you to follow - inspiration is waiting!


Sunday - Pete Hughes
Monday - Lory Bucaria
Tuesday - Celine Navarro
Wednesday - Paivi Forsstrom
Thursday - Karine Cazenave-Tapie
Friday - Anna Dąbrowska
Saturday - Paula Pascual


Enjoy - and see yoou soon!
Finn

Cool summer


 Although today is overcast we have had a foretaste of summer, and as the heat rises we look for things to make us feel cooler. So this week I have chosen these 2 fabrics to create my next project,


which will develop over the next few weeks. I have to admit that I'm not quite sure what the finished item will be, but I have the block design planned, so we will see how it evolves. We begin nest week with the cutting instructions.
Enjoy the weekend, and if you live in the UK enjoy the double Bank Holiday.


Hello everybody !


Welcome to the Sizzix Blog Hop !


Come on and see my Layout on my blog !


Today - Pete Hughes
Monday - Lory Bucaria
Tuesday - Celine Navarro
Wednesday - Paivi Forsstrom
Thursday - Karine Cazenave-Tapie
Friday - Anna Dąbrowska
Saturday - Paula Pascual

Happy Crafting  :)

Karine

Wednesday 30 May 2012


Hi everyone,


It's my turn on the Blog Hop today and i've made two special projects to share with you. Head over to my blog to see how to make them! Enjoy!


Here's the line up for the week...


Sunday - Pete Hughes

Monday - Lory Bucaria

Tuesday - Celine Navarro
Wednesday - Paivi Forsstrom
Thursday - Karine Cazenave-Tapie
Friday - Anna Dąbrowska
Saturday - Paula Pascual


Tuesday 29 May 2012

Happy Birthday!


Hello everyone!
Today is a very special day for my sweetheart, my man for the last 11 years :) He's turning 31 today! :D
I made him a very special layout, with a picture I took of him this morning! :) I always try to make a layout for him and myself on our birthday, just to celebrate THAT special day with a layout :)


I used my favorite Sizzlits Dies with my Big Shot : the Washer Border.


The Sizzlits Dies are perfect to cut through paper and with a tiny bit of sewing, it adds extra texture and interest to the page.


Supplies list : Studio Calico June kits; Stamps (Kesiart, Studio Calico); Badges (Marcy Penner).


A HAPPY BIRTHDAY to my LOVE, Damien! :D


Céline

I love you- Reasons why layout


Helloooo everyone!

Today a new layout to share and I have to be true: I adore it and the meaning behind it!

Here it is :) I hope you like it and it inspires you a lot!


Materials I used:)

Instructions and write up:

Usually when I think to create a page I think to a sort of sketch first! It helps me a lot to focus on the page, the photo and the embellishments! I find it a good method to not waste time and not feel frustrated when you start a page.

Find the right combination of colors and a kit could suggest you what to use immediately.

Print the picture, I love this pic, it means a lot for me! ... and start assembling the page! What i have always on mind when I create is to have fun! Always!


I have cut some numbers from the number set from tim holtz, I was thinking about a sort of list with many points for my page and they should be perfect! 

I have cut many circles with the fantastic framelits, ... you have to know that I am completely in love with them and I would to use them in every single page I create... LOL... and put one circle on another to have a cool effect and at the end add double side tape behind the numbers and place them on different circles:)


Play with diffent patterned papers and colors and add gems:) In the last period I am crazy for gems! At the end add some words stickers and make all together , everything is connect. Add some sequins and embellishments :)

Behind the turquoise circle I have inserted an embossed circle ... using the amazing embossing dots folder:)

Simple, clean and very funny, don't you find?

I hope to have inspired you :)

Love, Lory


Blog Hop!


Hello everyone!


Next stop on the blog hop, it's me!


Today - Pete Hughes
Monday - Lory Bucaria
Tuesday - Celine Navarro
Wednesday - Paivi Forsstrom
Thursday - Karine Cazenave-Tapie
Friday - Anna Dąbrowska
Saturday - Paula Pascual

Hope you are enjoying it! :)
Celine

Monday 28 May 2012

Blog Hop: Lory


As we continue our blog hop, today we hop to:


Today - Lory Bucaria

Tuesday - Celine navarro

Wednesday - Paivi Forsstrom

Thursday - Karine Cazenave-Tapie

Friday - Anna Dąbrowska

Saturday - Paula Pascual

Sunday 27 May 2012


We've really excited to be holding the first Sizzix blog hop this week. Each day one of our fabulous designers will be bringing you a wonderful projects using our latest range of Framelits dies so be sure to check back here every day to see what's coming up!


Here's the line up for the week.


Today - Pete Hughes

Monday - Lory Bucaria

Tuesday - Celine navarro

Wednesday - Paivi Forsstrom

Thursday - Karine Cazenave-Tapie

Friday - Anna Dąbrowska

Saturday - Paula Pascual


Just back from Germany where I was the guest of Rayher who are a large distributor of all things crafty in Europe, where I was spreading the Godspel according to Sizzix. It was a great show and it was so nice to get out amongst our customers and find out how they are using our products and sharing a few tips and tricks with them.


Today I want to show you a few projects featuring our new range of Framelits dies, I have chosen two of the dies which are going to be featured on our upcoming Sizzix Show at QVC on the 14th of June, I don't know what time the show goes out but I'll let you know when I hear from them.


I started with a limited colour palette, less is more as they say! I am using the My Mind's Eye Miss Caroline range which is based around fresh floral vintage designs and lots of woody textures.
Once I have my papers the rest is easy (Don't believe that for a second!). These framelits sets give such a clean cut, they are a pleasure to work with and they are only two of our new range which vary from the very basic, graphic framelits to the more ornate vintage style like these seen below. Here is a new home card and a frame featuring Nan & Grandad....


..... and here is a card with a rubber stamped phrase and my beloved Grandmother. The problem with these dies is they throw up so many ideas and possibilities that it's hard to know when to stop!


Friday 25 May 2012

1977 and all that!


I don't know if you are aware, you may not have heard but it's JUBILEE TIME! the nation has gone red, white and blue crazy so I thought I would get in on the act.

I was about thirteen at the time of the silver Jubilee in the summer of 77. Just finished my first year of secondary school and starting to grow my hair a bit longer (which is not an option I have these days). My Memories of the time are all Punk and Pageantry which are polar opposites if you think about it. Nowadays, postcards featuring mohican wearing punks sit alongside pictures of Buckingham Palace at every Souvenir shop in London. 

As these two disparate cultural icons seem to have made peace in the intervening years, I thought I would create a card which celebrated them equally and here it is


I hand cut all the strips of coated card (accuracy isn't part of the Punk ethos) then I embossed them using a Textured Impressions folder (Classical Beauty & Baroque Wallpaper 657748). Next, I attacked them with distress inks prior to sanding over the embossed detail. I attached all the elements of the flag to the base card using 3D foam pads and used my PC to Create and print the phrase onto grey paper, trimmed each one to size and distressed with my sanding pad. Finally, my crown charm, don't ask where it's from because I really couldn't tell you!

Hopefully I can follow this with another Jubilee themed card next time!

Art Journaling with Framelits!

Hi there friends!
I hope you had a wonderful,creative week and your heads are ready for new ideas coming from our great DT here, on Sizzix blog. I'm here with you to show my latest creations with Framelits Dies... there were small forms, there were bigger forms - time for Art Journal, one of my beloved ways of expressing myself. 

As I said few times before - you can't get bored with Sizzix dies! If you only open your eyes you'll find loads of inspiration everywhere! Cutting elements for your projects is funn...but looking through the leftovers is fun too! I saved the pieces of paper from my last cutting...and that's how my journal page was created! 
So, basically I took Sizzix Framelits Die Set - Flowers (657901) and played a bit with cuting elements from plain white cardsock. 

Then I  looked carefully through the leftovers I had - I simply loved the shapes I found! I couldn't stop thinking about using them for creating texture on my journal page, yhinking about how cool they would look like covered with gesso and pain!
So, I just did it - and I LOVE the effect!


Here you can see some close-ups - on this page I used mostly the leftovers toghether with some random paper pieces - the effect is beyond amazing!


And here you can see the smallest flower as a part of the background too - I think it looks just beautiful!


I hope you feel a bit inspired today and you'll take a second look on your paper leftovers now - who knows what treasures you can find there? 
Happy creating!
Finn

Thursday 24 May 2012

Masculine layout by Karine


Page "Pré-ado ?"

A very masculine layout for you today ! All you will need is a big size picture (13x18cms – I chose one of my son), patterned papers that fit with the teenager theme and a vintage die !

Une page aujourd'hui très garçon ! Une photo de mon fils en grand format (13x18cm), des papiers aux imprimés "Ado" un die très "Old School" et le tour est joué !

I used the Framelits 657559 die (http://www.sizzix.co.uk/product/657559/sizzix-framelits-die-set-3pk-frame-shield-w-crown-wings ). With its frame, crown and wings, it is just perfect for my theme !

J'ai utilisé ici le die Framelits 657559 cadre, bouclier avec couronne et ailes (http://www.sizzix.co.uk/product/657559/sizzix-framelits-die-set-3pk-frame-shield-w-crown-wings) tout juste parfait pour ma thématique !

I chose a very simple layout. I glued my picture on the „sneakers“ patterned paper then I added printed paper strips from the same collection.

Une mise en page très simple, j'ai simplement collé ma photo sur l'imprimé "baskets" puis ajouté des bandes de papiers imprimés de la même collection.

I slightly inked all the elements of my lay out with Adirondack Clover ink (which is green).

Tous les éléments de ma page sont légèrement ombrés avec de l'encre Adirondack Clover (vert).

As for the embellishments, they were all glued at the end (stickers, paper strips, title).

Les élements de décoration : étiquettes, bandes de papiers, titre sont collés à la fin.

My die shape is cut from the white – green stripes paper. I drew the edges of the die with a black pen to put the emphasis on it.
All the elements that are inside are glued with 3D foam adhesive.

Le die est quant à lui découpé dans un imprimé blanc à rayures. Afin qu'ile ressorte davantage, j'ai repassé les contours au stylo fin noir. L'intérieur est monté en 3D à l'aide d'adhésifs en mousse.

That’s all for today ! let’s meet again next Thursday for a more feminine spring layout !

Have a nice day !

Karine

Et voilà pour aujourd'hui, retrouvez-moi jeudi prochain pour une page plus printanière et féminine !

Très bonne journée à vous,


Supply list:
Papers : Fancy Pants
Alphabets :American Crafts
Stickers : Embelli Bag
Ink : Adirondack Clover
Divine Twine
Patterned masking tape
Others : Tag, eyelets

Matériel :
Papiers : Fancy Pants
Alphabets :American Crafts
Etiquettes : Embelli Bag
Encre : Adirondack Clover
Divine Twine
Scotch de masquage imprimé
Divers : Tag, oeillets

Red,white and blue table runner


The sun is shining, it's Chelsea Flower Festival and the Queen's Jubilee next week - so I thought a few flowers would brighten up all the picnics and street parties. But because we don't know how long the sun will be shining for this is a quick make - even a cheat if need be.
I ironed fusible web onto the wrong side of a selection of red and blue fabrics.

Using the Big Shot and die 657165, dresden plate, I cut a number of petal shapes, and arranged them on a long piece of white fabric, to form flowers.


When I liked the arrangements I bonded them in place, ready to satin stitch in place, and then hem the edges of the runner.
However if you don't have time to stitch you can use the table runned with the flowers just bonded on, which would make an ideal addition to the table on a street party.
But why stop there - you could use single flowes to decorate cushions, or bags, or anything else your imagination runs to.
 If you change the colours it could be used to decorate runners or tableclothes for a weddinig, or special event.
I loved playing with this and hope to have time to play some more with clolours and maybe overlapping petals to make bigger flowers.
Have fun and enjoy the sunshine while it lasts.

Wednesday 23 May 2012

Super Easy Gift Box


I especially LOVE making cards, but I also LOVE to decorate gift boxes. It is nice when you have found a perfect gift for someone that you also have a beautiful box to go with it! In craft stores you can find boxes of various shapes and sizes. I always use double-sided adhesive sheet to attach papers to the box.


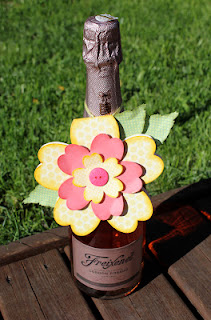
The flowers you see on the box are really beautiful and SUPER EASY. Die-cut with Framelits Die Set - Circles, Scallop (657552) lots of circles. I used four different sizes from the Framelits Set. I used nine circles to make one flower.

1. Make a small hole in each circle and attach together with a brad.
2. Wrinkle each layer separately.
3. Wrinkle all layers.
4. Open the flower, layer by layer.


Die-cut some flourish with Bigz Die -Elegant Flourishes (656639) and some leaves with Movers and Shapers Die Set - Mini Branch and Leaf (657208). Stunning and SUPER EASY!

Tuesday 22 May 2012

I have a sweet tooth, what about you?


Hello dear Sizzix lovers!
Here's a new layout I made using the Sizzix Sizzlits Decorative strip dies that I love!
With this layout, I decided to work with STRIPS : my photographs, my papers, fabric, masking tape and Sizzix Decorative WASHER BORDER strip.
These Decorative Strips are just SO easy to use : cut them with your Big Shot and your Extended Platform and the pad, you can now layer them the way you want!


Add some Blings here and there, use some mists to color it, or you can use it as a mask!


Enjoy!
Céline

Saturday 19 May 2012

A Tag Card


Today I am sharing a tutorial on how to make a Tag card using movers and shapers. For it I am using one of my favourite Sizzix Bigz dies of all time, Tim Holtz, Tag and Bookplates ( Movers & Shapers L die) and the Movers & Shapers Magnetic Mini Hearts.


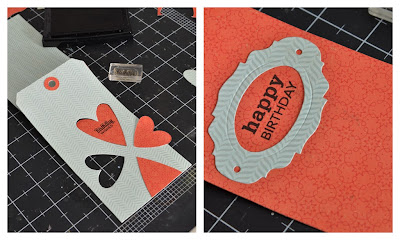
First up, position the heart within the open area of the tag. If you are like me and almost always die cut FFF (Front Facing Foam), you need to remember that the image on the die will be mirrored, i.e. the short heart will be on the left rather than on the right of the tall heart once die cut.


Die cut two pieces of patterned thick paper or card at the same time.


Then die cut an extra heart using any left overs (the one I used was from between the bookplates).


(I forgot to take the photo of the next step. So words will have to do.) Attach one short heart opposing the die cut one, and one tall one mirroring the tall die cut one.


Trim off the excess of the bottom one only.


Attach a similarly coloured thread to the paper. Use PVA glue to secure it in place.


Use one of the two tall hearts and add some adhesive to the centre. Attach it on to the thread and position it from the back of the card.


Attach the last tall heart over it with PVA glue. So that it looks like this.


To cover the threads, use the second die cut tag and glue it over it from the back.


Die cut a tag without any magnetic movers and shapers. Those squares are magnetic ejecting black foam, they are so that the card doesn't sink in on the area and easily come off. I recommend to always die cut movers and shapers with them on as long as it is possible.


The die cut card and once cut then score about 1/2" or 2.5cm from the top.


Add PVA glue to that scored flap and attach to the back of the die cut tag.


Stamp the message on the heart. I used one of my clear stamps sets for the front and for the inside I stamped a bigger sentiment from another set inside a die cut book plate.


And added the last remaining heart to the back, just perfect to write "handmade by...".


And this is the finished tag card. You can see on the right photo how the heart has a bit of movement.