Showing posts with label star. Show all posts

Saturday, 17 October 2015

Christmas Card Prototype #2


Hey guys,
how was your week? I´m still in progress creating prototypes for my christmas card this year. Using a lot of different Sizzix dies. This week I made a christmas-word-background with the holiday words. Maybe I´ll try some more colors for this kind of card. What do you think?


I love the colors of the sequins. They fit perfectly to christmas cards. I am a bit into violet and lavender this year. ;)


For a little more "glimmer" on my card, I used goldglitter watercolor to decorate the star.

My list of supplies that I used:
Watercolors in violet, yellow and goldglitter
Star stamp by hero arts
StazOn Ink Pad Tuxedo Black (works perfectly with watercolors)
Sequins by Pretty Pink Posh
Sizzix Big Shot Plus Starter Kit (White & Gray) #660515
Sizzix Thinlits Die Set 16PK - Holiday Words 2: Block #660976
Sizzix Framelits Die Set 5PK - Stars #657567

What will your cards look like this year? I´m curious about what you will make. :)
Have a nice weekend, xo Julia

Monday, 13 July 2015

STAR QUILT: PART 5


Dies used: Half-Square Triangles, 4 1/2in Finished Square
                Square, 4in Finished (4 1/2in Unfinished)
                Star, Nested

One single-size boys quilt, completed!


I'm so happy with the results and more importantly so is its new owner, Aidan. It was really very straightforward to make (especially the cutting, obviously!) using just two shapes (and therefore only two dies) for the pieced quilt top - definitely an example of simple but effective! A third die was used for the small applique stars that pepper the low volume, in-between areas.
There are plenty of colours in it but it meets his specification (thankfully it passed!) of 'mainly blue' with the orange fabric really bringing out the blues and providing some depth.

The backing fabric was picked up in the sale in Ikea and although it wasn't ideal to quilt with being more of a canvas weight it looks really good, the large print contrasting nicely with all of the fine detail on the front.


Hand-sewing the binding took longer than usual as making a stitch through thick backing fabric wasn't as easy as it would have been with quilters weight cotton but it wasn't too much of a hardship.


I really enjoy hand-sewing binding but it's starting to feel a bit indulgent when deadlines are looming and other sewing projects are stacking up, it may be time to investigate machine binding techniques!

Here it is in its new home.


Now to start something new, probably not another full size quilt just yet but I do have another son wanting one for his bed.

Happy sewing!


Thursday, 18 June 2015

Father's day - super hero, superstar


As promised another blog for Father's day - and it's quick as well, glasses case and a phone cover -
 
All you need is a tie or too - now I raided my husbands ties - but I did ask - take a hint that if you use his best tie he isn't really going to like what you've made with it.
If you love him dearly but he embarrasses you so much - then make sure that the tie you choose, from his wardrobe, charity shop or store, is really outlandish and choose crazy colours for the lettering!
One word - the tie does need to be quite wide because we are going it make a glasses case, or a phone cover.
I used the Bigz™ XL Alphabet Die - Word Play by Tim Holtz® -657837 http://www.sizzix.co.uk/product/657837/sizzix-bigz-xl-alphabet-die-word-play
or you can use the BigShot™ 660200http://www.sizzix.co.uk/product/660200/sizzix-big-shot-machine-only-white-gray
For alternative items I also used Bigz™ Die Stars 656339 http://www.sizzix.co.uk/product/656339/sizzix-bigz-die-stars
and Bigz™ Die Heartfelt by Tim Holtz -660233 http://www.sizzix.co.uk/product/660233/sizzix-bigz-die-heartfelt
 
You will also need a small amount of fusible web (Heat and Bond, Bondaweb or similar) and a similar small amount of fabric for the letters.
Fuse the web to the wrong side of the fabric for the lettering and cut out the letters that you need - for the first glasses case I'm using  1 each of s u p h o, and 2 each of e and r.
For the glasses case - I measured the glasses 15cm and added a couple of cm for ease and then doubled it - so I cut the tie to 40cm long. 
As I am going to stitch letters onto the right side I undid the stitching on the back of the tie, and opened it out flat. (Now I forgot to take a photo with the tie open so we are looking at my next tie)
Arrange the letters within the length you need for the glasses and then fuse them in place and stitch them -

The back of the tie is re-stitched and the narrow hem is turned in and stitched -
Next fold the tie so that the 'case' is the right length, and pin the layers together -
 and stitch the layers together.
Add a button and a ribbon loop to complete the case -

this one is because everyone knows that if you take off, or put on your glasses you can become a superhero!!
Which then led me to think of a super star -
and then I thought of a cover for a phone  - the tie needs to be cut to about 30cm for this and because it is smaller the word had to be shorter - so -
Hope you like these and are tempted to make one or two, and maybe keep one yourself!
Have fun, enjoy the weekend.
Angela
 

Monday, 15 June 2015

Star Quilt: Part 3


Dies used: Half-Square Triangles, 4 1/2in Finished Square
                 Square, 4in Finished (4 1/2in Unfinished)
                 Star, Nested

The piecing for my eldest son, Aidan's quilt is now finished.


I mentioned in my previous post that there was an issue with the quilt top that needed ironing out and so after the piecing was done resolving that was next on the list. I ordered the background fabric online and so didn't examine it thoroughly before buying it but I knew that the many little line drawings of everyday objects that covered it would fascinate and appeal to Aidan. So far so good. It was only when I began to cut it into squares and half-square triangles on my Big Shot that I noticed an unexpected picture that wouldn't really be at home on an almost 8 year old boy's quilt. I'm not going to go into detail here about the not-particularly-suitable items that were depicted (I have gone into more detail on my own blog http://twoowls.typepad.co.uk/ ) but after some thought, concluded that they should probably be covered up.

Applique was the obvious choice of cover-up method and a star shape to echo the patchwork design seemed most appropriate. I fixed some iron-on adhesive (fusible web) to the reverse of some scraps that were just big enough to cover the smallest, central star on the Stars, Nested die and cut out a neat pile of perfect little stars.


After removing the backing paper from the stars, I then pressed them in place over each of the unwanted pictures wherever they occurred on the quilt top. Considering the stars were added purely to solve a problem, they really add something to the overall look of the quilt top and it looks better for them.


Each star now needs to be sewn around to ensure that they are firmly held in place and they will also be quilted over later for extra security.


From now on I will be posting every other week and so hopefully this quilt will be finished in time for my next post - it has to be really as it's Aidan's birthday in 10 days time!

Happy sewing!


Monday, 8 June 2015

Star Quilt: Part 2


Dies used: Half-Square Triangles, 4 1/2in Finished Square
                 Square, 4in Finished (4 1/2in Unfinished)


Hello and happy Monday!

Sewing has been happening in fits and starts over the last week as my youngest (and most energetic) son has had an extra weeks holiday from pre-school and so superhero games have been top of the agenda instead.

Out of 15 blocks, 10 almost 11 are now done and decorating the wall above my sewing machine (along with the Counting Sheep blankie from the current issue of Love Patchwork and Quilting).


All of the fabric is cut out and ready go for the remaining blocks but just as things were speeding along the thread ran out. Typical.


It's starting to take shape though and so far thankfully it meets with my eldest son, Aidan's approval. Phew!


That said, there is a small issue with it though that will hopefully be ironed out over the course of the coming week and I'll post about it next time.


Thursday, 16 April 2015

New quilt started


I hope you've all been enjoying our lovely spring weather.
I am pleased to report that the baby quilts are not only finished but have been sent and received by at least one of the families - the one to America will obviously take a little longer!
I've also managed to find the quilt I had started for my granddaughter, Abi, it has eluded me for several weeks, and that is now well on the way to completion - so have been feeling quite pleased with myself.
The fabrics I showed you last week are coming together nicely -
I really like this die - http://www.sizzix.co.uk/product/660183/sizzix-bigz-l-die-triangles-isosceles-right-3-1-2-h-assembled - because it makes these stars easy to make.
I partnered it with the 3"finished square - http://www.sizzix.co.uk/product/657608/sizzix-bigz-die-square-3-finished-3-1-2-unfinished  and this makes a 9" finished block.
My dilemma now is that I'm not sure how to complete this - I think a trip to my local patchwork store is called for - I think maybe a plain fabric sashing, or maybe a few more blocks with plain fabrics - I'll have to let you know next week.
I'm also hoping to create a few more blocks using this die so that you can see how versatile it is, or there maybe another new die featured I'm not sure yet.
In the meantime have a lovely week, and keep sewing.
Angela


Thursday, 27 November 2014

Scandi Star Christmas quilt


Hello there - I'm happy to share that the Christmas quilt is coming along very nicely - and here's the photo to prove it -
 

and here is the complete top -

As each block is 16 1/2" this quilt only needed 12 blocks! and so the quilt can be cut and pieced in a day -add another day or a couple of evenings and this quilt will be complete - there is still time before Christmas!!
I used 12 different fabrics from Scandi Christmas fabrics and needed 40cms of each, and there is some left to create a pieced binding.
Cut the following pieces from each fabric using
 1 x 8" square die, http://www.sizzix.co.uk/product/657265/sizzix-bigz-pro-die-square-8-finished-8-1-2-unfinished , and the Big Shot Pro http://www.sizzix.co.uk/product/656250/sizzix-big-shot-pro-machine-only-periwinkle-w-standard-accessories ,

With the Big Shot and die 657520 - 8 x half square triangles - http://www.sizzix.co.uk/product/657520/sizzix-bigz-l-die-half-square-triangles-5-finished-square ,

 4 quarter square triangles http://www.sizzix.co.uk/product/657639/sizzix-bigz-xl-die-triangles-4-5-8-h-x-8-1-2-w-unfinished ,

and 4 squares - http://www.sizzix.co.uk/product/659838/sizzix-bigz-die-square-4-finished-4-1-2-unfinished .

Mix and match the fabrics - I used dark reds with light greys, light reds with dark greys - so that each square is different.
The piecing instructions are on my blog for 13th November.
When the 12 blocks are completed, and pressed, lay them out in 4 rows of 3 blocks each. 
Join the blocks together to complete the 4 rows and then join the rows together.
I will probably machine quilt for speed and then make a pieced binding to complete - I hope to have it ready to show you completed next week - and maybe some little girls snuggled up under it.
 Well that will be another first for me - a Christmas quilt - hope you like it.
Angela


Thursday, 13 November 2014

Quick Scandi Christmas block


How are you - I hope you're enjoying the build up to Christmas and that you have a lot more fun and enjoyment than stress.
Last year I thought it would be nice to start a family tradition - a quilt for Christmas eve - when the grandchildren can snuggle up under the quilt, in their Christmas pyjamas, and  enjoy watching a film together.
So we are only 6 weeks away from Christmas and I'm just starting the blocks for the quilt! Well that is progress, and even though I might not get it finished for this Christmas, I am moving in the right direction.
So I have chosen these lovely Scandi style fabrics, and plan to keep the design quite simple -
 

 I just love these colours and designs.
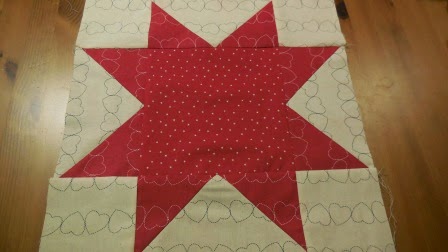
I have used the following dies for my star block -
 1 square in red with white stars.
With the Big Shot and die 657520 http://www.sizzix.co.uk/product/657520/sizzix-bigz-l-die-half-square-triangles-5-finished-square , and red with cream heart outlines, I cut
 8 half-square triangles.
 4 x 4 1/2" squares.
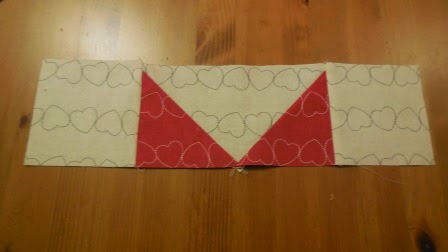
To begin I stitched 2 half square triangles to each side of the quarter square triangle -
and then I stitched these to opposite sides of the 8 1/2" square -

and then I joined the 41/2" squares to each end of two of  the pieced triangles -
 To complete the block these were stitched to  opposite sides of the centre square -
So that is my quick make for Christmas - it is a 16" finished block - so it could be a cushion or a table centre. I am still hoping that I can make a quilt for Christmas - and so I plan to use the same design for all of the quilt blocks, and mix and match the various fabrics I have from the range.
Will it be finished for this Christmas? - I have no idea, but, for the first time ever, I have the beginnings of a quilt for Christmas - I feel quite warm and cosy inside!
That's all for now - have fun.
Angela


Tuesday, 10 September 2013

Card with tags and stars....


Hi everybody....today I have made a card for you with Brenda Waltons Gift Tags -Sizzix Bigz Die - Gift Tags ...beautiful design on these Gift Tags ♥
The stars I found on this Sizzix Die - Sizzix Bigz Die - Stars, Celestial 


Supply list:
657900 Sizzix Big Shot Machine Only (Powder Blue & Teal)
658730 Sizzix Bigz Die - Gift Tags
658345 Sizzix Bigz Die - Stars, Celestial 
656627 Sizzix On the Edge Die - Scallops
657826 Sizzix Sizzlits Decorative Strip Die - Washer Border

Papers: Authentique, Manila tag #12
Stamps: Stampers Anonymous Tim Holtz collection
Inks: Distress ink Pad - Walnut Stain, Broken China, Archival Ink - Jet Black, 
Other: Tim Holtz Stencil, Seam Binding Ribbon, Button, Feather.


Fold Patterned paper to a card and die cut the edge with  Sizzix On the Edge Die - Scallops
Die cut 3 stars with Sizzix Bigz Die - Stars, Celestial and distress the edges with Distress ink Pad - Walnut Stain. Sew or glue the stars to the card. 
Die cut 2 Gift Tag with  Sizzix Bigz Die - Gift Tags
Die cut border with Sizzix Sizzlits Decorative Strip Die - Washer Border and glue it together with Gift Tag , ribbon and feather. Sew a button on the star and glue it to the card.


Distress Manila tag # 12 with Distress ink Pad - Walnut Stain and Broken China. Distress the tag with Tim Holtz Stencil....add some text and glue a Gift Tag (for journaling)  to the main tag.
Wish you a great day and thanks for stopping by.
Anne Kristine

♥♥♥♥♥

Hei alle sammen ...i dag har jeg laget et kort med Brenda Waltons Gift Tags -Sizzix Bigz Die - Gift Tags ...nydelig design pÃ¥ disse tags'ene ♥
Stjernene fant jeg pÃ¥ denne Sizzix die - Sizzix Bigz Die - Stars, Celestial 

Materialer:
657900 Sizzix Big Shot Machine Only (Powder Blue & Teal)
658730 Sizzix Bigz Die - Gift Tags
658345 Sizzix Bigz Die - Stars, Celestial 
656627 Sizzix On the Edge Die - Scallops
657826 Sizzix Sizzlits Decorative Strip Die - Washer Border

Papir: Authentique, Manila tag #12
Stempler: Stampers Anonymous Tim Holtz collection
Inks: Distress ink Pad - Walnut Stain, Broken China, Archival Ink - Jet Black, 
Annet: Tim Holtz Stensil, Seam Binding bånd, knapp, fjær.

Fold mønsterark til et kort og stans ut kanten med  Sizzix On the Edge Die - Scallops
Stans ut 3 stjerner med Sizzix Bigz Die - Stars, Celestial  og distress kantene med Distress ink Pad - Walnut Stain. Sy eller lim stjernene til kortet.
Stans ut 2 tags med Sizzix Bigz Die - Gift Tags
Stans ut borden med  Sizzix Sizzlits Decorative Strip Die - Washer Border og lim det sammen med tag, bÃ¥nd og fjær. Sy en knapp i midten av stjernen og lim det til bÃ¥ndet.
Distress Manila tag # 12 med Distress ink Pad - Walnut Stain og Broken China. Distress tag'en med Tim Holtz Stencil....stemple tekst pÃ¥ tag'en og lim Gift Tag (for journaling)  til den store tag'en.

Ha en fin dag og takk for at du stikker innom her.
Anne Kristine


Tuesday, 29 January 2013

Make your own background!


Hello!

Embossing has been a very popular technique in my scrapbook classes over the last few years. People like that you can emboss paper and turn any piece of paper into a new one, adding texture and a 3D effect to your crafty projects.

Today, I would like to show you a 8x8 layout I made, mixing patterned paper with white cardstock that I previously embossed and inked!

But first of all, here's what you'll need for this layout : 


  • Big Shot (655268)
  • Sewing and measuring Tape Embossing Folder set (657671)
  • Papers (Studio Calico)
  • Stamps (Studio Calico, Technique Tuesday)
  • Badge (October Afternoon)
  • Wood veneers (Studio Calico)
  • Alphas (American Crafts)
  • Inks (Versafine)
  • Mists (Studio Calico)
  • Cut'n'Dry foam (Ranger)


First of all, you need to cut a piece of white cardstock size 4x4". Then, insert it once inside the embossing folder and run it through your Big Shot.

As the width of the embossing folder is 4", you just have to run it through your Big Shot once.

Once your white cardstock is embossed, grab your favorite Studio Calico mists and add colors to the top embossed designs, using a cut'n'dry foam.

While you let this dry, start glueing your picture on the upper right side.

You can start stamping your background (here I used a ROAD TRIP stamp by Technique Tuesday) and create embellishments with title stamp (like the I love this life stamp by Technique Tuesday).

Once your embossed paper is dry, glue it at the top of the paper, near your photo.

Use your sewing machine and sew all around the edges.

Add your title, wood veneer embellishments, badge and label and you're good!

I am loving this size more and more so you might see more of these layouts in the near future! :D

Have a great day!
Céline