Tuesday 31 March 2015

Owl Card


Hi Sizzix fans!
The new Bigz Die Owl #2 is one of my new favourites.
I think it's just adorable and very versatile as well. 
I used this die to make a cute card for a baby girl. 


This card was entirely made with the Owl #2 die. I cut out the eyes, paws, beak, and the hearts from different papers and inked the edges. I also added a few pearls, a wood crown and several fussy cut butterflies and then my card was finished. 


Thank you for visiting the Sizzix blog today!

In Dutch:
Hoi Sizzix fans!

De nieuwe Bigz Die Owl #2 is een van mijn nieuwe favorieten.
Ik vind het zo'n schattige en veelzijdige stans..
Ik heb deze stans gebruikt om dit kaartje voor een babymeisje mee te maken.

De kaart is helemaal gemaakt met de Owl #2 stans. Ik heb de ogen, pootjes, snavel en hartjes uit verschillende vellen papier gesneden en heb de randjes aangezet met inkt. Daarna heb ik een aantal parels, een houten kroon en uitgeknipte vlindertjes toegevoegd om mijn kaart af te maken.

Bedankt voor je bezoekje aan het Sizzix blog vandaag!

Garland of paper flowers


Hello crafter,
Spring is back!!!
Finally the sun is here......and the FLOWERS bloom!
Today we present a project simple and great effect:
Garland of paper flowers


NECESSARY:

Sizzix Big Die - Camelia
Sizzix Thinlits Die Set 4PK - Sunny Flower
Sizzix Thinlits Die Set 4PK - Sweet Floral 
Sizzix Flowers Layers #9
Sizzix Flowers Layers #10
Cardstocks and paper craft
Wire thin
Glue
Hot glue
Cotton thread
Scissors


Cut the dies in the various shapes and compose to create the flowers with the stick glue using fantasy.


Shear wire thin grow on you to form a circle.
Whit cotton thread  form a noose and start to past the flowers with hot glue.


Welcome SPRING!
See you soon with a new project.....

Pasticci di Carta
Sara


Ciao a tutte,
la primavera è arrivata!
Finalmente c'è il sole e i fiori sbocciano!
Oggi vi presentiamo un progetto semplice e di grande effetto.....una ghirlanda di fiori di carta!

OCCORRENTE:
Sizzix Big Die - Camelia
Sizzix Thinlits Die Set 4PK - Sunny Flower
Sizzix Thinlits Die Set 4PK - Sweet Floral 
Sizzix Flowers Layers #9
Sizzix Flowers Layers #10
Fogli di carta scrap
Carta craft
Fil di ferro
Colla
Colla a caldo
Filo di cotone
Forbici

Tagliare le varie forme di fiori e comporle a piacere. Poi incollare con la colla stick.
Tagliare il fil di ferro e dargli una forma circolare.
Con il filo di cotone creare un cappio ed iniziare poi ad incollare i fiori con la colla a caldo.
Questo è il risultato finale!


Buona PRIMAVERA!
Ci vediamo presto con un nuovo progetto....

Pasticci di Carta
Sara

Happy Easter


Hello everybody,

Today, I am suggesting to prepare the Easter holiday by decorating a small egg box and to associate it with a card.


I kept this small box which contained 4 eggs with in mind to decorate it, fill it with chocolate eggs and offer it during Easter celebrations.


I chose to paint it using a slightly spangled pink bomb: on all surfaces, inside and outside.

The benefit of this technique is the speed of realization, within 5 minutes it's done. But it is necessary to do this in a safety way: outside or in a well-ventilated place, wearing a mask and gloves.

Let dry the box outside. Then, it's time to decorate...

Please yourself with the pretty colours of the spring! I used papers and printable labels Sizzix, which you can download for free here

I have added flowers cut in pink, yellow and fuchsia Bazzill, using the Die Flowers in 3D. This gives a lot of pep and volume to the decoration of this box.


The box closes with a small ribbon. Do not hesitate to play with the theme by adding small eggs or rabbits.

You can also decorate the inside and leave a personal message.


For the card, I used the same papers and technique for the flowers and I used the Die Leaves to create a foliage in a green Bazzill.


Here is for this Tuesday, I wish you a happy Easter holiday!

Supply list:

658300:  Sizzix Big Shot Starter Kit
656545:  Sizzix Big Die - Flowers, 3-D
657119:  Sizzix Big Die - Leaves

Paper, Alpha, Chipboards & stickers: Bella Boulevard
Strass & Doily: Scrapboukits
Cardstock: Bazzill
Paper: Easter collection Sizzix

Thank you and bye for now


*************
Joyeuses Pâques 

Aujourd'hui, je vous propose de préparer les fêtes de Pâques en décorant une petite boîte à œufs et de l'accompagner d'une carte.

J'ai récupéré cette petite boîte qui contenait 4 œufs, pour la décorer, la remplir d'oeufs en chocolat et l'offrir à l'occasion des fêtes de Pâques.

J'ai choisi de la peindre à l'aide d'une bombe rose légèrement paillettée: sur toute sa surface, intérieur comme extérieur. L'avantage de cette technique est la rapidité d'execusion, en moins de 5 minutes c'est fait, mais il faut faire ça dans les règles de l'art, c'est à dire de préférence à l'exterieur ou dans un endroit très aéré, en portant un masque et des gants. Laisser sécher aussi à l'exterieur.

Ensuite, il suffit de décorer... Faites vous plaisir avec les jolies couleurs du printemps, j'ai utilisé les papiers et les étiquettes imprimables Sizzix, que vous pouvez télécharger gratuitement ICI

J'ai ajouté des fleurs découpées dans sur Bazzill rose, jaune et fuchsia grâce au Die Flowers 3D ce qui donnent du pep's et du volume à la décoration de cette boîte.
La boîte se ferme avec un p'tit ruban et n'hésitez pas a jouer avec le thème en ajoutant des petits œufs ou des petits lapin.
Vous pouvez aussi décorer l'interieur et y laisser un petit message personnel....

Pour la carte, j'ai utilisé les même papiers et la même technique pour les fleurs, j'ai utilisé aussi le Die Leaves pour créer un feuillage dans du Bazzill vert.

Voilà pour ce mardi, je vous souhaite de très jolies fêtes de Pâques.

Merci et à très bientôt

Monday 30 March 2015

Shoefly Quilt Block


Hello Sizzix friends! 
I've not made much progress on the Vintage Dresden Quilt this month as I need to add some borders and figure out the best way to do the scalloped border - but I'm on the case ;-) Instead I thought I would share a simple Shoefly block I put together recently. 

Dies Used:
Square, 2" Finished (2.5" Unfinished) #657607
Half Square Triangle, 2.5" Finished Square # 659831

For each block cut the following;
x1 square, dark fabric 
x4 HST's, dark fabric
x4 square, light fabric
x4 HST's, light fabric


Arrange as follows. If you are using directional fabrics ensure they are placed the correct way. 


Starting with the HST units sew these together, then join so you have completed rows. Join the rows together to form your block. 


Now the fun part is to decide what I'll be turning these blocks into! Sometimes I have an urge and just have to sew a few random blocks, with no plan - though I do have a sneaky idea for these… something along the lines of this. I've had that bag pinned on my Pinterest board for-ev-er with the intention of making one similar, so maybe now is the ideal time to make it as I'm off on a trip to France next month visiting a quilt show! A quilty bag for the quilt show! Perfect.

Teaching all the goodness of Sizzix

I am really lucky to travel a lot for work, one of my favourite parts of my job is teaching die cutting in different places. I specially enjoy when it is in my native Spain, where I get to teach them in my mother tongue, Spanish. 


This is the project I taught, a 4 x 4 mini album with many different tecniques of die cutting.


Two weeks ago I taught for the second time in Mallorca where I grew up. And this time one of the students was my mum? Can you guess who she is in this photo?


Then it was time to prepare for the following workshop in a shop in Barcelona. as I was cutting loads of Frameworks and of course I was left out with loads of bits.


I thought to make pretty cocktail sticks, which are always useful in clases to poke things out of their dies and to attach glue. A fine and useful idea courtesy of Katie Skilton and Elena Roche.

In the morning I taught this Big Shot Materclass. A bit too grand of a name, but basically this frame has over 20 different techniques and 16 different materials all die cut. Form embossing and sanding to paper patchwork and duck tape.


I loved how two students made a different colour scheme. Love when they do that!


And all of them finished the project! So proud!


Just as a confirmation, I introduce you my mum! 

My mum had never till three weeks ago used a die cutting machine but recently had said how much she would like one as it would be great to create craft projects with her granddaughter as well as to incorporate elements into her sewing, her true craft. My father, a professional full time artist, is now also very very interested in the Big Shot Plus, all those textures!

And in just two weeks of having the Big Shot Plus is addicted! Everyone can die cut and everyone can have a great time crafting, even if you never thought that it would be possible.

Paula

MY THIRD QUILT: PART 7


The end is definitely in sight, I still haven't quite finished my quilt but the actual quilting is now complete.


I totally underestimated how long it would take to actually quilt the design I chose for it. It's quite a dense pattern and not being an experienced quilter I had no real idea of the amount of work involved (including all of the un-rolling and then re-rolling the sides whenever it was turned for quilting in the other direction).


I am so, so pleased with the results though, it's been well worth the effort. The quickest part of making this quilt BY FAR has been cutting all of the half-square triangles on my Big Shot (using the Half-Square Triangles, 4 1/2in Finished Square die) at the beginning!

Also since starting it I've realised how versatile half-square triangles are and noticed lots of great designs using just half-square triangles recently. It's such a useful die to have with so many options.

So all that is left now is to hand-stitch the binding down on the back and as that's my favourite bit I'm saving that job to take away with me when we go away for a couple of days during the Easter break.


The binding fabric, as with every other fabric except for one Michael Miller print (Tiny Tiles, Topaz), is Cotton and Steel. Sticking mainly with one manufacturer meant any concerns about how well or not the colours would work together were minimal, colour choice tends to be my weak spot and this seemed the safest way to use vibrant colours.

Making this quilt has been a great learning experience, along with gaining a more realistic idea of the time involved in piecing and quilting, I've got to know my new sewing machine much better too!


Sunday 29 March 2015

Monogram favor


Hello Sizzix friends!
Today I'd like to share with you a party favor idea.
When we decide to arrange a party at home or outside it is always a good idea to make a small gift for our guests.
In Italy we love this kind of candies so much that I decided to suggest you a nice way to pack them by customizing the package.
You can choose the candies according to colours or flavours.


You need:
Sizzix Big Shot Machine Only (Powder Blue & Teal) (657900)
Cardstocks (acid green, white)
Glitter silver cardstock
Plastic vial
Glue
Scissors
Lace ribbon
Baker's twine (grey-white)
Violet italian candies
 
Fill the vial with candies. 
Die cut the banners in two size (the biggest using the acid green cardstock, the small using a white cardstock).
Die cut the monogram letter using the glitter cardstock.
Die cut a small star (I used the smallest star from the Sizzix Framelits Die Set 5PK - Stars) using the acid green cardstock.
Paste the white small banner on the green big banner with the glue.
Cut the banners with a hole punch to get a tag.
Paste the monogram letter on the tag and paste the star on the plastic vial.
Place a piece of lace on the vial hole and made a knot.
Place the baker's twine on the vial hole, above the lace.
Make a knot, add the tag and make a bow.
Cut the baker's twine in excess and cut the lace.


This kind of favor is perfect for a party, to give your guests a little gift.
You can fill the vial with candies or with a message.
Thank you for reading.
See you next sunday!


*Per le lettrici italiane*
 
Buongiorno!
Oggi voglio condividere con voi un'idea per realizzare un piccolo dono per i nostri ospiti.
Quando decidiamo di organizzare una festa in casa o fuori, è sempre bello fare un piccolo dono ai nostri ospiti.
In Italia amiamo così tanto queste caramelle che ho deciso di suggerirvi un modo carino per realizzare confezioni personalizzate.
Potete scegliere le caramelle in base al gusto e ai colori disponibili magari in coordinato con le decorazioni della festa.


Ho usato:
Sizzix Big Shot Machine Only (Powder Blue & Teal) (657900)
Cartoncini (verde acido e bianco)
Cartoncino glitterato argento
Fialetta in plastica
Colla
Forbici
Nastro in pizzo
Baker's twine (grigio e bianco)
Caramelle alla violetta
 
Riempire la provetta con le caramelle.
Fustellare le due misure di banner (la più grande usando il cartoncino verde, la piccola, usando il cartoncino bianco).
Fustellare la lettera per personalizzare la confezione utilizzando il cartoncino glitterato. 
Fustellare una piccola stella (io ho usato la più piccola disponibile dal Sizzix Framelits Die Set 5PK - Stars) usando il cartoncino verde.
Incollare tra loro i due banners con della colla.
Fustellare un foro nei banner ottendendo così una tag.
Incollare la lettera sulla tag e la stella sulla provetta di plastica.
Inserire un pezzo di nastro in pizzo nel foro del coperchio della provetta e fare un nodo.
Inserire lo spago nello stesso buco, proprio sopra al nodo del pizzo.
Fare un nodo, inserire la tag e fare un fiocco.
Tagliare l'eccesso di spago e rifinire il pizzo.
 
Potete usare questa idea di confezione per le vostre feste e decidere di riempirla con caramelle oppure con un messaggio. Che ne dite?
Grazie per la visita.
A domenica prossima!

An Easter Card with Free Paper Downloads


Happy Sunday Sizzix friends!

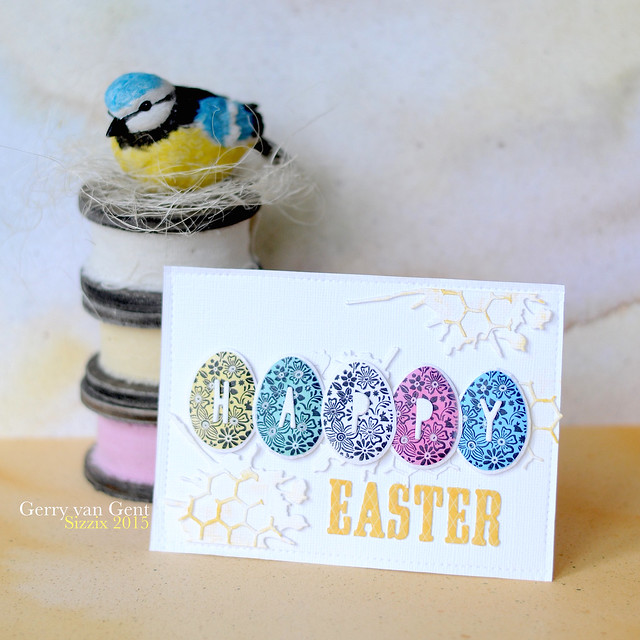
Today I have another Easter card to share with you.
This card was also created by using the gorgeous
free to download Easter papers which are available ------> HERE

Free Easter papers 2015

Happy Easter card_gerry
siz
NEW 660515 Sizzix Big Shot Plus Starter Kit
660804 Sizzix Thinlits Die Set Happiness Phrases
660220 Sizzix Thinlits Die Set Mixed Media
660222 Sizzix Thinlits Die Set Scribbles & Splat
658554 Sizzix Sizzlits Dec. Strip Alphabet Die Wanted 
*     *     *    

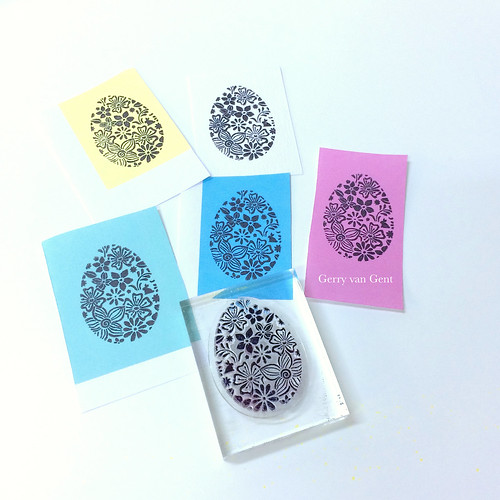
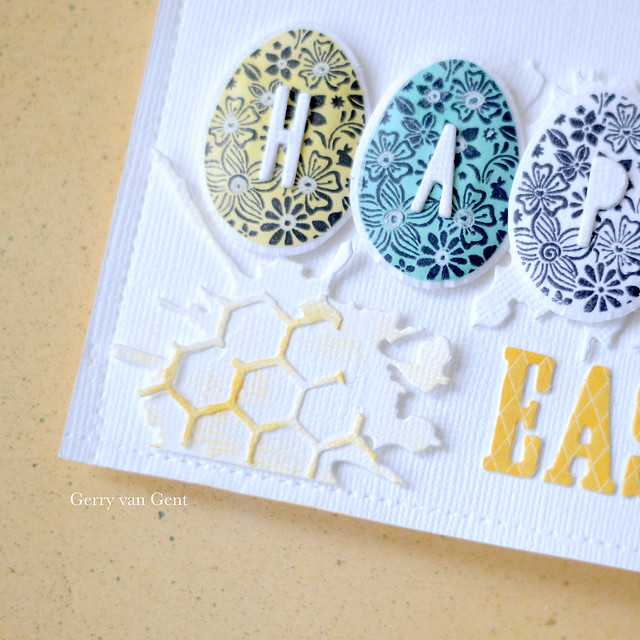
I began creating the card by stamping an egg pattern on 4
different coloured scraps from FREE EASTER PAPER DOWNLOADS.
I needed 5 eggs because of the word "happy" 
so I added a white egg in the middle....
how

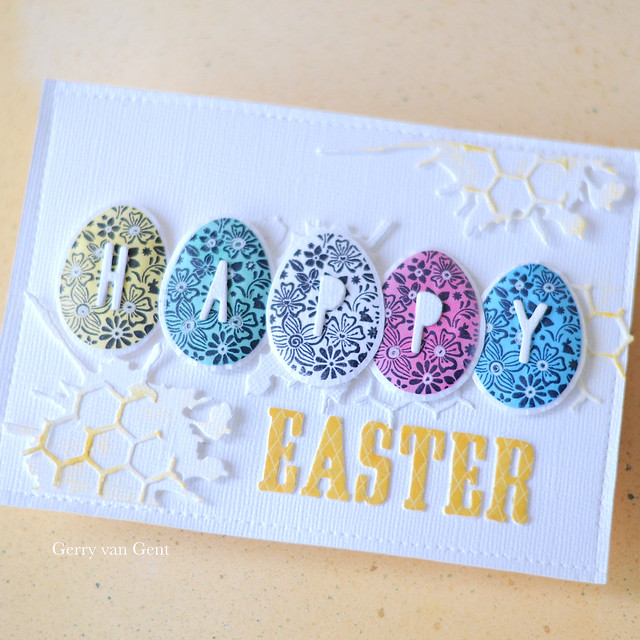
When my stamped eggs were ready I adhered them on front of the card.
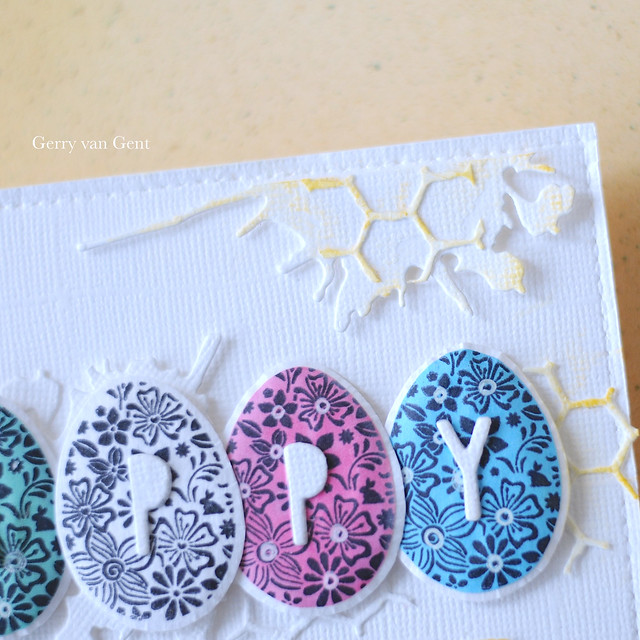
After that I added the letters H-A-P-P-Y on top of each egg.
c3

c1
I die cut the splats and honeycomb from white cardstock
and distressed them just a bit with yellow ink to match the title.
c2
OTHER PRODUCTS I USED:
clear stamp egg - brand unknown
papers "Easter" title - "Webster's Pages"
white cardstock; yellow ink
*      *      * 
Thank you for your visit!
Have a creative Sunday!