Wednesday 30 September 2015

Up, Up and away!


The title comes from a 1967 song from a band called Fifth Dimension which was part of the soundtrack of my early childhood. The second half of that line is, of course.....'in my beautiful balloon' which is where we start today's post.

Why 'Beautiful' balloon? Well, it has been designed by none other than Brenda Walton and it is one of several beautiful Thinlits dies sets in her new collection. This set also comes with a set of gorgeous text stamps which compliment the dies perfectly.I will probably showcase some of the others in the coming weeks but for now we are looking at Framelits Die Set 9PK w/Stamps - Hot Air Balloon which will be in shops from the beginning of October.

I'm also using my old favourite Mixed Media die set which always comes in very handy for mixed media and shabby chic style projects.


I am using a lovely paper pad from Studio Light which is perfect for the style that I want together with the die/stamp set. Apart from a few Distress Ink pads and some white card, that's pretty much it!


I cut a rectangle of blue patterned card and applied a few shades of brown Distress Ink around the edges before distressing and scrunching the edges concentrating on the corners. I used a fine sanding pad over the creases to add further contrast. Next I added the stamped sentiment in dark brown ink.


 I used a couple of my Mixed Media die set to add detail, I don't know what happened to the exposure on the second photo but they are the same, honest!


Time to cut the separate parts of the balloon which I then inked before putting together.


For my cloud (one of two in the set) I wanted to give the impression of sunset so I applied some Distress Inks to the base of the die-cut shape.


I took the bunting die and cut half a dozen triangles before inking the edges and gently curling up the tips. I attached them to the assembled balloon following a gentle curve.


Using double sided tape, I applied some short lengths of cotton to join the main body of the balloon to the basket.


I attached the cloud and the balloon to the background using adhesive foam pads before mounting onto a white base card.

If you like this card, and I hope you do then I must give 90% of the credit to Brenda Walton for creating such a beautiful and well thought through set of dies.


2 cool watercolor effect backgrounds


Hi everybody!

I love watercolors! and I love my embossing folders! that's why today I want to share with all of you 2 easy ways to create beautiful watercolor effect backgrounds.


Here you have a video to see what I'm saying, I'm sure you'll do a lot of times in a lot of projects!


This 2 watercolor effects are great to create all the projects you want. Here are 2 cards created with the effects you've seen me making in the video.


and some nice details


This are the Sizzix products used in this projects:
660020 Sizzix Big Shot PLUS (White & Gray)
660982 Sizzix Bigz Die - Handwritten Believe
660979 Sizzix Thinlits Die Set 11PK - Handwritten Holidays
660838 Sizzix Framelits Plus Die Set 15PK - Circles

Be Happy!!

------------------------

Hola a todo el mundo!

Me encantan las acuarelas! y me encantan mis carpetas de embossing! es por eso que hoy quiero compartir 2 formas muy fáciles de crear fondos con efecto acuarela muy chulos.

Mas arriba tienes un video para ver a lo que me refiero, estoy seguro que lo vas a hacer un montón de veces en un montón de proyectos!

Estos 2 efectos de acuarela son geniales para todos los proyectos que quieras hacer. Mas arriba hay 2 tarjetas de ejemplo creadas con los efectos que me has visto hacer en el video.

Estos son los productos Sizzix usados en estos proyectos:
660020 Sizzix Big Shot PLUS (White & Gray)
660982 Sizzix Bigz Die - Handwritten Believe
660979 Sizzix Thinlits Die Set 11PK - Handwritten Holidays
660838 Sizzix Framelits Plus Die Set 15PK - Circles

¡¡Sed muy felices!!

Tuesday 29 September 2015

Dear Santa Claus..

Hello! 
There are only three months at Christmas and my wish list is already full!

My daughter this summer that has already prepared all notes for        
Santa Claus, so I decided to write him a letter with her and send it to the North Pole. 

What do you say ? 
You have already prepared your wish list for Christmas??


NECESSARY:
Sizzix Big Shot Plus Starter Kit (White & Gray)
Sizzix Thinlits Die - From Our Home
- Cardstock or paper scrap
- Scissors
- Stick glue
- biadhesive with thickness
- felt pen
- pencil
- ruler


We see you with many new projects that I'm preparing for you for a sweet xmas :)))

Manuela
Pasticci di carta


*per i lettori italiani*
Ciao!
Mancano solo tre mesi a Natale e la mia lista dei desideri è già strapiena.

Mia figlia è da quest'estate che ha già pronti tutti gli appunti per Babbo Natale, così ho deciso di scrivergli una lettera anche io insieme a lei e di spedirla al Polo Nord.

Voi che dite?
Avete già preparato la vostra??

OCCORRENTE:
Sizzix Big Shot Plus Starter Kit (White & Gray)
Sizzix Thinlits Die - From Our Home
Sizzix Thinlits Die Set 3PK - Happy Trims
- Cartoncini o carta scrap
- forbici
- colla stick
- biadesivo con spessore
- pennarello fino
- matita
- righello

Noi ci vediamo con tanti nuovi progetti che sto preparando per voi, per un Natale coi fiocchi :)))

Manuela 
Pasticci di carta

Sailboat Mini Quilt, Part 2


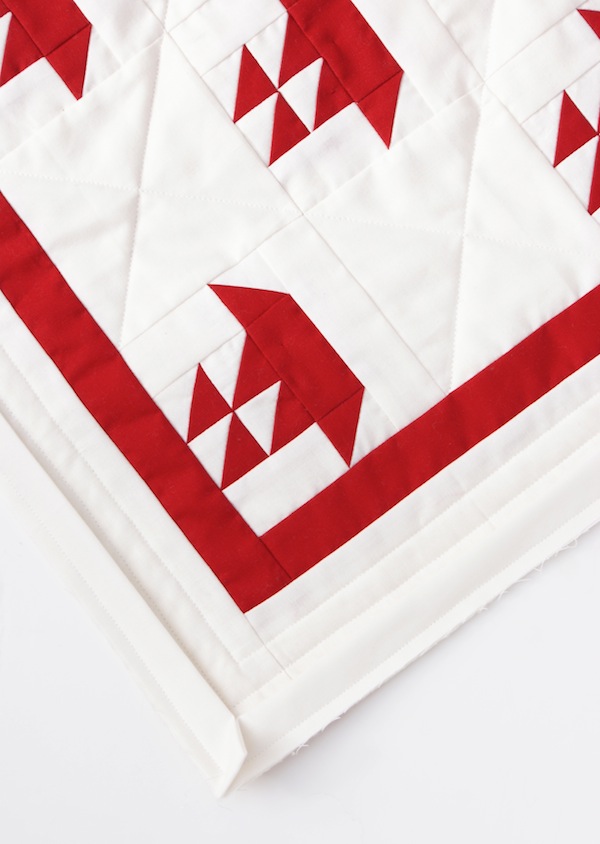
I'm back with part 2 of the Sailboat mini quilt today. A little delayed, sorry about that folks! 


Once you have your 6 sailboat blocks from part 1, cut (6) 4-1/2" blocks from white fabric. 

Arrange your blocks as follows, alternating between each. Measure the sides of your quilt and cut 1-1/2" wide strips. Press seams towards the dark side. Repeat for the top and bottom of the quilt. 


Repeat the same steps above to add the side borders. Measure the sides of the quilt and cut 3" wide strips, repeat for top and bottom. Baste quilt and quilt in a diagonal fashion in the alternate blocks. Straight line quilt 1/2" lines around the outer border.


Bind the quilt using (3) 2" x WOF strips in the matching white fabric. If you need an in-depth binding tutorial, you can find a great one here. Flip the quilt over and hand sew the binding to the backside of the quilt to finish.


Sizzix Products:
#660020 Big Shot Plus Machine
#659983 Half Square Triangles, 1-1/2in Finished Square
#658327 Strips, 1-1/2in Wide
#655267 Cutting Pads, Extended

Animal Love Lay-out

Hi Sizzix fans!
I hope you are having a wonderful week so far. As it is slowly starting to get colder in the Netherlands, I've been enjoying much craft time lately. I have also been playing around with my beautiful Sizzix dies a lot. Today I would like to show you a lay-out that I made with some of them about our cat Beertje. 


Sizzix supplies:

I wanted to decorate my lay-out with several die-cut patterns and therefore cut out two honeycomb patterns with the Thinlits Die Set Mixed Media. I attached these patterns in the corners of my lay-out. I also used some of the reverse cut-outs as details on my lay-out.


As you can see, I also cut out many hearts from the papers with the wonderful Bigz Die Heartfelt. The lovely butterflies that I added were punched out with the Paper Punch Butterfly Large. For the title 'Forever Friends', I used the beautiful Thinlits Dies Handwritten Love


I hope you enjoyed my blogpost.
Happy Tuesday and happy crafting!

In Dutch:
Hoi Sizzix fans!
Ik hoop dat jullie tot nu toe een fijne week hebben gehad. Omdat het langzamerhand steeds kouder wordt, ben ik de laatste tijd weer lekker aan het knutselen geslagen. Ik ben vooral heerlijk aan de slag gegaan met mijn Sizzix stansen. Vandaag zou ik graag een lay-out laten zien die ik met een aantal mooie stansen heb gemaakt over onze kat Beertje.

Sizzix benodigdheden:

Ik wilde mijn lay-out versieren met een aantal uitgestanste patroontjes en gebruikte daarvoor het honingraat patroon uit de Thinlits Die Set Mixed Media. Ik heb deze patroontjes in de hoeken van mijn lay-out geplakt. Ook het binnenste gedeelte van de uitgestanste patroontjes heb ik op een aantal plaatsen op mijn lay-out verwerkt.

Zoals je kunt zien, heb ik verder veel hartjes uitgestanst met de mooie Bigz Die Heartfelt. De leuke vlinders zijn verder uitgeponst Paper Punch Butterfly Large. Voor de titel 'Forever Friends' gebruikte ik de Thinlits Dies Handwritten Love

Ik hoop dat jullie mijn blogpost leuk vonden.
Nog een fijne dinsdag en veel knutselplezier!

Felt Tic Tac Toe Game for Travelling with Kids


Hi friends!

Today we will use our Big Shot to make a Felt Tic Tac Toe game for use in travel with children.

Thanks to the velcro pieces do not fall, and it can be folded and stored in a small bag.

You Need:


Cut a square of felt of the desired size. Mark with a pencil line on the board. With the sewing machine and embroidery stitch, go over the lines and make a border around the board.

We will make 8 pieces, 4 of each color. Each piece has a base of a color, we must cut twice, and decorative detail in a contrasting color, we cut simple. Cut nine squares of Velcro (male and female).

 To make each piece of flower: Sew the leaf to a flower, and the center to another flower. Sew Velcro to the flower with leaf, from the opposite side to which we have sewn leaf. Paste the two flowers with fabric textil glue, and let it dry with a weight on top.

 To make each piece of heart: Sew Velcro to one of the hearts. Paste the two hearts of the base, and the heart stalled. Leave to dry with a weight on top.

 Sew the squares of Velcro that we were on the dashboard.


 What do you think? We'll see you next week with a new tutorial!

////////////////////////////////////////////////////////////

Ciao amici!

Oggi useremo la nostra Big Shot per fare un tris in feltro da usare nei viaggi con i bambini.

Grazie al velcro le pedine non cadono, e inoltre si può piegare e sistemare dentro una piccola busta.

Materiali

Tagliare un quadrato in feltro della misura desiderata. Disegnare con una matita le linee della griglia. Con la macchina da cucire e scegliendo un punto da ricamo, ripassare le linee e fare un bordo tutto intorno alla griglia.

Dobbiamo fare 8 pedine, 4 di ogni colore. Ogni pedina ha la base in un colore, che dobbiamo tagliare doppio e dei dettagli in un altro colore constrastante, da tagliare semplice. Inoltre taglare 9 quadratini di velcro (maschio e femmina).

Per fare le pedine a forma di fiore: Cucire la foglia su uno dei fiori, e in centro all'altro. Cucire il velcro sul fiore con la foglia, del lato opposto dov'è cucita quest'ultima. Incollare i due fiori e far asciugare con peso sopra.

Per fare le pedine a forma di cuore: Cucire il velcro a uno dei cuori. Incollare i due cuori di base, e dopo incollare quello traforato. Far asciugare con peso sopra.

Cucire i quadratini di velcro rimasti sulla griglia.

Che ne pensate. Ci vediamo la settimana prossima con un altro tutorial!

////////////////////////////////////////////////////////////

Hola amigos!

Hoy usaremos nuestra Big Shot para hacer un juego Tres en línea de fieltro para usar en los viajes con los niños.

Gracias al velcro las piezas no se caen, y además puede doblarse y guardarse en una pequeña bolsa.

Materiales

Cortar un cuadrado de fieltro del tamaño deseado. Marcar con un lápiz las líneas del tablero. Con la máquina de coser y una puntada de bordado, repasar las líneas y hacer un borde alrededor del tablero.
Haremos 8 piezas, 4 de cada color. Cada pieza tiene una base de un color, que debemos cortar doble, y un detalle decorativo en un color contrastante, que cortamos simple. Cortar 9 cuadraditos de velcro (macho y hembra).

Para hacer cada pieza de flor: Coser la hoja a una de las flores, y el centro a la otra flor. Coser el velcro a la flor con la hoja, del lado opuesto al que hemos cosido la hoja. Pegar las dos flores con adhesivo para tela y dejar secar con un peso encima.

Para hacer cada pieza de corazón: Coser el velcro a uno de los corazones. Pegar los dos corazones de base, y el corazón calado. Dejar secar con un peso encima.

Coser los cuadraditos de velcro que nos quedaron en el tablero.

 Qué os parece? Nos vemos la semana que viene con un nuevo tutorial!

Clipbaord so mint!


Hi everybody!

For our Tuesday meeting, I am suggesting a bit of decoration and freshness with a clipboard that could decorate your house.


I chose to embellish this original support with a tender collection thanks to the lovely Mint colour, very trendy at the moment. 


I emphasized my picture with the die "foliage" of Tim Holtz.
I added a touch of yellow to sublimate the pastel of the flowers and the light wood of the foliage.


This clipboard has found naturally its place in my office for the greatest pleasure of my little girl Cléo!


paper: Swirlcards
strass: Scrapboukits

Have a good day,


*************

Clipbaord,


Pour notre rendez-vous du mardi, je vous propose un peu de déco et de fraîcheur avec un clipboard qui pourra décorer votre maison.

J'ai choisi d'embellir ce support original avec une collection tendre grâce à sa jolie couleur Mint très tendance en ce moment. 
J'ai mis en valeur ma photo avec le die "feuillage" de Tim Holtz
J'ai ajouté une touche de jaune pour sublimer le pastel des fleurs et le bois clair des feuillage.

Ce clipboard a trouvé tout naturellement sa place dans mon bureau pour le plus grand plaisir de ma petite Cléo!
Bonne journée à toutes et tous!

Monday 28 September 2015

Owl paper clip for your planner


Hi everybody! Elena here. 

Do you like planners? I love them and I like to decorate them seasonally. So this week I have created a paper clip perfect for autumn, with the Little Owl Thinlits Die Set from Craft Asylum.


Supply list:


To make this owl paper clip you will have to die cut the body of the owl twice and glue both front and back with some glue on the ears. Then hot glue it to the top of the paper clip. Finally, die cut the other parts of the owl and glue them to the front of the clip. 

I love how it goes with the autumn theme of my october pages in my planner, but if you aren't into planners you can use it as a bookmark.

Happy planning!

Elena


..........................

¡Hola a todos!

¿os gustan las agendas? La verdad es que a mí me encantan y además me encanta decorarlas de acuerdo con cada estación del año. Hoy os enseño este clip-búho que he hecho con sólo un troquel.

Para hacer este clip tenéis que troquelar el cuerpo del búho un par de veces y pegar las dos partes por las orejitas. Después lo pegáis a la parte superior del clip con cola caliente y le ponéis los demás detalles que lo adornan. 

Así de sencillo. me encanta cómo queda este clip en mi agenda con la decoración de otoño, aunque si no os gusta decorar vuestra agenda también lo podéis utilizar como punto de lectura.

¡Espero que os guste!

Elena