Tuesday, 4 June 2013

Prima Blog Switch - Day 2


Hello, everyone! My name is Sharon Laakkonen and I am so excited to do a Prima blog "switch" with my wonderful friends at Sizzix in Europe! And to make it even more exciting I will be showcasing some of our new Prima dies. Yes, you heard that right! Prima and Sizzix are a perfect match, right? It was so fun working with both companies to create a few projects just for you. But before I start showing you the projects, we've got a special giveaway to tell you about. Simply comment on this blog by telling us what you love about the new Prima and Sizzix collection and you could be in with a chance of winning this fabulous prize - a Big Shot machine, plus 2 dies from the new range! Closing date for comments is 9pm on Sunday 9th June. Good luck!


Right, here we go with my projects...

It's June and I can hear wedding bells all around me. I know at least ten couples who are getting married this year! (Including two of my own daughters:  Brittany and Breanna. They have both found wonderful guys. I could not be happier for them!)


So, with weddings on my mind I thought it would be lovely to create a few elegant cards with Prima's Leeza Gibbon's papers and our new Sizzix dies.


My first card is simple and sweet. It showcases gorgeous Wishes & Dreams paper, elegant die-cut swirls and a fanciful shaped border. You could seriously make this card in less than 20 minutes!

  • Cut 9 x 6 inch card. Fold in half to create a 4.5 x 6 inch card.
  • Die cut swirls, tag and border from white paper. Add to card as shown.
  • Tie tulle around card and knot. Add a large Prima flower and tuck in three die-cut leaves.
  • Add greeting and crystals.
Turquoise Congrats Card:
Prima

Wishes & Dreams paper-970031
Wishful Thinking paper-970383
Leeza Gibbon's Flower-970888
Tiny Alphas-563295

Crystals

Sizzix 


 ..............................................

My next card is a bit bolder and graphic, but I love how it still has some elegant touches!


hardest part in making this card is lining up the patterned paper text with the die cut! You could also just stamp on the label...or use letter stickers!


I just put the paper in place over the die making sure my greeting was centered. (Don't tell anyone, but I added a teensy bit of tape to hold it in place!)

  • Once the greeting was cut the card was so easy to put together! 
  • Cut a 4.5 x 11 inch card out of Wishful Thinking paper. Fold to create a 4.5 x 5.5 card.
  • Cut a 4 inch doily in half and add to both sides of the card as shown.
  • Layer tags with foam, then add the greeting.
  • Decorate with flowers, one brad, tulle, and crystal swirls (cut those in half too!)
Purple One Day Card:
Prima
Wishful Thinking papers-970321, 970383
Wishes & Dreams paper-970031
Wishful Thinking Brad-970451
Divine Flowers-565268
Frost Flowers-565787
Crystals-563622

Sizzix
Bigz Die - Elisse-Tags 658526
Bigz Die - Estate-Label 658527

                                                  ..............................................

The last project is my favorite! Start with the large flower die to create your card base. (Cut two of these, flipping the paper over for the second cut. Glue the two flower shapes together back-to-back making sure they match up.)


Cross seam binding as shown and set on top of the large flower. Adhere a medium paper flower on top to sandwich the ribbon.


Decorate with flowers, leaves, tulle, a greeting, a twine bow, and a butterfly. 
Write your personal message to the bride and groom on the back and tape to a gift. The newlyweds can hang this tag around their new home as a reminder that love is everlasting!

Love Everlasting Tag
Prima
Wishful Thinking paper-970383
Wishes & Dream paper-970031
Frost Flowers-565787
Divine Flowers-565268, 565251
Divine Rose-565282 
Papillon Butterfly-543839
Divine Stickers-563264
Precious Metals Leaves-547394

Sizzix

 ..............................................

I hope you enjoyed the wedding cards and tag! (You could easily use these designs for other occasions by simply switching out the greetings.)


Be sure and check out the Prima blog as we will be featuring three amazing Sizzix designers this week! 

A little gift box


Hi Everyone.
Today I will show you a little gift box using different sorts of  Sizzix dies.
 Items used:
Big Shot Starter Set 658300
Flowers, Lovely 658291
Mini branch and Leaves Set 657208
Supply list:
Paper: Riddersholm Design -Chantilly Dawn and -Flea Fall Market-
Ink: Distress ink- Vintage Photo-, Peeled Paint-
Brads,recycled cardstock,green cardstock
How to make:
Die cut using Flowers, Lovely and dies from the starter kit.
 Use  lot of water and 5 or 6 die cut to one flower
Die cut using recycled cardstock


 I hope you enjoyed my project today. have a great week, see you  next  Tuesday
Pia

 Hej alle
Idag har jeg en lille gavebox at vise hvor jeg har brugt forskellige Sizzix dies.
Dies jeg har brugt:
Big Shot Starter Set 658300
Flowers, Lovely 658291
Mini branch and Leaves Set 657208
Andre materialer:
Papir: Riddersholm Design -Chantilly Dawn and -Flea Fall Market-
Ink: Distress ink- Vintage Photo-, Peeled Paint-
Brads,genbrugs pap,grøn karton
Sådan gør du::
Stands ud  Flowers, Lovely og dies fra starter kit og følg anvisningen på foto.
jeg håber det har været til inspiration, du må have en dejlig uge, vi ses næste tirsdag
Pia

"Tag - Pocket"


Hi everybody....today I have a "Tag - Pocket" filled with chocolate to show you. Perfect as a small gift to a friend. 


Supply list: 
Sizzix Texture Fades Embossing Folder 2 set - Checkerboard & Cracked Embossing

Manila Tag # 12
Inks: Distress Stain - Tumbled Glass, Picked Raspberry, Seedless Preserves, Chrused Olive, Peeled Paint, Shabby Shutter, Mowed Lawn.  Distress Ink Pad - Walnut Stain, Wild Honey, Salty Ocean, Archival Ink - Jet Black
Stamps: Stampers Anonymous Tim Holtz Collection.
Other:Perfect Pearls - Blue Raspberry, Pink Gumball, Seam Binding Ribbon, cheesecloth.


How to do:

Distress Manila Tag # 12 with Tumbled Glass  and Perfect Pearls - Blue Raspberry on the top of the tag. Distress the bottom of the tag with Distress Stain - Chrused Olive, Peeled Paint plus water. 
Ink embossing folder with Distress Ink Pad - Salty Ocean and emboss the tag.
Die Cut the bottom of the tag with 657183 Sizzix On the Edge Die - Twigs
Distress Manila Kraft with  Distress Stain - Picked Raspberry, Seedless Preserves and Perfect Pearls - Pink Gumball. 
Die cut Butterfly with Sizzix Big Shot Starter Kit
Ink cheesecloth with Distress Stain - Shabby Shutter, Mowed Lawn.
Sew or glue the tag to a pocket.


Thanks for stopping by!
Anne Kristine

Hei alle sammen... i dag har jeg en "tag m/lomme" fyllt med sjokolade å vise deg. En perfekt liten gave å gi til en venn.

Materialer: 
Sizzix Texture Fades Embossing Folder 2 set - Checkerboard & Cracked Embossing

Manila Tag # 12
Inks: Distress Stain - Tumbled Glass, Picked Raspberry, Seedless Preserves, Chrused Olive, Peeled Paint, Shabby Shutter, Mowed Lawn.  Distress Ink Pad - Walnut Stain, Wild Honey, Salty Ocean, Archival Ink - Jet Black
Stempler: Stampers Anonymous Tim Holtz Collection.
Annet: Perfect Pearls - Blue Raspberry, Pink Gumball, Seam Binding bånd, osteklut.

Beskrivelse:
Distress Manila Tag # 12 med Tumbled Glass og Perfect Pearls - Blue Raspberry på toppen av tag'en. Distress bunnen av tag'en med Distress Stain - Chrused Olive, Peeled Paint plus water. 
Farg embossing folder med Distress Ink Pad - Salty Ocean og emboss tag'en.
Stans ut bunnen av tag'en med 657183 Sizzix On the Edge Die - Twigs
Distress Manila Kraft med  Distress Stain - Picked Raspberry, Seedless Preserves og Perfect Pearls - Pink Gumball. 
Stans ut sommerfuglen med  Sizzix Big Shot Starter Kit
Farg ostekluten med Distress Stain - Shabby Shutter, Mowed Lawn.
Sy eller lim tag'en til en lomme.
 
Takk for at du stikker innom her.
Anne Kristine


Monday, 3 June 2013

Layered layouts with Sizzix Sizzlits!


Hi again! I've been very busy travelling and teaching classes in beautiful, sunny Brazil so today I've got a new dimensional layout for you! It is just amazing how easy it is to construct interesting, detailed composition using scraps of paper and Sizzix Sizzlits Dies together with Sizzlits Decorative Strips to cut out elements for layering. 
Here is the example of using white cut outs on colorful layout - white negative space and intricate, beautiful Sizzix cut-outs give a lot of fresh air to the project. 


I love using scraps and torn elements - I cut my cut outs into smaller pieces, tear and distress them. The more I can add to the page - the better! Here you can see how they are layered in between the papers , doilies and tags:


And finally - here are the dies I used: 
- 658506 - Sizzix Sizzlits Die - Vintage Doily
- 657996 - Sizzix Sizzlits Die - Card, Scallop Circle Insert
- 658001 - Sizzix Sizzlits Decorative Strip Die - Interlocking Circles


I hope you will have a great creative week - I'll be back soon with more Sizzix-inspired creations for you!
xoxo
Finn

Prima blog switch - day 1


Hi everybody! Elena here. Today I'm very excited about the new range of Sizzix dies in collaboration with Prima that is being released this month. I love all of them!

And I want to invite you to the Prima blog, where I'm sharing two projects I have created using these dies and Prima products.

See you there!


¡Hola a todos!Hoy estoy muy contenta sobre la nueva colección de troqueles que Sizzix ha sacado este mes en colaboración con Prima. ¡Son preciosos!

Y os quiero invitar al blog de Prima, donde comparto dos proyectos que he creado usando estos troqueles y productos de Prima.

¡Nos vemos allí!


I need your help!


This weekend I started converting what was our dressing room (and by rights should be our spare bedroom) into a sewing room. I can't even begin to tell you how exciting that is for me! I used to rent a studio space but that didn't really work out all that well, although I loved it, it was expensive and I didn't use it as much as I should have because (quite honestly) I like being at home, in my jammies and my slippers

I currently use the dining room and kitchen to sew in, which is great to be able to spread out and take over the whole area but once I pick my kids up from school it becomes family space again and so from 3pm onwards my stuff is stacked in a huge mess either on the floor or pushed towards the far end of the dining table. It's not great when you're halfway through working on something, and it's especially not great when you're halfway through cutting stuff out - I always seem to end up losing bits and pieces or forget how far I've got with my cutting.

My new space isn't huge - it's about 10 ft square so I have to be very careful in how I plan where things go. I have my sewing machine, of course, a big shot pro (which is a big machine!) as well as my big shot and all my dies. The big shot pro will probably live on the floor under my cutting table and be lifted onto it when I use it (even as I'm typing that my arms are aching at the thought. But won't I have amazing upper arms with all that lifting?!)

At the moment it's pretty much a blank canvas. Eventually I'd like to get some nice flooring but to save money I've whitewashed the floorboards and I've seen a big rug that will fit perfectly and add a bright splash of colour. I'm also thinking that the big wall straight ahead will be the perfect place for a design wall (so I don't need to worry too much about my paint job...I'll admit painting and decorating is not one of my strong points!)

Untitled

I'll have a lot of shelves built into this unit pictured below (you can see I've started with those) but I'd love your suggestions on storage for my dies because right now they live in a sideboard which will stay downstairs in the dining room (and will again have dining room things in it - fancy that! A dining room sideboard with actual dining ware in!)

Untitled

How do you store yours? How should I store mine? How should I store everything to be quite honest - so it's neat but easily accessible. I don't have room for more furniture, I do have wall space for shelving but I'd quite like to have my precious room to be (potentially) tidy. It will probably not be all that tidy at all, but if I have the systems in place I'm more likely to be tidy - right? I really value your opinions, I have to admit I'm a bit stuck and I'm not sure what to do with them. I also have a tendency to rush out and buy a load of impractical storage that ends up being completely useless!!!


Sunday, 2 June 2013

"It`s Time for lunch" by Gerry van Gent


Hello Sizzix friends & Happy Sunday!
Today I have a layout to share with you where
I combined a few different Sizzix dies as part of my design.
658701 Sizzix Framelits Die Set w/Stamps Word Labels 
658951 Sizzix Thinlits Die Ornate Hanging Sign 
658947 Sizzix Thinlits Die Set Doily & Doily Border 
658506 Sizzix Sizzlits Die Vintage Doily
657701 Sizzix Sizzlits Die Crescent, Ornate
658072 Sizzix Sizzlits Dec. Strip Die Card Edges, Dec. Accents & Leaves

Here are a few close-ups for you....
The clear stamps were used as part of the background.


Other products I used:
Webster's Pages - NEW "Citrus Squeeze" paper collection
Webster's Pages - rubber stamps
Webster's Pages - ribbon  

*  *  *
Dutch Tranlsation

Hallo Sizzix vrienden & fijne zondag!
Ik wil graag vandaag een scrapbook pagina met jullie delen 
waar ik verschillend Sizzix stansjes gebruikt heb.

Gebruikte materialen:
658701 Sizzix Framelits Die Set w/Stamps Word Labels 
658951 Sizzix Thinlits Die Ornate Hanging Sign 
658947 Sizzix Thinlits Die Set Doily & Doily Border 
658506 Sizzix Sizzlits Die Vintage Doily
657701 Sizzix Sizzlits Die Crescent, Ornate
658072 Sizzix Sizzlits Dec. Strip Die Card Edges, Dec. Accents & Leaves

*  *  *
De stempels zijn gebruikt als onderdeel van de achtergrond.
*  *  *

Have a Great Week!

Baby layout


Hi!
Time for a Sunday layout from me. 
It is in bright happy colours. 
And I have used some of my favourite Sizzix dies - frames, stripes and doilies.
I hope you enjoy it!


658949 Sizzix Thinlitz Die - Frame, Ornate Oval

Have a nice Sunday!
See you next week.

Camilla

******************************************************

Hej!
Det är dags för en söndagslayout från mig.
Den har starka och glada färger.
Och jag har använt några av mina favoritdies från Sizzix - ramar, remsor och doilies.
Jag hoppas att ni gillar den!


Ha en härlig söndag!
Vi ses nästa vecka.

Camilla

Saturday, 1 June 2013

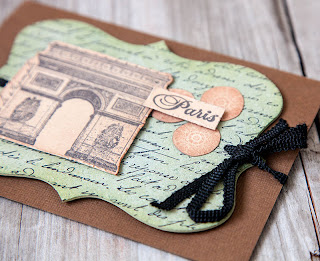
Ornamental Paris Card


Hi everyone! Today I'd like to share a card using the Ornamental Movers and Shapers die with grungeboard and Darkroom Door stamps:


I love that you can cut thick pieces of grungeboard, chipboard, fabric and lots of other materials using this die.


 Here's how I made the card:

Arc De Triomphe
1. Fold a 210mm x 150mm piece of dark brown cardstock in half to form a horizontally opening card.
2. Die cut Grungeboard with Tim Holtz 'Ornamental' die. Sponge with Forest Moss and Stormy Sky Distress Ink. Stamp French Script Background Stamp over the top with Archival Jet Black inkpad.
3. Punch a hole on the left and right sides of the grungeboard using a Crop A Dile. Thread black ribbon through both holes.
4. Adhere Grungeboard to card using foam tape. Finish wrapping the ribbon around the inside of the card and tie on the right hand side of the card as shown.
5. Stamp Arc de Triomphe from the DDRS050 Champs Elysee stamp set onto Fawn Cardstock with Jet Black ink. Trim and sponge edges with Vintage Photo Distress Ink. Adhere to left side of grungeboard.
6. Stamp the little flower from the same set onto Fawn cardstock using Sepia ink three times. Trim around each flower and sponge the edges. Adhere to the grungeboard.
7. Stamp ‘Paris’ from the ‘Cafe de Paris’ stamp from the Champs Elysee stamp set using Jet Black ink. Distress the edges with a paper distresser and adhere to the grungeboard with foam adhesive.


I hope you enjoyed today's inspiration!

Have a great weekend!

Rachel