Monday, 27 May 2013

Sweet as sugar tag


We are already in the 3rd week of my Starter Kit Series! There is only one more to go, and it is a such a pity, because I'm having so much fun playing with this awesome kit. The possibilities are endless!


Today I am showing you how to make a tag with lots of elements, using a layering technique that is very funny and creative. Let's Start!


Supply list:
  • 658300 Sizzix Big Shot Starter Kit (Powder Blue & Teal)
  • Manila tag
  • Cardstock and paper scraps
  • Distress ink
  • Background stamp
  • Adhesives: Liquid glue, foam squares, glue dots
  • Embellishments: Ribbon, twine, stickers, buttons, rhinestones, washi tape, paper clips...
  • Others: Black gel pen, mini stapler
Start by preparing your manila tag with some distress ink and a background stamp. Then select 3 or 4 pieces of different colors of cardstock and die cut a bunch os shapes from your Starter Kit. Then place all your die cuts and your embellishments on your work surface and start creating the different layers. Place your bigger elements on your first layer and place them in the middle of the tag. Then keep creating more and more layers with smaller elements and at the end put some small details, like pins, rhinestones and, of course, some dash lines with a black gel pen.


Tags are always so fun to create, and the layering technique si perfect for these little pieces of art. You just have to be creative and keep layering and layering until you are happy with the results. And, believe me, the hardest part about this technique is knowing when to stop :)


Happy Monday!

..................................
¡Ya estamos en la tercera semana de mi Starter Kit Series! Solo queda una más, y es una pena, porque me estoy divirtiendo mucho jugando con este kit, ¡las posibilidades son infinitas!
Hoy os voy a enseñar cómo hacer un tag con muchos elementos, usando la técnica de las capas que es muy divertida y creativa. ¡Empezamos!

Materiales:
  • 658300 Sizzix Big Shot Starter Kit (Powder Blue & Teal)
  • Etiqueta de almacén
  • Restos de cartulinas y papeles
  • Distress ink
  • Sello de fondo
  • Adhesivos: pegamento líquido, foam adhesivo, glue dots
  • Embellecedores: Cinta, cordón, pegatinas, botones, brillantitos, washi tape, clips de papel...
  • Otros: Rotulador negro, grapadora
Empieza preparando tu etiqueta de almacén con tinta distress y un sello de fondo. Después selecciona tres o cuatro colores de cartulina y troquela un montón de formas de tu Starter Kit. Una vez hecho esto, coloca todos tus elementos encima de tu mesa: las formas troqueladas y todo lo que se te ocurra que puedas utilizar: blondas, cintas, pegatinas, botones... Empieza la primera capa poniendo los elementos más grandes en medio del tag. Después sigue creando capas con elementos más pequeños rodeando la primera capa y al final pon los detalles más pequeños, como los brillantitos, los alfileres y, por supuesto, el toque de rotulador negro.
Los tags son siempre muy divertidos de hacer, y la técnica de las capas es perfecta para ellos, solo tienes que ser creativo y poner capas y capas hasta que estés satisfecho con el resultado. Y, créeme, lo más difícil de esta técnica es saber cuándo hay que parar :)

¡Feliz lunes!

what a bind!


Every month I do some projects for Sizzix that are for editorials or projects that will (soon) be tutorials on the website and I thought it might be helpful to have a binding tutorial in one place for quick reference (please excuse the 11 billionty photos


bindings in progress

There are hundreds of tutorials for binding quilts online, but this is my slightly cheating, ever so easy binding tutorial.

First up you need to measure your quilt around the perimeter - so all 4 sides. Then add on 10" for good measure (to allow for when you miter the corners and to make finishing the ends easier)

Divide the total number by the measurement of the width of your binding fabric. In this case 42" (most fabrics are between 40" and 44" wide from selvedge to selvedge). This number is the how many strips you need to cut.

making binding

I like to make my double fold binding using the 2 1/2" strip die. This gives you a slightly wide binding on the back of the quilt. This isn't set in stone - some people prefer a narrower binding, but I like the look of the wider binding on the reverse of the quilt, and so that's what we're doing today!

Press your fabric well and trim off the selvedge.

Using the 2 1/2" strip die cut the number of strips you calculated.

Sew these strips end to end using a generous 1/4" seam. Press the seams to one side, all in the same direction.

making binding

Now fold in half all along the length, wrong sides together, and press.

making binding

I like to wind my binding onto an empty thread spool, so I can pop this spool onto the spare spool holder on my machine when I'm sewing on the binding, it helps keep it nice and tidy and stops it getting tangled up as you sew.

making binding

Now you're ready to attach the binding to your quilt.

Starting in the middle of one side of your quilt, match up the raw edges of the binding to the raw edge of your quilt. Leave a tail of about 4 or 5"


binding 5

Use a 1/4" seam (a walking foot is a good idea because you're stitching through multiple layers and the binding might be stretchier than the quilt) and sew along until you get to 1/4" from the first corner. Stop and backstitch. Fold up the binding at a 90 degree angle.

binding 6

  Fold right back onto itself. This gives you a mitered corner that you want when you finish sewing the binding to the reverse of the quilt.

binding 7

  Start sewing again from the very edge. Backstitch again and continue using a 1/4" seam

binding 8

  Continue doing the same with the other corners as you just did (stop 1/4" from the end, fold up 90 degrees, fold back down and sew on) and then stop (secure with a backstitch or 2) about a hand's width or so away from where you started. You'll have another tail, just like you started with (or longer - it's ok, you'll trim it in a bit - you can keep all the tails and leftovers from binding and sew them together into one lovely scrappy binding)

Binding tutorial

  Now this is the cheaty bit. Fold those tails up towards each other and press down to create a fold.

binding 10

  Pin the binding together at either side of the fold

binding 11

  And sew along the fold

binding 12

  Open out the seam (you can press to one side if you prefer), trim off the tails to 1/4" and finish stitching the binding on.

binding 13

  Flip the binding over to the reverse and hold in place with hair clips (if you're cheap like me) or binding clips (which look exactly the same but are silver and not lovely pretty pink clips) Hand stitch the binding to the reverse of the quilt using a thread that matches and small whipstitches.

binding 14

  To get nice sharp corners fold the edge of the binding down and stitch up to the corner. Take the next edge and fold down tightly, you might need to wiggle the corner about a bit to get it nice and tidy, but a few wiggles and you'll have a lovely corner. It'll pretty much fall into place without a lot of work, because you did the front correctly when you sewed the binding on, remember?

Tidy corners

And that's it. 
Go forth and bind!!

Sunday, 26 May 2013

A Bunch of Flowers


 Good morning!
I have made a card to show you today. I have used the gorgeous bird cage die together with a Bunch of Flowers dies. They are really versatile - you can make fabulous flowers with these dies. The papers are from Maja Design. As a flower center I used some pearls to keep it simple.


And a close-up of the flowers.


Have a great Sunday!

Camilla

************************************************

God morgon!
Jag har gjort ett kort att visa er idag. Jag har använt den fina Bird Cage dien och A Bunch of Flowers dies. De är verkligen användbara - du kan göra fantastiskt fina blommor med dessa dies. Pappren kommer från Maja Design. Jag använde några pärlor till att ha som blommornas mitt för att hålla det enkelt.


Ha en härlig söndag!

Camilla

Saturday, 25 May 2013

Washi Tape Gift Card Folder


It's getting to be that time of year when the graduation announcements, wedding and shower invitations are rolling in. Because our family is spread out all over the country, we often choose to send gift cards to celebrate happy events. I like to make them special by making fun gift card folders to personalize them.  I used washi tape and the new Sizzix ScoreBoard Gift Card Folder to create this project. 

Sizzix Supplies:
658054  Gift Card Folder and Label- ScoreBoard
657119  Leaves

Other Supplies:
washi tape, Clearsnap Chalk Inks, twine, ribbon, letter and number stamps, Scotch ATG gun 


 opening....
ta-dah!
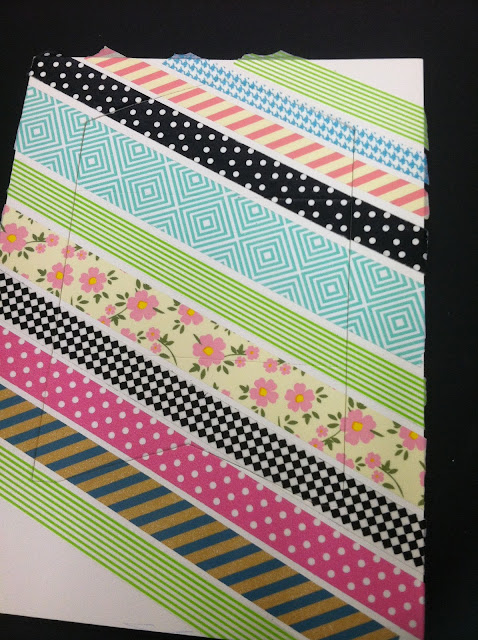
First, cover a sheet of matboard with washi tape striped on a diagonal leaving a little room in between each piece. Then die cut a Gift Card Folder from that matboard, making sure to lay the tape side facing the die.
First, cover a sheet of matboard with washi tape striped on a diagonal leaving a little room in between each piece. Then die cut a Gift Card Folder from that matboard, making sure to lay the tape side facing the die. 
Die cut a Gift Card Folder from that matboard, making sure to lay the tape side facing the die. 
Fold die up on score lines into folder shape.
Smear inks randomly on the inside of the folder. Blend with a sponge.

Emboss a coupon envelope with the word Congratulations. Adhere to folder.
 Ink lightly to bring out the words. Slip gift card inside.
I wound up inking the edges and open areas that did not have 
tape on them in brown at the last minute.
Add embellishments to folder.
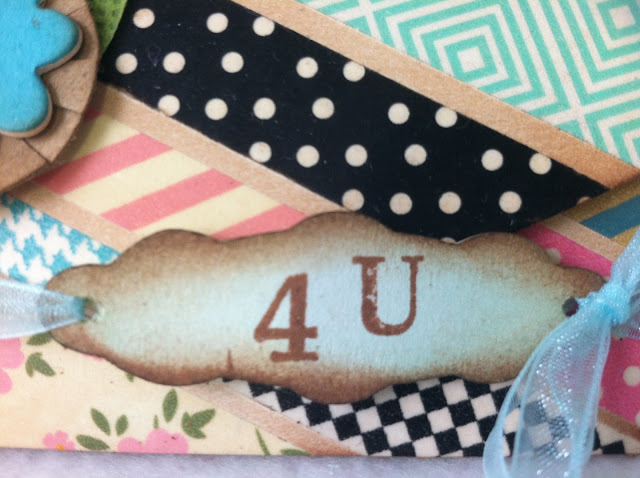
Stamp 4 U on the label and tie firmly around folder. To open it, 
just slip the label down to the bottom and open the flap!

Love your garden? Next time I will have samples from my brand new Picket Fence collection! So excited that they will finally be in stores. Have a great weekend... Eileen

Making a personalised Toddler Union Jack T Shirt


Hello, I am back after a bit of a rest!
I am so happy to be able to share here how to easily and cheaply personalize a blank T-shirt.

For this project I used the following:
Sizzix Big Shot
Sizzix Bigz XL Alphabet Die - Block Talk - 658563
Sizzix Bigz Die w/Bonus Textured Impressions - Union Jack - 658296

Basic Grey Hello Luscious Fabric, Jelly Rolls
Heat & Bond Ultra Hold Iron On adhesive


In this case I wanted to do one for my nephew. He is a lovely one year old boy but as he lives in Vancouver, Canada, we dont see him often enough. As I want him to remember his aunt an oncle living in the UK, I thought a T-shirt with the Union Jack die could be a good idea. I selected the materials I wanted to use, I thought it would be nice to have some soft colours with small patterns perfect for die cutting.


I hate waste, so I cut small (approx. 6" by 6") pieces of the material and iron them onto the exposed side of the Heat & Bond Ultra which is the best option of a fusible interfacing that I have found for die cutting.
As I am not the world best sewer so I I decided to use the Ultra instead of the Lite version of the Heat & Bond because I knew I would not enjoy the sewing afterwards. Hopefully, the Ultra version should  withstand machine washing, something essential for a toddler!


Once the Heat and Bond has cooled down completely - very important - I die cut the Union Jack motive placing the fabric side down.


I placed the cut outs on the front of the T-Shirt. I like to make sure the colours and patterns work well.


I remove the backing - from the Heat and Bond, place the cross first as centred as possible on the front and then I  iron it on following the instructions from the adhesive manufacturer.


I then die cut a scrap piece of coloured card using the Union Jack to use as a template. I tested its resistance to heat before hand! The template is essential to position the small pieces in the right place.


Then I iron them all in place through the template, so nothing moves.


And voila, there you have it! The fabric pieces are perfectly attached to the T shirt. If you are a good sewer, unlike me, and you would like to sew the pieces I would then recommend to use the Heat & Bond Lite version instead.


Then I proceed to cut the letters to really personalised the back of the T-Shirt. I used the fantastic Block Talk Bigz XL die. It is fantastic for fabric die cutting as well as for tradicional paper crafting.


I laid the letters on and iron them out.  And that was it.


All in all, it didn't take long to make at all once I knew what I wanted to do and what dies with which materials. So know I can repeat this project changing the patterns and colours to suit my nieces tastes.