Thursday, 27 November 2014

Christmas tree decorations with Karine


Hello,

This week the whole Sizzix team will propose nice ideas to decorate your Christmas Tree! This year, I chose pastel feminine shades for a merry colourful tree!

Supply List:

Very Merry Kit: entreartistes.fr
Cardstock: American Crafts
Badges: Freckled Fawn
Gold twine
Gold cloth
Golden label: Ephéméria

Dies:

658300 : Sizzix Big Shot Starter Kit
659978 : Sizzix Thinlits Die Set 9PK-Winter Borders & Rosette
659994 : Sizzix Bigz Die Snowflakes #3

Have fun cutting loads of rosettes to create your own Christmas decorations! I cut my first shape out of white cardstock; it is glued with double-sided tape. At the back, a little gold thread is glued so that it could be hung to the Christmas tree. The embellishments have to be minimalist and light so as to hang properly.

Instead of using a star at the top of the tree, I cut a large snowflake out of gold cloth. Its center is decorated with a Freckled Fawn badge.

Little golden bows and pink snowflakes will come as a completion.

We only have a week left to wait before decorating the Christmas Tree! I’ll be cutting out die cuts while waiting for this moment :-)


Have a lovely day,


Karine

Bonjour,

Toute l'équipe de Sizzix vous propose cette semaine de jolies idées pour décorer votre arbre de Noël ! Cette année j'ai choisi la couleur, des teintes pastels et féminines pour un sapin acidulé !

Matériel :

Very Merry Kit :entreartistes.fr
Cardstock : American Crafts
Badges : Freckled Fawn
Ficelle dorée
Tissu or
Etiquette dorée : Ephéméria

Dies utilisés :

658300 : Sizzix Big Shot Starter Kit
659978 : Sizzix Thinlits Die Set 9PK-Winter Borders & Rosette
659994 : Sizzix Bigz Die Snowflakes #3

Usez et abusez des rosettes pour fabriquer vos propres décorations de Noël ! J'ai découpé ma première forme dans du cardstock blanc, elle est fixée avec du double face. Au dos un petit lien doré est collé pour pouvoir accrocher ma décoration au sapin. Les embellissements se doivent d'être minimalistes et légers pour tenir.

En guise d'étoile qui sera fixée en haut tout en haut du sapin, j'ai découpé un grand flocon dans du tissu doré. Le centre est décoré avec un badge Freckled Fawn.

Des petits noeuds dorés et des flocons roses viendront compléter ma décoration.

Plus qu'une semaine à attendre et nous ferons le sapin ! En attendant je continue mes découpes :)

Bonne journée

Karine

Wednesday, 26 November 2014

Owl be home for Christmas!


Oooh! that's a bad pun, even by my standards which are pretty low!
Last week when I was making the Santa/Rudolph gift boxes I mentioned in passing that people are doing some amazing things with owls. Owls seem to be one of the things to hang on your tree this year so I thought why not?

The dies I used are;
 I started by die-cutting, folding and gluing my box from heavyweight ivory card. Next I die-cut a selection of festive greenery from the same card before delicately inking the tips using 'Antique Linen' Distress Ink. Next I applied a little glue to the tips with my fingers and added some Distress glitter and a strategic smattering of sand coloured glitter before using them to cover the box as shown below.
I die-cut two of the smaller paper rosettes and inked the edges before assembling each one and placing a large pearl brad in the centre. Next, I used my finger to apply a little PVA glue around the edges before dipping them in Stampendous Glass Glitter.

To make the owl's beak I die-cut a small heart using one of the Framelits Heart dies before inking and applying more glass glitter.
All that was left to do was to attach the eyes and beak with a glue gun before inserting a loop of string through the hole in the top. The beauty of this decoration is that it can also contain a few goodies or a small gift. I hope you enjoyed it, I know I had fun?


Christmas Trees for the Christmas Tree


The third week of the Christmas Challenge 2014 will be filled with ideas for ornaments you can create using Sizzix products. I've made a trio of white glittery trees that can go on the Christmas tree or (as will be the case in our home) can be hung in a window or somewhere else in your home.


I used the Triplits Die Set 14PK - Christmas Trees to create all three trees. This set lets you mix and match various dies to create your own unique trees. For all my tree I diecut the tree base in both cardstock and glitter wrapping paper and then I diecut the details in cardstock as well.


Once I had done the fronts of my three trees (adding a little red heart diecut using a die from
Thinlits Die Set 10PK - Phrase Cards) I felt that the backs of the trees needed a little TLC. I was happy to see that the details for the larger trees would work on the back as well as on the front. For the smaller trees I diecut glitter paper circles using the smaller dies that comes with the set and added them were there are holes on the front of the tree.


Now all that is left is to hang the ornaments and enjoy them throughout December - and I like knowing that no matter which way the ornaments turn they look nice.

Supply list:
Sizzix Big Shot Starter Kit (Powder Blue & Teal)
Sizzix Accessory - Magnetic Platform for Wafer-Thin Dies
Cardstock
Glitter wrapping paper
Silver thread (DMC)
Glossy Accent (Ranger)

---o---

Denne tredje uge af Christmas Challenge 2014 er fuld af ophæng til træet eller andre steder i dit hjem, og jeg bidrager med en trio af juletræer.

Jeg brugte Triplits Die Set 14PK - Christmas Trees til at lave alle tre træer. Diesættet lader dig mixe og matche forskellige dies, og derved kan du skabe dine helt egne unikke træer. Jeg udskar træernes base i både karton og glimmer-gavepapir, og så udstansede jeg detaljerne i samme karton som basen.

Da jeg havde lavede fronterne til alle tre træer (med et lille rødt hjerte fra Thinlits Die Set 10PK - Phrase Cards som ekstra dekoration), syntes jeg, at træernes bagsider manglede lidt omsorg. Heldigvis passede detaljerne til det store træ både på for- og bagside, så det var nemt at pynte det store træs bagside. Til de små træer brugte jeg de to cirkeldies, der er med i Triplits Die Set 14PK - Christmas Trees til at udstanse cirkerl, som jeg monterede på bagsiden af de små træer, hvor der er huller på forsiden.

Nu er det eneste, der er tilbage at gøre at hænge træerne op og nyde dem gennem december - og jeg er godt tilfreds med, at det er lige meget, hvordan træerne drejer sig, så er de fint afsluttede og pyntede.
Ingredienser:
Sizzix Big Shot Starter Kit (Powder Blue & Teal)
Sizzix Accessory - Magnetic Platform for Wafer-Thin Dies
Karton
Glimmer-gavepapir
Sølvtråd (DMC)
Glossy Accent (Ranger)

Christmas Challenge 2014 - Tree Decorations


Hello to all:) This week we have a theme "Tree Decorations". I like recycling so I used some old pages for this decoration. What a more, this is really quick to do:)

Sizzix products:
Sizzix Big Shot Machine 657900
Sizzix Bigz Die - Heart Pendant 659244


 Take six pages and cut the hearts out using die Sizzix Bigz Die - Heart Pendant 659244 . The pages are so thin that you can cut all the siz at the same time. Emboss all the frame hearts randomly using embossing folder "Snowflake" or other suitable. You can also skip this if yo want:)
After embossing place all the six hearts and frames one on the other and sew them together like in the picture. Finally open the pendant and hang up!


Happy crafting, Minna

*    *    *    *

Moi, tällä viikolla teemana kuusenkoristeet:) Itse tein tällaisen nopeatekoisen koristeen ja koska olen innokas kierrättäjä, käytin vanhan kirjan sivuja tähän.

Sizzix tarvikkeet:
Sizzix Big Shot Machine 657900
Sizzix Bigz Die - Heart Pendant 659244

Ota kuusi sivua kirjasta ja leikkaa sydämet stanssilla Sizzix Bigz Die - Heart Pendant 659244 . Koska sivut ovat ohuita voit leikata kaikki kerralla, nopeuttaa työtä. Embossaa sydänkehykset satunnaisesti kohojauheella "Snowflake" tai jollain muulla sopivalla. Voit myös jättää tämän vaiheen tekemättä. Asettele sydämet päällekkäin ja ompele yhteen kuten kuvassa. Lopuksi taita  ja asettele sivuja auki. Tässä kaikki!

Mukavaa askarteluhetkeä, Minna

Tuesday, 25 November 2014

Christmas tree decorations week 3


Hi everyone
Today i will show you some Christmas tree decorations using the lovely new dies
 
 To the first one I have used: Til den første har jeg brugt:

 To this one I have used: Til denne har jeg brugt:
Paper. White cardstock
pearls and ribbon
To this one I have used: Til denne har jeg brugt:
Paper: Christmas Story/ Craft & You design
ribbon, brads ,stickles gold/ Ranger
Thanks for stopping by, wish you a great creativ week
Pia
Tak fordi du kiggede forbi, jeg ønsker dig en skøn kreativ uge
Pia

Christmas week 3 with Lilith

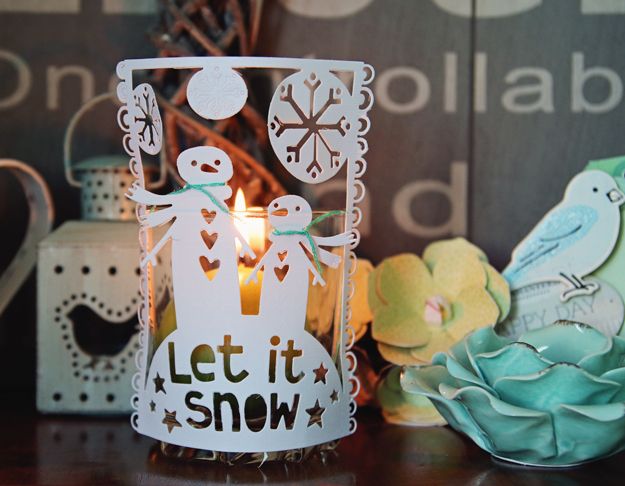
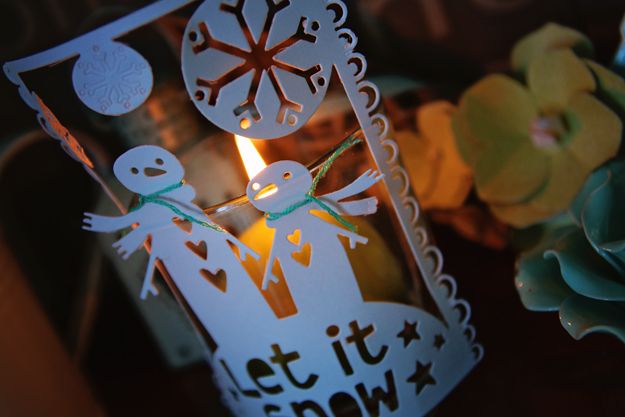
This week's theme is Tree Decorations. I have made many decorations in the past and really wanted to make something different. I decided to tweak the theme a bit and I made a decoration by not for the tree. (naughty me). I also wanted the project to be quick and this one was SUPER FAST but I really love the end result. All you need is a water glass (I used a wide one), some embroidery thread and the Sizzix Let it Snow thinlits die.  
http://www.sizzix.co.uk/product/659921/sizzix-thinlits-die-let-it-snow
 Just cut out the design, add some thread to recreate scarves for the snowmen and adhere it to your glass. Pop in a candle, light it and voilà. A pretty feature to add to your decorations or on the dinner table. 


  Supplies:
Let it Snow thinlits die, embroidery thread, glass, candle, glue. 

Oh and just a reminder NEVER leave candles unsupervised. They are beautiful and add lots of ambiance but can also be dangerous. Have a wonderful week.

Lilith 
 

Monday, 24 November 2014

Christmas tree decorations! Christmas Challenge week 3!


It's week three of the Sizzix Christmas Challenge 2014! And it is Tree Decorations! So I decided to do a large bubble with a decorated inside.

For this third Christmas Challenged I used:

Thinlits™ Die Set 9PK - Winter Borders & Rosette by Paula Pascual 659978
Thinlits™ Die Set 9PK - Christmas Phrase Cards by Paula Pascual 659973
Framelits Die Set 8PK - Circles #2 658604
Bigz Die - Ribbon, 3-D 658978

And I used the free downloadable papers from Sizzix, click here for the link.


I started by die cutting the rosette from the Winter Borders & Rosette set. I die cut two strips and covered the back with washi tape to make sure that the perforating lines don't brake. (They usually don't, but if you live in a very dry place or have the heating up as I do, the fibers are more brittle and tend to break much easily than they should.)
I cut the strips to be five pointers each amd making sure that one of the ends ended in a W and the other on a M. Then I linked those to create a lampshade sort of shape.


I die cut two circles using the medium circle die included in the set. I placed a bop of  hot glue in the center of one and pressed down on the rosette. then I used another circle to secure it in place.


I used a double sided adhesive sheet from Stix2 on white paper and die cut it using the larger circle die from the Winter Borders & Rosette set. I removed the backing of and placed the white paper die cut snowflake (also from the Winter Borders & Rosette). Then I dumped in my gold flake tub and rub any excess off - To see more of this technique click here.


I finished it off layering it with circles die cut from the Circles #2 set. On the opposite side I die cut the word peace from the Christmas Phrase Cards and snowflakes. Then I placed it on a plastic bubble and pour chunky matte glitter. Finally I added a die cut bow, embellishments from the Hobby House and a ribbon loop.


And there it is...
Soft Christmas Tree Decoration!


Simple Circle Strings


My son, Aidan and I have had lots of fun this week making super-easy circle strings to decorate the house and tree with this Christmas. Aidan has been fascinated by the Big Shot for a while and so was delighted to get the chance to help me use it. At 7 he's too young to operate it without adult supervision but he was more than happy to just be in charge of handle turning whilst I handled the die and dealt with the fabric.


We used the Circles, 3/4in die to cut all of our circles and used 6 different coloured felts in total (as selected by Aidan).


Once we had a sufficiently large pile of felt circles they were then fed them under the presser foot of the sewing machine one at a time, sewing straight down the centre. The next circle was fed under just as the last stitch was made on the previous one so that they were chain pieced together.


I can't remember where I first saw the idea for these but I expect it was somewhere on Pinterest. They are so quick and easy to make and really effective, we made an 8ft or so string in little over half an hour from start to finish.


They make a great simple decoration and could even be used as a trimming to tie around gifts too. We might try a different shape and colours next time, little hexagons would look good. Aidan is hooked on making them and so by the start of December I'm expecting the inside our house to be webbed.


Sunday, 23 November 2014

Bente's Week 2 post 'Gift wrap & Tags'.


Hi and welcome to my week 2 post using the gorgeous free papers that you can download from the Sizzix web page. There is a link at the end of my post :-)

This week here at Sizzix UK we are focusing on gift wrapping and making cute tags for the recipients. I have been busy doing some of that too, and here is the result:

I used some of my fave dies at the moment for my giftwrap and tags.
The 'Circles, scallop' finds it's way to most of my projects.And when I am thinking of a seasonal project the 'Winter Borders and Rosette' by the talented Paula Pascual is one of the first sets I look for.

As I said I used the free downloadable papers here and the snowflake on blue is one of the neat little labels on them. I love how it turned out after I used the scallopped circle to cut it out.


I used the snowflake-patterned strips as they are and added a single little white snowflake as well. For a different texture I also used a silvery chipboard snowflake. It is so much fun to use corrugated cardboard for giftwrapping as it will almost always turn out looking rustic and decorative. It is also such a great way to recycle something you would otherwise throw away. :-)

I used:
Free downloadable papers
657900 Sizzix Big Shot Machine Only (Powder Blue & Teal)
Sizzix Framelits Die Set 7PK - Circles, Scallop
Sizzix Thinlits Die Set 9PK - Winter Borders & Rosette

Thanks for looking today and as always thanks in advance for any comments you my leave me ;-)

--------------------------------------------------------------------------------------------------------------


Hej och välkomna till vecka 2 av hur vi kan använda de fina papprena som du kan ladda ner helt gratis från Sizzix hemsida. En länk finns i produktlistan på slutet.

Denna veckan har vi fokuserat på att göra fina inslagningar och tags. Det har jg också gjort och här är resultatet:

Jag använde några av mina favorit dies för ögonblicket. 'Circles scallop' kommer med på de flesta av mina projekt just nu, och ska jag göra något vinter/jul relaterat så är en av de första jag använder  'Winter Borders and Rosette' av den duktiga Paula Pascual.

Som jag sa så använde jag gratis papprena för mina paket och den lilla snöflingan med blå bakgrund är ett av de söta motiven att klippa ut.


Jag använde de tryckte stripen med snöflingor som de är och la till en extra liten snöflinga i vitt. För att få lite extra textur använde jag en färdig silvrig chipboard snöflinga. Jag tycker det är jättekul att använd wellpapp för att slå in paket. Det ser så härligt rustikt ut och det är dessutom ett bra sätt att återanvända något som kanske annars skulle hamnat i soptunnan. ;-)

Jag använde:
Gratis nerladdningsbara papper
657900 Sizzix Big Shot Machine Only (Powder Blue & Teal)
Sizzix Framelits Die Set 7PK - Circles, Scallop
Sizzix Thinlits Die Set 9PK - Winter Borders & Rosette

Tack för att ni tittar inom och även för eventuella kommentarer ni är snälla att läna mig :-)


Saturday, 22 November 2014

Chritmas Tag and Wrap by Olga


Hello all!

We continue Christmas challenges with Sizzix and this time it's a Gift Wrap and Tag week. I love tags and ready to create them as often as cards)) I don't wrap presents this way but when I do this is a separate project for me)) I used again FREE Christmas Papers Downloads as the designs are so beautiful and so festive!


I wrapped Kinder chocolate so I hope my kids will like to unwrap it))


The products I used:


Have a nice day!

Olga