Tuesday, 9 October 2012

Embossing in a mini album!


Hello everyone!

How are you today? I've been busy teaching last weekend and I would like to show you my mini album :)

Here's a mini album I made using a Studio Calico kit, mixing the products with some of my favorite embossing folders from Sizzix!

First of all, you'll need these products to create the mini album : 


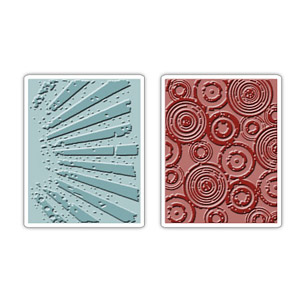
Here are the embossing folders I used...


This is the cover of my mini album :  a mix of paper, masking tape, stamps...

For this page, and basically for all of the other embossed backgrounds, I embossed a piece of white cardstock : for this one, I used the Roses set. You simply put your piece of white cardstock inside the embossing folder and run it through your Big Shot.

Once your piece of cardstock is embossed, simply mix your Distress ink with water on a piece of kraft sheet and dip your embossed image in the ink.

Use your heat gun to make it dry faster, and dip into the ink back and forth until you're satisfied with the results.


Simply do the same for all of your other pieces of cardstock you wish to emboss and change the colors of the ink for each piece. 


You can of course mix two differents colors of inks on the same embossed cardstock.


The embossed image will grab the colors differently than if it was a flat piece of paper.


Try this at home : you're going to love it! :)
And feel free to share your creations here in the comment sections! Would LOVE to see what you come up with! :)

Love!
Céline

Monday, 8 October 2012

Halloween cards


Hello everyone,
how are you? How did you spend your last weekend... my camera is dead and my internet connection is off, I'm posting using my iphone as a router... Iphone saves your life sometimes! LOL

Today I want to share with you some cards for Halloween!!! the secret is to play and enjoy creating as you were a child!

Materials you need:
Sizzix eclips holiday cartridge (656167)
Eclips machine
bella boulevard too spocky papers and embellishments.

The most wonderful thing using this amazing machine is that you can draw your own cards, and play with many shapes and many papers :)

Take a look here :)


What do you think about?

3D flowers


Like most crafters, I can't have enough 3D flowers, so here is my take on how to make a bunch of flowers using Flowers, Lovely, from my Sizzix Everyday Collection.


I started by die cutting many flowers in all three sizes using Bo Bunny Double Dot papers (my current favorite for die cutting at the minute).

Position the flower upside down on top of a mouse pad or flower shaping mat. Then use a round ended tool to shape the centre and keep it in circular motions moving to the petals. Gentle does it!


Turn it upside up and shape the centre down. Then add the flower on to another to layer them as on the right photo.


Another way to do 3D flowers, to create more of a lotus or peonies look, is to shape them on the front.


Layering many of the same size and then adding smaller sizes inside.


These are some of the ones I made. And then I had to make them into stems (florist's wire and tape) and them through the large spools.


By the way, if you like Sizzix and specially the Everyday range, tune in QVC UK on Wednesday 10th of October at 2pm (GMT) as I will be showing some of the sets on air. You can watch online here.

Friday, 5 October 2012

Mixed Media fun with Decorative Strips!

Hi!
Today I'm sharing more mixedmedia ideas - I've played in my journal again, this time using one of my favorite Sizzix Decorative Strips (657706)Sizzix Sizzlits Decorative Strip Die - Curly #2 which not only gave me a beautiful elegant element to decorate my page but a ot, really a lot super-inspiring leftovers! Just take a look at these beauties!


I've played with paper scraps, cut-out leftovers and a lot of gesso to create a background for this journal page dedicated to my husband. 

Journal 034 - Always and forever


All the elements were covered with Silks (Luminarte) - beautiful acrylic metallic paints to reveal all the great details! I really love rubbing this paint into the texture like a paste or simply applying it with my fingers in the chosen places - and on the Sizzix elements it looks more than cool!


I hope you will have a great creative week - see you soon!
Best wishes!
Finn

Thursday, 4 October 2012

Halloween Tags


Last week I posted a Christmas project but I was getting ahead of myself a little..... let's get Halloween out of the way first!

I know we don't go crazy for Halloween in the UK, which is a shame because the colours and textures are so much fun to work with and it's a great excuse to scrapbook for those of us with kids or grandchildren.


Above are a series of tags which I created for the CHA summer show in the US featuring a number of Tim Holtz dies and embossing folders, both old and new, I hope you like them.


Gingerbread man stocking


I finally settled on making a stocking with my gingerbread man last week ( I still have to decide what to do with my line of gingerbread men, but that will have to take a turn nearer Christmas).


Materials needed - calico 75cms x 140cms ( approx)
                             - red fabric 30cms
                             - green ric rac 75cms
                             - 2 buttons,  red, green and black sewing thread
                             - wadding 75cm x 75cm
                             - fusible web 16cm x 12cms 
With the calico cut out 4 stocking shapes - mine are 57cms long and 30cms across to the toe.
From the wadding cut out 2 stockings.
Iron the fusible web onto the red fabric. Using the Big Shot machine and die 658178 cut one gingerbread man.
Place the top of the head 14cms from the top of the stocking, centre it and iron in place.
Stitch around the gingerbread man using a machine zig-zag stitch, or if you prefer stitch by hand.
cut 4 pieces of ric-rac to fit across the arms and legs, and stitch in place, with zig-zag stitch, trim excess away.


Hand stitch eyes and mouth in black. Position buttons on his front and stitch in place.
Pin two strips of ric-rac 7cms and 11cms from the top of the stocking, and stitch in place.

Layer calico/ wadding/calico/calico/wadding/calico - to create front,back and linings for stocking.
Pin and tack all these layers together, but leave the top open.

From the remaining red fabric cut 5cm bias strips, and join together to make a length of 2m of binding. Press the strip in half along the edge and use to bind all around the stocking - leaving the top unfinished. Make a loop 14cms long, and stitch along pressed fold. Pin to the inside top of the stocking. Complete by stitching binding around the top. You could add a name between the rows of ric-rac to personalise this. It's a quick and fun make - enjoy.


Thank you Card by Karine


Hi there!

Today we’re making 3 "thank you" cards for a change! It is always nice to receive a card and it is so fast to realize, so why not being tempted?

I used the two dies below:
657715  Sizzix Textured Impressions Embossing Folders 2PK - Circle Frame & Sparkling Set
657810 Sizzix Textured Impressions Embossing Folders 4PK - Bohemian Botanicals Set

Supply list:

Papers: October Afternoon
Cardstock: American Crafts
Wooden accents: Studio Calico
Stickers: Echo Park
Brad: Prima
Washi Tape
Stamp: Craft Origine
Inks: Black Versafine
Others: ribbon, doily

I love to use the embossing technique on my cards. It is very refined and qualitative.

My cards follow an easy pattern and are realized on the same scheme. I folded in half a 20x20 cms printed paper. Either vertically or horizontally, your choice.

I used the embossing technique on some cardstock that will be the focus point for the decoration composed of 3D accents. Then I simply add a title stamped with a nice Craft Origine stamp.

Here are my three cards. I hope you’ll like them and that you will feel like saying thanks to your loved ones more often!

See you next Thursday with a new layout!

Karine


Des cartes pour dire Merci !

Bonjour !

Aujourd'hui pour changer 3 petites cartes pour dire MERCI ! Parce qu'une carte ça fait toujours plaisir et que c'est très rapide à réaliser , alors pourquoi s'en priver ?

J'ai utilisé ici deux dies :
657715 Sizzix Textured Impressions Embossing Folders 2PK - Circle Frame & Sparkling Set
657810 Sizzix Textured Impressions Embossing Folders 4PK - Bohemian Botanicals Set

Matériel :

Papiers : October Afternoon
Cardstock : American Crafts
Embellissements en bois : Studio Calico
Autocollants : Echo Park
Brad : Prima
Washi Tape
Tampon : Craft Origine
Encres : Versafine noire
Divers : ruban, napperon

J'aime beaucoup utiliser de l'embossage sur mes cartes, je trouve que cela apporte un côté très classe et travaillé.

Mes cartes sont toutes simples et fabriqué selon la même manière, j'ai utilisé un imprimé au format 20x20 que j'ai plié en deux. A prendre verticalement ou horizontalement selon vos goûts.

J'ai embossé du cardstock et composé mes cartes tout autour en jouant avec des petits embellissements en relief.Elles sont ensuite accompagnées d'un titre réalisé avec un joli tampon Craft Origine.

Voici mes trois cartes, j'espère qu'elles vous plairont et vous donneront envie de prendre un peu de temps pour dire "Merci" à vos proches !

A jeudi prochain pour cette fois-ci une page !

Karine


Wednesday, 3 October 2012

Home Decor: You can achieve it!


Happy Wednesday everyone,
 
Have you ever tried using scrapbooking techniques for a home decor item? Have a look at what I created last weekend – I hope it will inspire you to try it yourself!


For this project I used very inexpensive materials like small leftover pieces of cardstock and pages of an old book. Without careful planning I just started layering items on a piece of white cardstock. And I have to say that I really like the outcome!


Here’s a list of materials I used:


For this project I did not want to use a standard black and white photo. Instead, I printed the picture on transparency foil and placed it on an old book page. 
Tip: When attaching transparency to paper remember to use adhesive on such spots that are later hidden under embellishments or other elements.

I used book pages also for butterflies: My book pages were quite thin so I attached a piece of craft cardstock underneath before die-cutting the images. Before adhering I inked the edges of all paper embellishments (butterflies, tag, decorative strip).


As you know there are no written rules for scrapbooking. The metal embellishment is actually a piece of a bracelet I got from my friend and I think it fitted nicely in this photo frame. Not all the elements you use on your projects need to be expensive ‘official scrapbooking supplies’ from a paper crafting store. Just look around and use your imagination! :)


Have an inspiring week!


Tuesday, 2 October 2012

I'm a Fossil Bag addict

Hello everyone!

Today, I'd like to show you a layout I made using my new favorite Framelits dies set : the Frames, Decorative #2 :)

You'll need for this layout : 


I used the Decorative Frames Framelits to create the 3 cute labels on this layout. I used both the cut-out and the edges of the die-cuts, in order to create labels with 2 different patterned papers.


Isn't it cute?


The best way to use these Framelits is to cut into double-sided papers, so that you can choose which side you want to use on your layout!

Hope this inspired you!
Take care !
Céline

Monday, 1 October 2012

cover Album details


Hi everyone,
how are you? Happy Monday!!!!! Today is the First day of October, a new month starts!!!
Today I want to share with you all my love for felt that is perfect when you use sizzix dies!

Materials you need:


Let's start!
It's very simple process and it can be used for every kind of cover album you would like to create! Every size! I took inspiration from Kerrin Quall creations.

Simply play with your favorite dies and felt colors and create many lovely embellishments using needle, thread and buttons. 


What do you think?
I remember you that there is a big huge giveaway over here on the sizzix Blog, so if you want to win amazing prizes stay tuned and go here !