Saturday, 11 July 2015

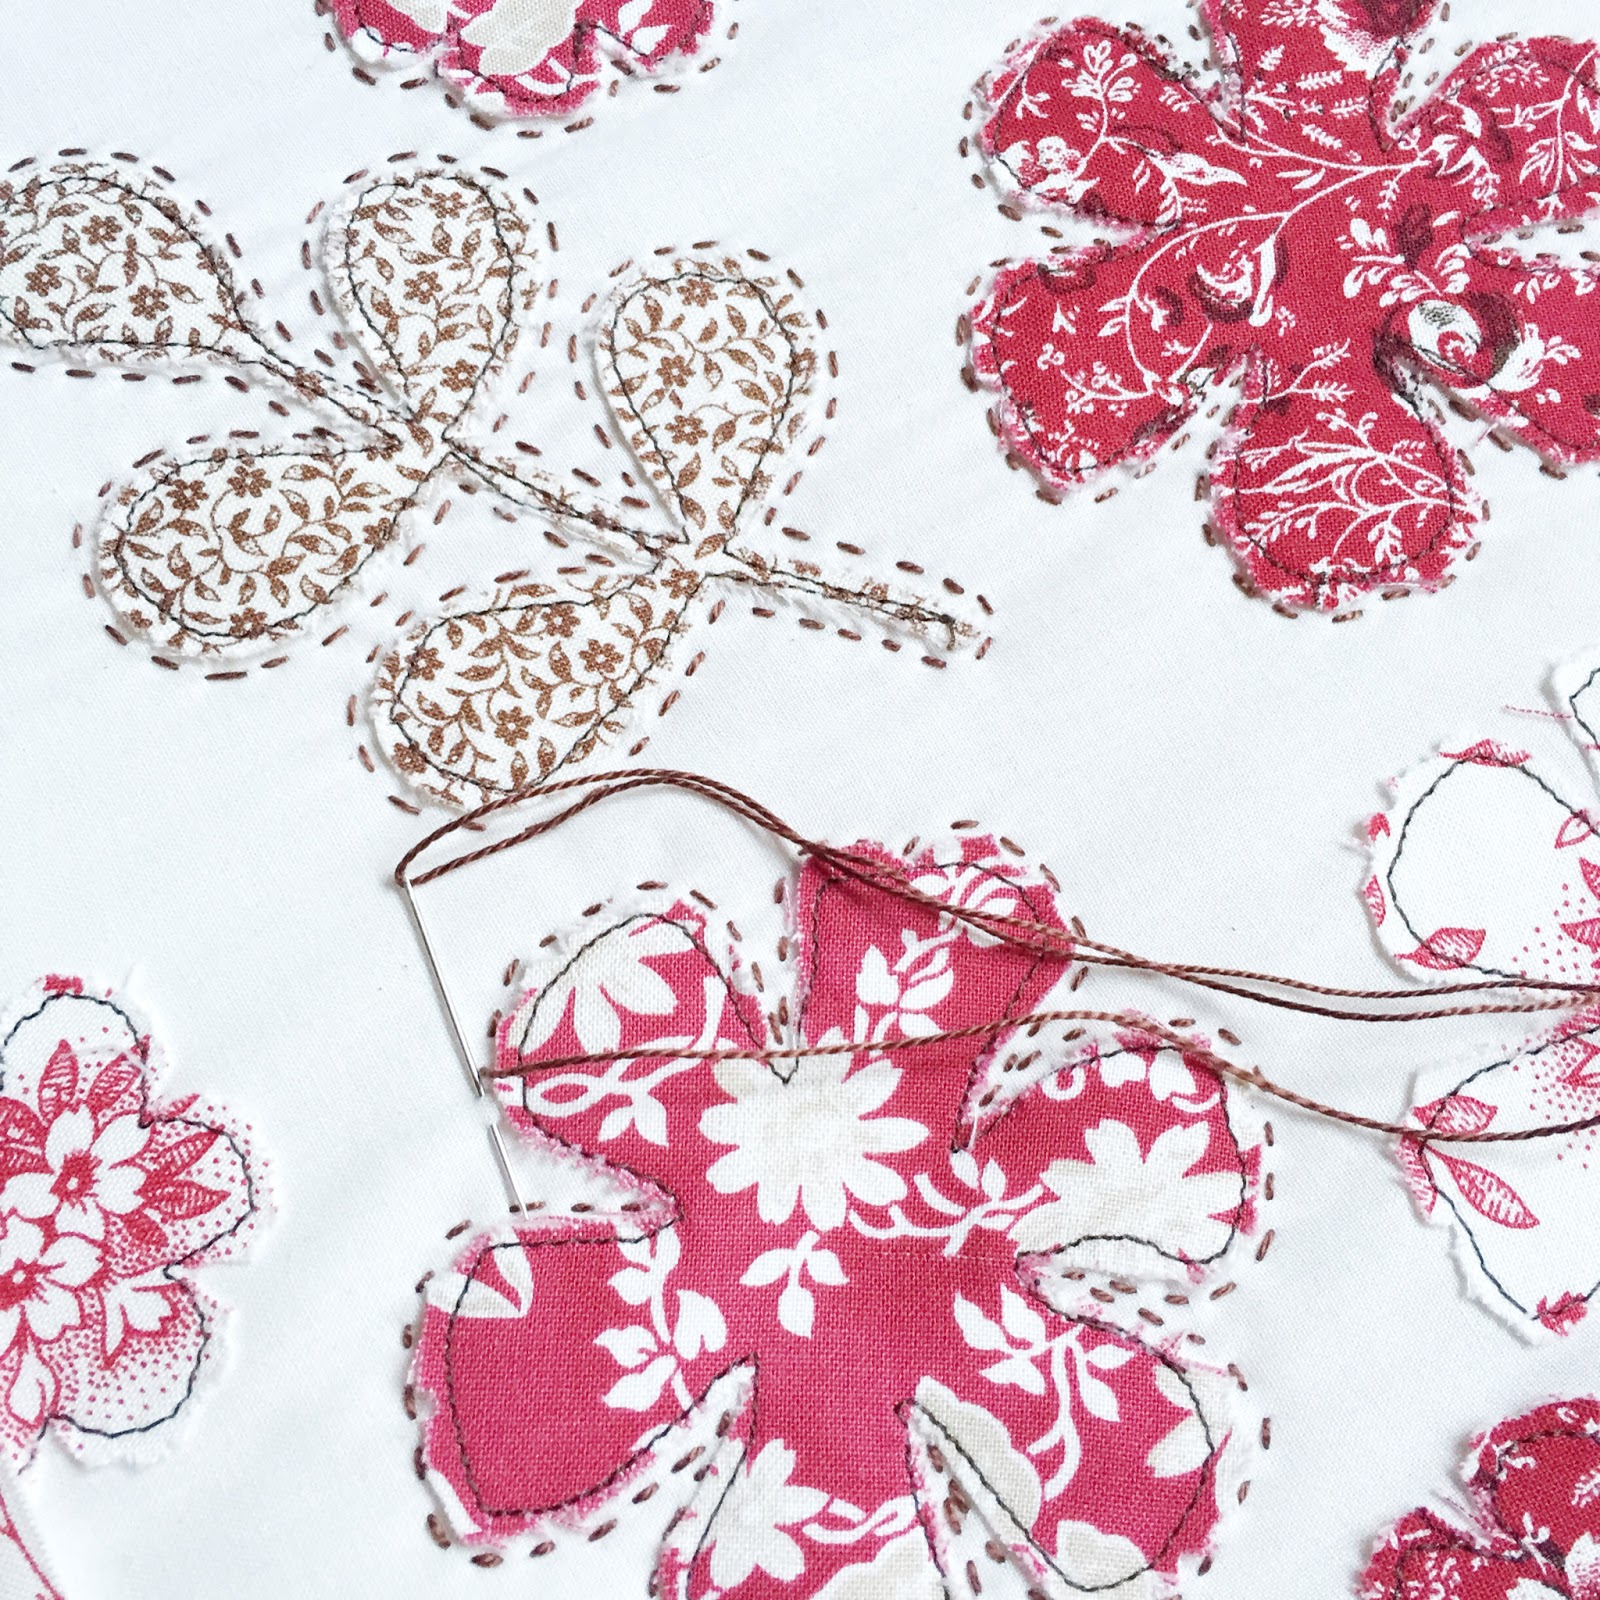
Summer Tattered Flower Cushion


Hi everyone! Today I come back with a new cushion project. I love  how  turned it on.
This time I wanted something different, elegant  and  more creative so I sew some embellishment.
For my summer project I chose some of the essentials dies, one of them included in the Sizzix Plus Starter kit. This new machine let me to use two dies at the same time.
I love tattered  Florals  by Tim Holtz and this die is one my all time used die since it was on sale.
You can see how versatile is this flower die taking a look to the Vintage Sewing Machine cover  and published in Manos Maravillosas issue.


First I ironed some fusible web on the wrong side of the fabric and cut  the pieces, flowers and leaves.

656640


Then I layer on my background fabric , a very cream tone, and stitched with my machine and brown thread, all around.


With the pieces stitched and displayed as you can see in the pic, I started hand quilting with perle  brown  8 cotton. Previously I added some  batting, of course.


I wanted some  beads in my cushion so  I chose some in red, cream and brown.


 Finally I did the finishing with some fabric ribbon I sew by machine and used to tie on the back of the cushion. You can take a look to  Merry Xmas Cushion  or Autumn  Fox Faces cushion finished in the same way.
Now it matches perfectly with my Ohio Star quilt I showed here and waiting for quilting yet.
I like this style cushion , don´t you ?


Hope you can enjoy this time of the year , perfect to be with family and friends!!
See you in two weeks again!!
Love
Mercedes

........................................................********************...................................................................


¡Hola a todo el mundo !Hoy vengo con un nuevo proyecto cojín .Me encanta cómo ha quedado. Quería que fuera algo diferente, elegante y creativo así que añadí algunos abalorios.
Para  mi proyecto de verano  he elegido algunos  troqueles básicos de Sizzix , uno de ellos  incluído en el Starter kit de la  nueva troqueladora Big Shot Plus. Lo bueno es que al se más ancha ,puedo usar dos troqueles a la vez, con lo que ahorro tiempo.
Me encanta el troquel Tattered Florals de Tim Holtz y es uno de los que más uso desde que salió a la venta.

Puedes ver lo versátil que es echando un vistazo en otro proyecto que hice , la funda Vintage para la máquina de coser y que fue publicada en la revista Manos Maravillosas.

Lo primero que hice fue planchar por el revés de la tela elegida , algo de entretela. Luego corté con los troqueles lo que necesitaba , flores y hojas.


656640


Coloqué todo sobre la tela de fondo , una en crema muy clarita, y cosí alrededor a máquina con hilo marrón oscuro. Después hice algo de acolchado a mano con hilo  perlé de algodón marrón  en el número 8, sin olvidar añadir algo de guata por detrás ,claro.
Como ya te he dicho , quería algo de adornos así que dispuse  algunos abalorios en crema, marrón y rojo.
Finalmente lo terminé añadiendo algunas cintas  para cerrarlo con ataduras , usando tela de la misma colección . Si echas un vistazo a  Merry Xmas Cushion  o  Autumn  Fox Faces cushion 
puedes ver  explicado el mismo acabado.

Ahora hace juego perfectamente con el quilt  Ohio Star que te enseñé aquí y que aún está esperando ser acolchado. Me gusta este estilo de cojín, ¿ y a ti?
Espero que disfrutes esta parte del año , perfecta para estar con la familia y los amigos .
Te veo en un par de semanas.
Cariños
Mercedes

Friday, 10 July 2015

Beach Babe...{Summer} Essentials


Hi there,

summer is really here - after weeks of colder temperatures, last weekend we had
about 40 degrees in Germany... Best weather for taking a bath at the pool...

Just like the summer 30 years ago when i was a little one naked at the wading pool...

Today i show you a layout i made with a very very very old photo of this "pool party"
and a lot of cool products out of the Sizzix Essential range...

Materials:
Sizzix Big Shot Plus Starter Kit (White & Gray)
Sizzix Framelits Die Set 5PK - Stars
Sizzix Movers & Shapers L Die - Tag & Bookplates
Sizzix Bigz XL Alphabet Die - Word Play

And i also used the sugar sweet coloring papers you can download for free...


Have a great weekend, Stephanie

******

Hallo Ihr Lieben,

der Sommer ist tatsächlich da... nach Wochen mit kühlerem Wetter
war es doch tatsächlich letztes Wochenende 40 Grad heiß...
Genau das richtige Wetter für den Pool.

Genau wie in dem Sommer vor ca. 30 Jahren als ich noch ein kleiner nackter Floh im Planschbecken war...

Heute habe ich ein Layout mit einem sehr sehr sehr alten Foto und den tollen Produkten der
Sizzix Essential Reihe für euch...

Materials:
Sizzix Big Shot Plus Starter Kit (White & Gray)
Sizzix Framelits Die Set 5PK - Stars
Sizzix Movers & Shapers L Die - Tag & Bookplates
Sizzix Bigz XL Alphabet Die - Word Play

Und ich habe auch das tolle Coloring Paper benutzt, dass ihr hier kostenlos runterladen könnt.

Ich wünsche euch ein zauberhaftes Wochenende, Stephanie

Paper boat card


Hi Sizzix friends!

Today I want to show you my last Summer card. It’s a hexagonal card inspired by the sea, to create it I’ve used some of the Framelits from the Essentials Range and my Big Shot Plus, of course!!! 


It is so cute and reminds me the sea, with the waves and a little paper boat!!!  


Here are the materials and the dies I have used:


White cardstock, scrapbooking paper, hexagon and scallop squares, a stamp and enamels.


And a simple steps:


I have used the the scallop squares dies to die-cut the top of these halves hexagons to reminds waves.


More details of the card: 

I have used the foam pads to put each piece of paper together, giving volume to the card.


I’ve also distressed the edges in blue and yellow Distress ink. 


I hope you have enjoyed this hexagonal summer card . Thanks for your visit!


Have a creative and happy Friday!


------------------------♥------------------------♥--------------------------♥------------------------

¡Hola a todos!

Hoy os quería enseñar la última tarjeta veraniega que he realizado. Se trata de una tarjeta hexagonal inspirada en el mar, para realizarla he utilizado un par de Framelits del Essential Range y por supuesto mi Big Shot Plus !!!
Es una tarjeta muy resultona que recuerda al mar con sus olas y su barquito de papel!!! 
Y estos son los materiales y troqueles que he utilizado:  cartulina blanc, papel para scrapbooking, hexagon y scallop squares Framelits, un sello y enamels.

Unos sencillos pasos: He utilizado el Framelit del cuadro festoneado para darle forma a la parte superior de los medios hexágonos en tono azul para que parecieran las olas.

Más detalles de la tarjeta: Cada pieza de papel está enganchada con almohadillas 3D dándole volumen a la tarjeta. He entintado los bordes con tinta Distress amarillo y azul.


Espero que os haya gustado e inspirado esta tarjeta veraniega hexagonal. ¡Gracias por la visita!


¡Feliz y creativo viernes!

Summer Easel Card Owl


Hello! It's Anna here to share some ideas using Sizzix products.
Happy Friday! So are you melting? Week's weather was hot hot hot!!!
Here's a fun easel card I made with Big Shot Plus machine and Owl die from Essentials Range collection. I've never made an easel card before and it couldn't have been easier!

Easel Card Owl - sizzix bigshot plus by cafecreativo (1)

Easel Card Owl - sizzix bigshot plus by cafecreativo (2)

I think he turned out pretty cute :)
I love how the branch holds the owl upright.
In the video I explain how I made this card. Enjoy! The supply list is below.
 

I hope you found some inspiration.
I shall be back Friday to share with you another Sizzix project.
Happy crafting! :)
 
Items used:
cardstocks
cardboard
patterned papers (Echo Park, Bella Blvd, Pebbles)
distress ink
wooden skewer
black marker
 
**************************************
Flag_of_Italy
Per le amiche italiane! :)

Ciao, sono Anna e sono qui per condividere alcune idee utilizzando i prodotti Sizzix.

Buon Venerdì! Come va con questo caldo, vi state sciogliendo? Forse in alcune zone d'Europa sta migliorando. Cerchiamo di distrarci un po' con lo scrap... che è meglio!

Ecco una card molto divertente da realizzare. Si tratta di una easel card.
Molti conosceranno già questo tipo di struttura, ma per chi ignora cosa sia, posso solo dire che in italiano significa "cavalletto", forse perchè assomiglia ad un cavalletto da pittore, chi lo sa!
Per realizzare la card ho usato la Big Shot Plus e la fustella Gufo, che fa parte della collezione Essentials Range, che altro non è che una raccolta di fustelle “essenziali” e che penso molte di voi avrete già in casa. Anche tutte le altre fustelle usate per questo progetto (Framelits) sono della stessa collezione.
Ho scelto il gufo, giusto per non fare la solita forma rettangolare. Non avevo mai creato un biglietto con questa struttura fin'ora, ma devo ammettere che non avrebbe potuto essere più facile!
Cosa dite, la civettina è carina? :)
Mi piace come il ramo tiene la civetta in posizione. E' inutile che mi perda in ulteriori chiacchiere... 

Nel video che ho creato per voi, spiego tutti i passaggi per fare questa easel card. Buona visione! L'elenco dei materiali è in fondo.

Easel Card Owl - sizzix bigshot plus by cafecreativo (3)

Spero di avervi dato qualche ispirazione.
Sarò di nuovo qui Venerdì per condividere con voi un altro progetto Sizzix.
Happy crafting! :)
 
Materiali:
Sizzix Big Shot Plus Machine Only (White & Gray) (660020)
Sizzix Bigz Die - Owl #2 (657694)
Sizzix Bigz Die - Branch w/Leaves (656212)
Sizzix Framelits Die Set 8PK - Circles (657551)
Sizzix Framelits Die Set 8PK - Circles, Scallop (657552)
Sizzix Framelits Die Set 8PK - Squares (657565)
cartoncini
cartone
carte scrap (Echo Park, Bella Blvd, Pebbles)
distress ink
spiedino di legno
pennarello nero

Thursday, 9 July 2015

Flowers a plenty part 2


Today I've had fun embellishing the printed flowers from last week - I had hoped to complete it this week,  but I still have a lot to it.
I began by cutting lots of flowers and leaves in net, in similar colours to the printed flowers -
 and Bigz die Flower Layers & Leaves by Dena Designs™ 657690
The idea is to create some 3D flowers in the net, or maybe just to layer them flat on top of the printed flowers. I'm also going to add embroidery, and some beads.

I began with the large pink flowers at the bottom of the fabric and decided to use large lazy daisy embroidery stitches to give definition on some and then added 2 layers of net to another and stitched in place with long single stitches -
I folded net daisy like flowers folded in 4 on the yellow leaf shapes, and stitched them in place with small green lazy daisies -
and on the blue and lilac daisies I added 2 layers of matching net daisies and stitched beads in the middle of each flower to secure - they remind me of clematis.
 
Now this is where I'm not sure what is going to happen next - I'm thinking of some smaller embroidery on some of the blue flowers and some stitching on the leaves but I'm not sure if net will feature on the leaves.
As this is as far as I've got you're going to have to wait until next week to see how far I've progressed and how it's taking shape.
Now I'm about to sit out on my sun-baked patio and enjoy the new plants we have ready for my husband to plant in the border of the front garden, and a cup of tea.
Until next week - enjoy the summer and have fun with some sewing.
Angela

Hello Summer Card


Hi Sizzix fans!!!
Today we celebrate the coming of Summer with a cute card!!
For this project I used:
Sizzix Big Shot Plus Starter Kit 660515
Sizzix Framelits Die Set 8PK - Circles, Scallop
Sizzix Thinlits Die Set 3PK - Happiness Phrases

Sizzix Sizzlits Decorative Strip Die - Eyelet Lace & Scallops 660395

Watercolors
Glue
Gilding paste
Gold flakes
Scissors
Cardstocks
 Create a background using watercolors.
 Create a boat using different cardstocks.
Assemble all and decorate to your liking.
The Hello Summer Card is ready!!
Do you like it????

See you next thursday!
-PER LETTORI ITALIANI-
Ciao amici!!
Oggi celebriamo l'arrivo dell'Estate con un carinissima card ricca di elementi decorativi!
Per questo progetto ho usato:
Sizzix Framelits Die Set 8PK - Circles, Scallop
Sizzix Thinlits Die Set 3PK - Happiness Phrases

Sizzix Sizzlits Decorative Strip Die - Eyelet Lace & Scallops 660395

Colla
Forbici
Colla per foglia oro
Foglia oro
Acquerelli
Cartoncini vari

Creare uno sfondo sui toni del celeste usando gli acquerelli. Fustellare due nuvolette con Sizzix Thinlits Die Set 4PK - Speech Bubbles. Creare il sole usando Sizzix Framelits Die Set 8PK - Circles, Scallop e decorarlo con foglia oro. Fustellare la scritta Hello con Sizzix Thinlits Die Set 3PK - Happiness Phrases e tante onde usando Sizzix Sizzlits Decorative Strip Die - Eyelet Lace & Scallops 660395. Creare una barca usando vari cartoncini. Adesso assemblare tutto e decorare secondo la propria fantasia!!
La Hello Summer Card è pronta!!
Bella vero??
Alla prossima!!


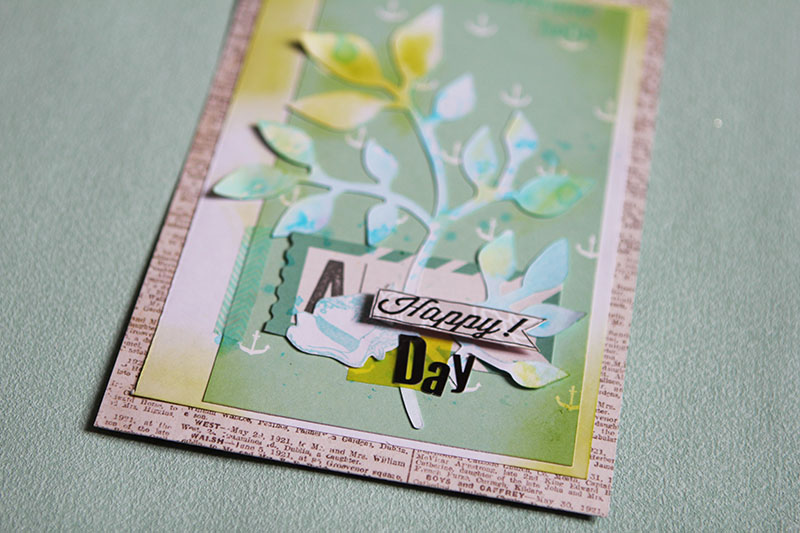
Happy Day card by Karine


Hi everyone!

It’s Thursday – here is a blue and green card, done for the pleasure of offering it!

Supply list:

Papers: Echo Park, Studio Calico
Cardstock: American Crafts
Alphabets: 7Gypsies
Die Cut: Crate Paper
Spray ink: Aladine Dye Ink Mer du Sud
Black Versafine ink
Adirondack ink: Citrus
Stamps: Bloomini Studio, Florilèges Design
Stabilo Pen68, Masking Tape

Dies

650515:  Sizzix Big Shot Plus Starter Kit
659436:  Sizzix Bigz Die- Garden Greens

Start by cutting the large foliage pattern from the die Garden Greens. With a very diluted blue spray ink, colorize parts of it. Once your paper is dry, shade the edges with the Adirondack Citrus ink.

Now choose your tone-on-tone papers.

Print the word “Happy” with a stamp, then glue it with 3D foam for more volume. Add some black alphabet letters.

Add some masking tape strips and make a few splashes for a freestyle effect.

Group all the elements together and you’re done with your card; it is ready to be shipped!


Have a lovely day,

Karine

Bonjour tout le monde !

En ce jeudi, une nouvelle carte toute bleue et verte simplement pour le plaisir d'offrir !

Matériel :

Papiers : Echo Park, Studio Calico
Cardstock : American Crafts
Alphabets : 7Gypsies
Die Cut : Crate Paper
Encre en spray : Aladine Dye Ink Mer du Sud
Encre Versafine noire
Encre Adirondack : Citrus
Tampons : Bloomini Studio, Florilèges Design
Stabilo Pen68, Masking Tape

Dies

650515:  Sizzix Big Shot Plus Starter Kit
659436:  Sizzix Bigz Die- Garden Greens

Commencez par découper le grand feuillage du die -Garden Greens. A l'aide d'une encre en spray bleue bien diluée, colorisez le partiellement. Un fois votre papier sec, ombrez simplement les bords avec une encre Adirondack Citrus.

Pendant ce temps-là choisissez vos papiers ton sur ton.

Imprimez le mot “ Happy” à l'aide d'un tampon, puis montez le en 3D pour plus de relief, complétez avec des alphabets noirs.

Ajoutez quelques morceaux de Masking Tape, et quelques éclaboussures pour un côté plus freestyle.

Regroupez tous les éléments ensemble et votre carte est terminée, prête à être expédiée !

Bonne journée

Karine