Friday, 25 January 2013

A lot of Hearts


Hi Everyone!
I'm Anna, from Middle Italy. I'm the author of the blog Cafe Creativo.
I started sewing and scrapbooking as a form of therapy and it has blossomed into a full blown addiction. Through these hobbies I've met some of the most wonderful people and I had amazing opportunities to inspire others. It's truly been a gift!
This is my first post here on Sizzix blog! I'm more than excited to share my projects and ideas.
I am working hard trying to learn English, sorry ;)
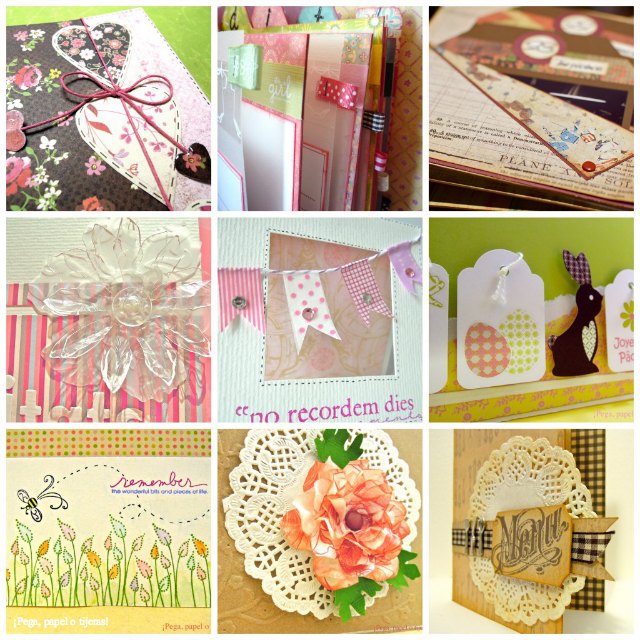
Let me introduce myself with a collage of some of my works:


I am here today to share what's my first project: the theme is Valentine’s Day… I thought about unconventional colors! Love this color combination!
Here is my project: I made a card and a gift bag to go with it. I packaged some chocolates in little wax paper bag.

Anna Drai - bag - card heart - valentine (1)
Anna Drai - bag - card heart - valentine (2)

Items used to make the card:
Sizzix Big shot machine (655268)
Sizzix Bigz Die - Tiny Tabs & Tags (657188)
Sizzix Bigz die – Hearts (656334)
white cardstock
turquoise patterned paper
pink glitter cardstock
scrap and strip of paper
vanilla tissue paper
pink and white twine
paper doily
color ink
sequins
two-sided tape, glue
Anna Drai - bag - card heart - valentine (4)

How to make card:
1- Cut a stripe of white cardstock of 15x30 cm. Fold the paper in half to make your card blank.
2- Cut a rectangle 9 cm x 14 cm from patterned paper and adhere in the center.
3- Let a few drops of color ink in the highest position.
4- Apply a piece of paper doily on the right edge.
5- Add a tag using the Die - Tiny Tabs & Tags. Some twine to finish it.
6- Add on a piece of cream tissue paper. Then apply the strips of paper.
7- Printed and add a small "love" close to the twine.
8- Cut a heart out (656334) of pink glitter cardstock. Stick it on with 3d double side tape.
9- Take white thread and roll it a bit. Placed close to the heart.
10- Then, use the sequins and glue them.

Anna Drai - bag - card heart - valentine (5)

Items used to make the little gift bag:
Sizzix Big shot machine (655268)
Sizzix Bigz die – Hearts (656334)
Sizzix Framelits Die Set 6PK – Squares (657565)
waxed paper bag
pink glitter cardstock
turquoise / teal lace or ribbon
scrap of paper
scrap of old book
pink and white twine
paper doily
little wood clothespin
glue

Anna Drai - bag - card heart - valentine (6)
How to make a paper bag:
1 - Cut the bag's opening with one of Framelits square, placed diagonally, so as to create a pennant.
2 - Fill the bag with chocolates and then fold the pennant.
3 - Apply the doily, folded in half, on the top edge.
4 - Take two strips of paper. Cut with Framelits to create the pennants.
5 - Add a bit of turquoise lace.
6 - Cut a heart out (656334) from pink glitter cardstock. Glue it on.
7 - Keep it all together with a clothespin.
8 - Some twine to finish it.
9 - If you want, insert a little tag with your message.
Thanks for stopping by and till next time happy crafting!

***********************************************************
Flag_of_Italy Per le amiche italiane! :)
Ciao a tutti!
Mi chiamo Anna, ma nel web sono conosciuta come Anna Drai. autrice del blog Cafe Creativo.
Ho cominciato a cucire e scrappare come forma di terapia per liberarmi dallo stress, ma ben presto si è trasformata in una dipendenza in piena regola!!! E' attraverso questi hobby che ho incontrato alcune delle persone più straordinarie che conosco ed ho anche avuto la possibilità di ispirare e trasmettere voglia di fare agli altri. E’ stato davvero un regalo piovuto dal cielo!
Questo è il mio primo post qui sul blog Sizzix! Sono stra-felice di condividere i miei progetti. Lasciate che mi presenti con un collage dei miei lavori (foto collage sopra).
Ma veniamo a noi, sono qui oggi per condividere quello che è il mio primo progetto.
Il tema affrontato in questo post è San Valentino, ma non in maniera convenzionale, almeno per quanto riguarda i colori ;) Questa combinazioni di colori è una delle mie preferite!
Ho realizzato una card e un pacchettino dove ho messo dei cioccolatini. Se usate sacchetti in carta oleata per alimenti, ci si può infilare anche dei bei biscotti fatti in casa, che sono sicuramente molto buoni e apprezzati! ;)

Ecco, dunque, il mio progetto che potrà comunque essere declinato per altre occasioni, quali anniversari, compleanni, festa della mamma, pensierino per un’amica ecc. Il biglietto potrà anche essere d’ispirazione come copertina di un mini-album, che dite?

Per realizzare il biglietto avrete bisogno di:
Sizzix Big shot machine (655268)
Sizzix Bigz Die - Tiny Tabs & Tags (657188)
Sizzix Bigz die – Hearts (656334)
cartoncino bianco
carta fantasia turchese
cartoncino glitter rosa
avanzi di carte varie
carta velina color vaniglia
cordoncino bicolore (rosa e bianco)
centrini di carta
colore spray o acrilico diluito
paillettes
biadesivo spessorato, colla

Procedimento:
1- Tagliare una striscia di cartoncino bianco di cm 15x30. Piegare il foglio a metà per avere la base del vostro biglietto.
2- Tagliare un rettangolo di 9 cm x 14 di carta fantasia e incollarla al centro del biglietto.
3- Lasciate cadere alcune gocce di colore sulla parte alta della card.
4- Applicare un pezzo di centrino sul bordo destro.
5- Aggiungete una tag tagliata con la fustella 657188. Aggiungete anche un po' di cordoncino in fondo alla tag per rifinirla.
6- Incollare sopra un pezzo di carta velina. Quindi incollate un paio di strisce di carta. Io ho usato anche un pezzo di copertina di recupero di una relazione!
7- Stampate e incollate una piccola scritta “love” vicino al twine.
8- Tagliare un cuore (fustella 656334) dal cartoncino glitter. Attaccatelo con il nastro biadesivo spessorato.
9- Prendete del filo bianco e “ingarbugliatelo” un po', quindi incollatelo dietro al cuore.
10- Infine utilizzando le paillettes e la colla date dei piccoli punti di luce qua e là. Il vostro biglietto è così terminato!

Per realizzare il sacchettino avrete bisogno di:
Sizzix Big shot machine (655268)
Sizzix Bigz die – Hearts (656334)
Sizzix Framelits Die Set 6PK – Squares (657565)
sacchetto in carta oleata (tipo quelli per alimenti)
cartoncino glitter rosa
pizzo o nastro turchese/verde acqua
una striscia di carte fantasia rosa
pagina di vecchio libro
cordoncino bicolore (rosa e bianco)
centrino di carta
mollettina di legno
colla
Procedimento:
1- Tagliare l'apertura del sacchetto con uno dei Framelits quadrati messo in diagonale, in modo da creare una bandierina a coda di rondine.
2- Riempire il sacchettino di cioccolatini o dolcetti e piegare quindi il il bordo a coda di rondine.
3- Applicare il centrino, piegato a metà, sul bordo in alto.
4- Prendere un paio di strisce di carta: io ho usato una striscia a righe rosa e una pagina di un vecchio libro. Tagliate anch'esse con i Framelits per creare sempre l'effetto “coda di rondine” su entrambe le estremità.
5- Aggiungere sopra, al centro, un pezzetto di pizzo o nastro turchese/verde acqua.
6- Tagliare un cuore (fustella 656334) dal cartoncino glitter e incollarlo sopra. Quindi incollare il tutto sul centrino.
7- Appuntare il tutto al sacchetto con una molletta.
8- Aggiungete anche un po' di cordoncino bicolore per rifinire.
9- Se volete, inserite una mini tag con il vostro messaggio. Il vostro packaging è così terminato!
Se avete domande sono qui...
Grazie per esservi soffermate a leggere il mio post e soprattutto... happy crafting!!! :)

Thursday, 24 January 2013

Enjoy Layout !


Hello!

Let’s work on a freestyle layout today!

I used only one set of dies for this one: 
Framelits Butterflies#4: 658290.

Supply list:

Cardstock: Toga
Papers: I Lowe Scrap
Alphabets: Making Memories
Die cuts: American Crafts
Stickers: American Crafts
Cloth labels: Basic Grey
Washi tape
Stamps: Paper Artsy, 7Gypsies
Inks: Adirondack, Archival
Spray inks: Glimmer Mist Tattered Angels
Others: eyelets, Indian ink, tags

No obvious dies on this one, I simply used a paper scrap in which I’ve been cutting out butterflies for a previous realisation.

So let’s have fun with this newly made stencil and spray inks! I worked my background with matching shades spraying Sunshine Glimmer Mist ink. I built my page around this effect, adding some paper scraps, tags and a few accents.

To make the butterflies stand out, I also used this 100% handmade stencil and worked on some of the shapes with a watermelon Adirondack ink and a cut’n dry foam piece.

Let’s add some stamps and my layout is done!


I really like this layout, especially since I got to use die-cut papers left-overs

Have a nice day,

Karine


Bonjour

Une page assez freestyle pour aujourd'hui ! Avec une seule référence de die utilisée : les dies Framelits Butterflies#4 : 658290

Liste du matériel :

Cardstock : Toga
Papiers : I Lowe Scrap
Alphabets : Making Memories
Die cuts : American Crafts
Autocollants : American Crafts
Etiquettes en tissu : Basic Grey
Washi tape
Tampons : Paper Artsy, 7Gypsies
Encres : Adirondack, Archival
Encres en spray : Glimmer Mist Tattered Angels
Divers : oeillets, encre de chine, tags

Sur cette page pas de dies apparent, je me suis simplement servie d'une chute de papier dans laquelle j'avais découpé des papillons pour une page passée.

Je me suis donc amusée avec ce nouveau pochoir et mes encres en spray ! J'ai travaillé mon fond pratiquement ton sur ton en vaporisant du Glimmer couleur Sunshine. J'ai construis ma page tout autour en rajoutant quelques chutes de papier, des tags, et quelques embellissements.

Afin de bien faire ressortir mes papillons, je me suis servie du même pochoir 100% fait main et j'ai retravaillé quelques formes cette fois-ci avec une encre Adirondack ( watermelon) et un morceau de cut'n dry.

Quelques tampons supplémentaires et ma page est terminée !

Je dois dire qu'elle me plait beaucoup, j'aime particulièrement cette façon de réutiliser les chutes de découpes :)

Bonne journée à vous

Karine

Hearts a flutter continued


Snowmen have been built, sledges used – and lots of heart blocks made.
I hope you’ve enjoyed making them – and you still don’t have to decide what you are going to make!
This week we are going to add borders/sashing to each block.
For each block you will need two 1.5” strips cut from the width of the fabric – 1 each of red and black.
I cut these using die 658327 and the Big Shot machine.
To add variety I used strips from different red fabrics.
First add the black strips to the top and bottom of the block, and then to each side.

Repeat with the red fabric.

Continue to add the borders to each block.
Remember to press the seams as you go.
Next week will be the time to decide what to make with these blocks because that will decide how we add sashing to complete the top.
At the moment I’m thinking maybe a pair of place mats, or a bed runner – but that decision will have to wait!
Happy sewing,
Angela


Wednesday, 23 January 2013

Splash of Colour


It's seems that most of the UK and Europe shivers beneath a blanket of snow and ice, I could create something appropriate and seasonal but I thought it might be better to introduce a splash of Summer colours to cheer us all up.

In a couple of days I am off to the Creativeworld Trade show in Frankfurt, Germany and this is one of several projects I created for Rayher at whose stand I will be demonstrating a range of Sizzix products and techniques.

For this project I used the following dies from The Botanical Sanctuary range by Scrappy Cat:

  • Sizzlit L Die - Butterfly by Scrappy Cat (658062)
  • Sizzlit L Die - Flowers Climbing on Vine by Scrappy Cat (658066)
  • Sizzlits 3 Die set - Butterfly Set #3 by Scrappy Cat (658068)
  • Sizzlits 3 Die set - Sunrise Blossoms by Scrappy Cat (658070)


Rather than cut coloured card or patterned paper I am using my favourite heavy weight white card from Inspire Me Papers. I use the Sizzlit to cut a full shape and just the flower heads.


Using various shades of distress inks (most dye inks will do) and an applicator I colour the foliage starting with the lightest colour (Mustard Seed) and finishing with the deepest (Faded Denim).


Next, I like to use a Mister to give a gentle blotchy effect which I enhance by blotting the die cut with Tissue paper. From the second die cut, cut away both flower heads and apply the colours of your choice to each. Mount the flower heads and foliage together before sealing with Spray and Sparkle varnish from Crafter's Companion.


Use the same techniques to create a number of colourful die cut flowers and butterflies.


Finally, attach each one to a simple garland made of twigs which is available from a number of shops which supply home décor dress items. Now all you have to do is sit back and dream of warmer days to come.


Butterfly Card


Hi!

My name is Daria. I live in Russia with my husband and daughter Evelina. I have been scrapbooking for 6 years. I’m a woman of many interests. I love to create scrapbook layouts and making cards. I love to create mixed-media projects and I love coloring.
I teach my own classes in scrapbooking and mixed-media  in my city and another cities of my country. And I’m one of the owners of the Russian Scrapbooking magazine “Scrap-Info”.
I love Sizzix products and I’m very happy to be a part of the Sizzix Design Team. 

These are some of my previous projects using Sizzix products.

Scrapbook layouts

Note for my daughter. She loves owls. And this owl is very cute.

Card

Advent calendar

And today I show you my new card – Butterfly Card.

Items used:
Echo Park papers – Victoria Gardens (6x6 paper pad)
Webster’s Pages bloomers – Celery, Candy Pink
Versa Magic ink – Pink Grapefruit
Liquid Pearls – Petal Pink
White cardstock
2x small white adhesive pearls

How to make:
  1. Fold a piece of white card in half to create a base card of 15x15cm. Cut a piece of striped paper to the same size and glue to the front. Round the right corners and ink the edges.
  2. Cut a piece of the pink paper 13x13cm and  round the right corners. Ink the edges.  Glue this piece to the left side of the card.
  3. Cut a scallop square from white cardstock using Scallop Square Framelits Dies.  Glue to the centre of the pink paper.
  4. Stamp text above the white scallop square.
  5. Use liquid pearls on the edges of the pink square. Wait until it dry.
  6. Cut a butterfly using the Butterfly Die. Glue all the butterfly details together. Glue the butterfly to the centre of scalloped square.
  7. Glue the bloomers on to the butterfly’s body.
  8. Use liquid pearls on the edges of the butterfly’s wings. Add two white pearls to the butterfly’s             horns.


I hope you liked this.

Daria.

Здравствуйте!
Меня зовут Дарья. Я живу в России со своим мужем и дочкой Эвелиной.
Я люблю создавать странички и открытки, делать проекты миксд-медиа, и раскрашивать. Я провожу мастер-классы в своем городе и других городах своей страны. Так же я одна из основательниц первого российского журнала по скрапбукингу - "Скрап-Инфо".
Я очень люблю продукцию Sizzix. И я очень рада быть частью этой замечательной дизайн-команды.

Выше я показала некоторые из своих ранее сделанных проектов, с использованием продукции Sizzix. А затем совсем новую открытку созданную специально для этого блога. 

Материалы, которые я использовала для создания этой открытки:
Бумага Echo Park  – коллекция Victoria Gardens (набор 15х15 см)
Цветочная лента Webster’s Pages –  цвета Celery и Candy Pink
Чернила Versa Magic – цвет Pink Grapefruit
Жидкий жемчуг – Petal Pink
Белый кардсток
2 маленькие белые самоклеющиеся жемчужинки


И инструкция по ее созданию на русском языке.
  1. Сложите белый кардсток пополам так, чтобы у вас получилась основа для открытки размером 15*15 см. Отрежьте полосатую бумагу из набора такого же размера и приклейте ее на лицевую часть открытки. Скруглите правые углы и затонируйте края.
  2. Отрежьте кусочек розовой бумаги размером 13*13 см. Скруглите правые углы и затонируйте края. Приклейте, выровняв этот кусочек по левой стороне.
  3. Вырежьте ажурный квадрат используя 2 ножа из набора Scallop Square Framelits Dies. Приклейте этот квадрат по центру розовой бумаги.
  4. Отштампуйте текст над ажурным квадратом.
  5. Поставьте точки жидким жемчугом по периметру розовой бумаги. Чтобы не смазать в процессе дальнейшей работы, дождитесь, чтобы они высохли.
  6. Пока точки сохнут, вырежьте бабочку, используя Butterfly Die. Склейте все ее детали. Затем приклейте бабочку в центр ажурного квадрата.
  7. Приклейте цветочную ленту на тело бабочки.
  8. Поставьте точки жидким жемчугом по периметру деталей бабочки и приклейте 2 жемчужины на ее усики.

Открытка готова! Она не очень сложная, но выглядит свежей и очень милой! Надеюсь вам понравится!

Дарья.


Tuesday, 22 January 2013

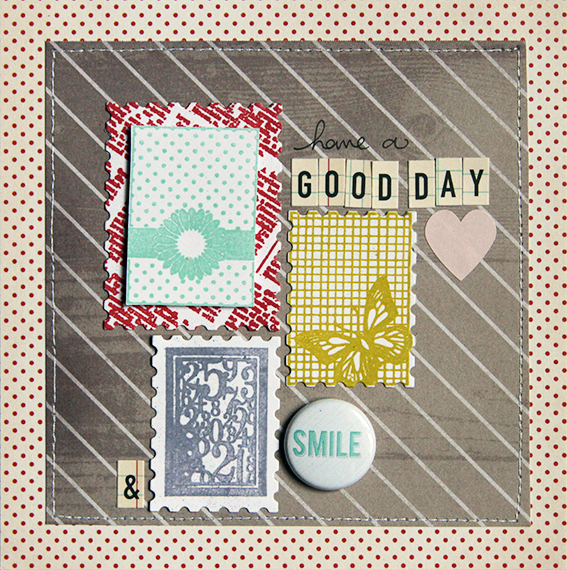
Have a good day and SMILE card


Hello everyone!

Even though it's been VERY colld everywhere in Europe these past weeks, I have a feeling Spring is just around the corner (or maybe it's just a thought to pretend WINTER should be over!) :)
I've been playing and testing the Exclusive Paula Pascual Framelits w/stamp die set and all I can say is WOW! They are so versatile, easy to use and pretty, you're going to love them!

Here's a cute card that you can make within 20 mns! Gather all the supplies below and get ready to have fun!


Now let's start! You'll see, it's very easy!

First of all, stamp each stamp from the Exclusive Paula Pascual Framelits w/stamp die set with a different ink color : a pale blue for the one with the flower, an olive green for the one with the butterfly, a lavender one for the small one with the numbers, and a deep red for the newspaper-like one.

This way, you'll get a nice colorful paper quilt to organize on your card background.

Once you are done with the stamping part, simply choose the dies and decide which shape you want each shape to look like : rectangle with stamp-like borders, simply a rectangle, rectangle with a white frame and stamp-like edges? It all depends on your mood and creativity!


Then, once you have run it all through your Big Shot, adhere the little rectangle die-cuts and embellish your card!

What I love about those Framelits w/stamps is that they all coordinate and it's so fast and easy to use : perfect for invitations, cardmaking, wedding invitations...

Have a great day!
céline

Tag & Envelope


Hi Sizzix fans, I'm Anne Kristine and live in Norway. This is my first blogpost here in Sizzix blog. I'm so happy to be here and share some projects for you through 2013. I love to be creative with paper and other materials. My style is shabby chic/vintage and I also love to use colors on my projects, it depends on what mood I'm in :o))
 Sizzix Dies is my favorite because I can cut out shapes in grungeboard and chipboard, and of course because they have so many nice items that fit the style I like to create in.
My written english is not the best but I hope you will understand what I write...I will do my best. I am going to post some pictures so you can see how I make my projects. 

Today I have a tag and "envelope" to show you. 

Supply list:

Cardstock: Manila Tag #8, Grungeboard
Papers: Pion Design - Silent Night 
Stamps: Stampers Anonymous by Tim Holtz
Distress Stain : salty ocean, chipped sapphire, tumbled glass, walnut stain.
Inks : Distress Ink Pad - walnut stain, vintage photo, Archival Ink - Jet Black
Other: Cheese Cloth, Seam Binding Ribbon, Tim Holtz idea-ology.


The little cute bird is cut out with grungeboard and distressed with distress stain - salty ocean, chipped sapphire, tumbled glass, walnut stain.

The background of the tag and the butterfly is distressed with distress stain - salty ocean, chipped sapphire, tumbled glass and perfect pearls - turquoise ... plus water.  


 Here you can see step by step how I created the envelope...and the little tab.
Thanks for stopping by and I hope you got some inspiration.
Anne Kristine


Hei alle Sizzix fans, jeg heter Anne Kristine og kommer fra Norge. Dette er mitt første blogg innlegg i Sizzix bloggen og gleder meg til å dele mine prosjekter med dere i hele 2013. Jeg elsker å være kreativ med papir og andre materialer. Min stil er shabby chic/vintage, jeg liker også å bruke farger på mine prosjekter, det kommer litt ann på hvilket humør jeg er i :o)) 
Sizzix Dies er mine favoritter siden jeg kan kutte ut former i både grungeboard og chipboard, og fordi Sizzix har fine former som passer til mine prosjekter og stil. 

Sizzix Dies som er brukt:
Materialer:
Kartong: Manila Tag #8, Grungeboard
Papir: Pion Design - Silent Night 
Stempler: Stampers Anonymous by Tim Holtz
Distress Stain : salty ocean, chipped sapphire, tumbled glass, walnut stain.
Stempelputer : Distress Ink Pad - walnut stain, vintage photo, Archival Ink - Jet Black
Annet: Osteklut, Seam Binding bånd, Tim Holtz idea-ology.

Tag'en er distresset med distress stain - salty ocean, chipped sapphire, tumbled glass og perfect pearls - turquoise ... pluss vann. 
Den søte lille fuglen er stanset ut i grungeboard og distresset med distress stain - salty ocean, chipped sapphire, tumbled glass, walnut stain.
    
Takk for at du stoppet i bloggen her og håper du fant litt inspirasjon.
Anne Kristine

Best Wishes


Happy Tuesday everyone
My name is Pia and I'm big fan of Sizzix products
Today's special, it's my first project for Sizzix. I hope I can give you inspiration how to use the beautiful Sizzix products
This Tuesday I will show you a card
Dies:
655268 Big shot machine
656938 Tag & Bookplates
658297 Embossing Folders-Banners & Flowers set
658291 Flower, Lovely
657496 Distressed Doily

Supply List:
Paper: Off-white cardstock Paper: Riddersholm design- Flea Market
Ribbon: Hug snug Seam binding
3D Foam
Ink:Distress Ink-Vintage photo
                             Tumbled glass
Hero Art Shadow ink-Cup O Joe-mid tone


How to make:
1.Fold a 15x30 off-white cardstock half to create a base 15x15 cm Cut a pieces of patterned paper    14.5x14.5 cm and glue to the centre of the card
2. Cut a strip of off white cardstock 6.5x 11.5 cm cut a strip of patterned paper 6x11 cm, glue the patterned paper to the centre of the cardstock. Attach the small cardstock to the card using 3D foam to add depth.
3. I used four different sorts of dies, starting with -Tag & bookplates-, embossing the tag using embossing Folder -Banner-. Decorated with Flowers set- Flower, Lovely-, lace -Distressed Doily dies- and ribbon.
I hope you like the card and it gave you some inspiration. See you next Tuesday
You can visiting me the rest of the week on my blog 
Kind regards
Pia

God tirsdag til alle
Mit navn er Pia, jeg er stor fan af alle Sizzix produkter
I dag er en speciel dag, det er mit første projekt for Sizzix.Jeg håber jeg kan være med til at give inspiration til hvordan de skønne Sizzix produkter kan anvendes
Denne tirsdag vil jeg vise et kort
Dies
Jeg har brugt:
655268 Big shot machine
656938 Tag & Bookplates
658297 Embossing Folders-Banners & Flowers set
658291 Flower, Lovely
657496 Distressed Doily

Andet jeg har brugt:
Paper: Off-white cardstock
Paper: Riddersholm design- Flea Market
Ribbon: Hug snug Seam binding
3D Foam
Ink:Distress Ink-Vintage photo
                           Tumbled glass
Hero Art Shadow ink-Cup O Joe-mid tone

Sådan gør du:
1.Jeg har foldet et stykke karton 15x30 cm off-white på midten så jeg får en base på 15x15cm. 2.Skær et mønsterpapir på 14,5 x 14.5cm lim på kortet. Skær et stykke off white karton på 6,5x11,5 cm og et stykke mønsterpapir på 6x11 cm lim det på kartonet og sæt det fast med 3D puder på kortet for at give dybde
3.Jeg har brugt fire forskellige Sizzix dies, startede med Tag & Bookplates som jeg embossede med embossing Folders-Banner og sværtede henover. Pyntede med blomster fra Flower, Lovely, til blonden har jeg brugt Distressed Doily.
Jeg håber du kan blive inspireret af kortet. Vi ses næste tirsdag.
De andre dage i ugen kan du finde mig på piabau.blogspot.com
Mange hilsener
Pia

Monday, 21 January 2013

So Sweet shadow box

Hi! Let me introduce myself. My name is Elena and I'm from beautiful Barcelona. I have been  paper crafting and scrapbooking for several years. I love all things simple and cute, pattern paper, inks, stamps and dies. I am passionate about all the creative possibilities they can offer me wich, combined with a good design, can create countless pieces like layouts, albums and cards. My passion for sharing and teaching has led me to film over 120 video tutorials about  scrapbooking and paper crafting,  teach several workshops, be part of design teams and collaborate with different publications. And now I'm so excited to be part of this amazing team of talented designers and bloggers wich form the Sizzix family!

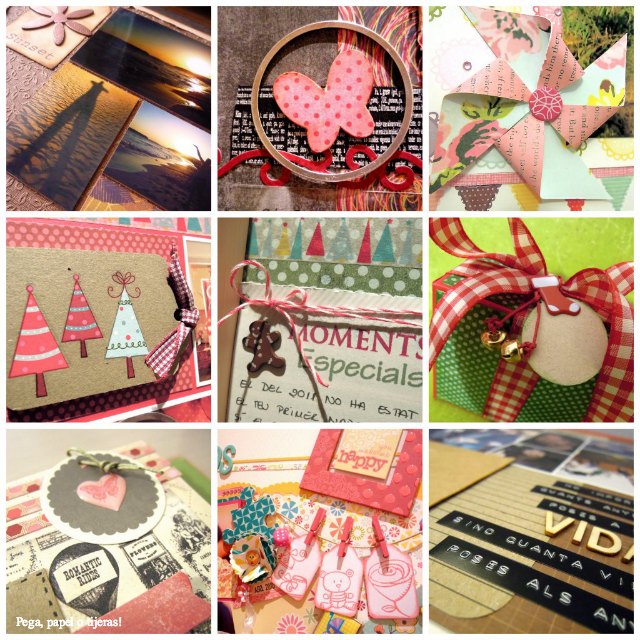
But before we get into my Sizzix project for today, let me show you some bits and pieces of my work so you know a little more about my crafting style.


And now let's get into my project for today!

Supply list:
  • 655268 Sizzix Big shot machine
  • 656577 Sizzix Bigz Die- Frame Back, Ornate #2
  • 656766 Sizzix Bigz Die- Flowers w/Stems, leaves & Heart
  • Papers: Webster's pages, Artoz, Core'dinations
  • Ink: Ranger Distress ink
  • Alphabet: American Crafts Thickers
  • Others: Ikea Ribba Shadow Box, chipboard, ribbon, brads, tags, button, clothespin, silver crystal
Now is very usual that you get the announcement of  the birth of a baby by sending a picture on the phone, so why not use that picture for a special gift?


All you have to do is print that photo and put it in a shadow box and frame it with pattern paper. Then, using your Big Shot, cut out the ornate frame with chipboard and yellow cardstock and the flowers with chipboard and pattern paper. Ink everything and glue it all at the bottom right corner. Then embellish it with some ribbon, the baby's name and little cute embellishments such as tags, buttons, brads and clothespins.


To create some balance, I created a cluster in the upper left corner with a strip of pattern paper, some leftover pieces of the dies and ribbon, and more little embellishments.


And there you have it! it is a very cute and simple project to do that parents and grandmas will love, especially because they provably have not had time to frame any baby's photo. 

Happy monday!

Elena
.................

¡Hola! Primero me presento: Me llamo Elena y vivo en Barcelona. Me encantan todas las cosas sencillas y bonitas, el papel decorado, las tintas, los sellos y los troqueles y me apasionan todas las posibilidades creativas que me ofrecen que, combinadas con un buen diseño, me permiten crear infinidad de trabajos como páginas, álbumes y tarjetas. Mi pasión por compartir y enseñar me ha llevado a rodar más de 120 vídeo-tutoriales de scrapbooking y manualidades en papel, impartir talleres, formar parte de equipos de diseño, y colaborar con diferentes publicaciones. ¡Y ahora estoy muy contenta de formar parte de este fabuloso equipo de diseñadores y bloggers con tanto talento que forman la familia Sizzix!

¡Vamos con el primer proyecto que hago para este blog!

Materiales:
  • 655268 Sizzix Big shot machine
  • 656577 Sizzix Bigz Die- Frame Back, Ornate #2
  • 656766 Sizzix Bigz Die- Flowers w/Stems, leaves & Heart
  • Papeles: Webster's pages, Artoz, Core'dinations
  • Tinta: Ranger Distress ink
  • Alfabeto: American Crafts Thickers
  • Otros: Ikea Ribba Shadow Box, cartón, cinta,brads, tags, botón, pinza, brillantito

Ahora es costumbre que te anuncien el nacimiento de un bebé enviándote una fotografía por el móvil, así que ¿Por qué no utilizar esa fotografía para hacer un regalo muy especial?

Todo lo que tienes que hacer es imprimir esa foto, ponerla en un marco y forrar la base con papel decorado. Después, utilizando tu Big Shot, corta el Ornate frame con cartón y cartulina amarilla y las flores con cartón y papel decorado. Entíntalo todo y pégalo en la parte inferior derecha. Después lo adornas todo con cinta, el nombre del bebé y pequeños adornos como tags, brads y pinzas.

Para equilibrar el conjunto, he creado un cluster en la parte superior izquierda con una tira de papel decorado, los restos de los papeles que había troquelado y más adornos pequeños.

¡Y listo! Es un proyecto muy bonito y fácil de hacer, que además les encantará a los padres y a las abuelas, porque seguramente todavía no habrán tenido tiempo de enmarcar ninguna foto del bebé.

¡Feliz lunes!

Elena

Hello from the new girl!


Regular visitors to the blog may be a little confused by my unfamiliar face and name, but hopefully as the weeks go by I'll become as familiar as Pete and Angela and the other Sizzix bloggers you know and love!

My name is Katy and I'm a quilter, author and blogger (you can find me the rest of the week at my regular home - Monkey Do), as well as a huge fan of the Sizzix big shot and dies.
If you were fortunate enough to visit the Festival of Quilts in Birmingham last August, you may remember me as being on the Sizzix stand with Angela running the free classes. It was a wonderful few days, and one of the highlights of my year. So, to be asked to become one of the blogging team for Sizzix is really quite exciting. I love to make quilts, and I love to share the process and talk about quilts (possibly a little too much, if you ask my family!)

One of my favourite types of quilt to make is a scrap quilt, and my Big Shot really does get a bashing with the amount of scraps I cut throughout the year. Whenever I make a project I cut the leftovers into squares or strips or triangles for ready made pre-cut pieces, like my very own charm packs or jelly rolls. It makes them far easier to store, and I'm more likely to use them if they're all cut and ready to sew.

Of all the Sizzix dies I probably use 2 more than any others - the Bigz 2.5" square die (either the single square or the Bigz XL longer die that cuts in multiples of 9), and the Bigz XL 2.5" strip.

This weekend I turned a pile of Christmas fabrics (I realise I'm a little late for Christmas, or possibly just incredibly organised for next Christmas - you decide!)...

the next scrappy trip along quilt!

...into strips....

cut cut cut

In order to make matching Christmas quilts for my friend and me (using this free pattern). I'll be sharing my progress over the coming weeks and next Monday I'll have a little project for you to try using scrap squares so get your 2.5" square Bigz die ready for that!

Over the Christmas and New Year period I whipped up the quilt below in just 3 days (for cutting and piecing the patchwork quilt top). The 2.5" strip die made it so simple to cut all of those strips (there were 216 in total from 72 different fabrics!) I also used the same Bigz XL 2.5" strip die to cut strips for the binding.


scrappy trips

So there you have it - that's a little introduction into what I like to make and what you can expect to see from me every Monday. I hope you'll stop by regularly and if you have anything you'd like to see then please leave me a comment and I'll do my best to give it a whirl!

Until next time, have a wonderful week and happy quilting!

Katy x