Wednesday, 8 August 2012

Tonal Table Runner


Hello again, are some of you looking forward to the Festival of Quilts and the NEC next week?
I know I am - although the preparation is always a bit hectic - I love seeing what other people have been working on, and the mixtures of colours and design, I also love meeting people.  This year I am running workshops throughout the show  so I hope to meet some of you there. tbe demonstrating the workshops witll be running throughout the show and I will deomonstrating some of the new patchwork dies in conjunction with the Big Shot machine. Come along and see what we're doing and try a project.
I do hope I'll get a chance to look round, but as always will try to resist buying fabric and books.( Let me know if any of you have a fool proof method for this!)

In the meantime I have been working with some of the fabrics I show cased recently - I have decided to make some table runners - partly because I wanted to see how different designs work, but also I wanted to make something small ( and maybe I'm planning ahead for Christmas.)


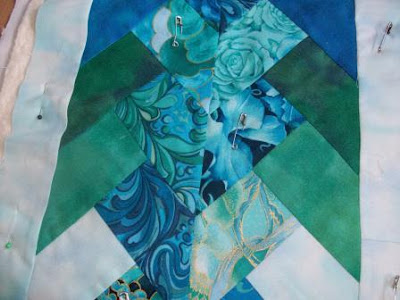
I have used 6 fabrics to create a sort of woven impression. The difficult bit was planning - but once planned the cutting and stitching was really easy. I used the Big shot  and dies 657607 (2" finished square) and 658328 (2 1/2" strip die and extended cutting pads)
It is best to draw out the design, or lay out all of the pieces before stitching to make sure the lines follow through. You can play with the shape of the ends of the runner, by sqauring off the ends of  bringing them to a point.
I then used the same fabrics with die 657615 and bordered it using the strip die 658328.

I think this one would work really well in Christmas fabrics as well - and the bonus is that as the cutting is so precise it is really quick to make.

For a change I used Tanya Whelan fabrics, I used die 657607 and set the squares on point and then used die 657611 to cut triangles to end each row.


Such a pretty range of fabrics.
I had fun with these - and the results will, off course, vary with the choice of fabrics.
Have fun.
Angela

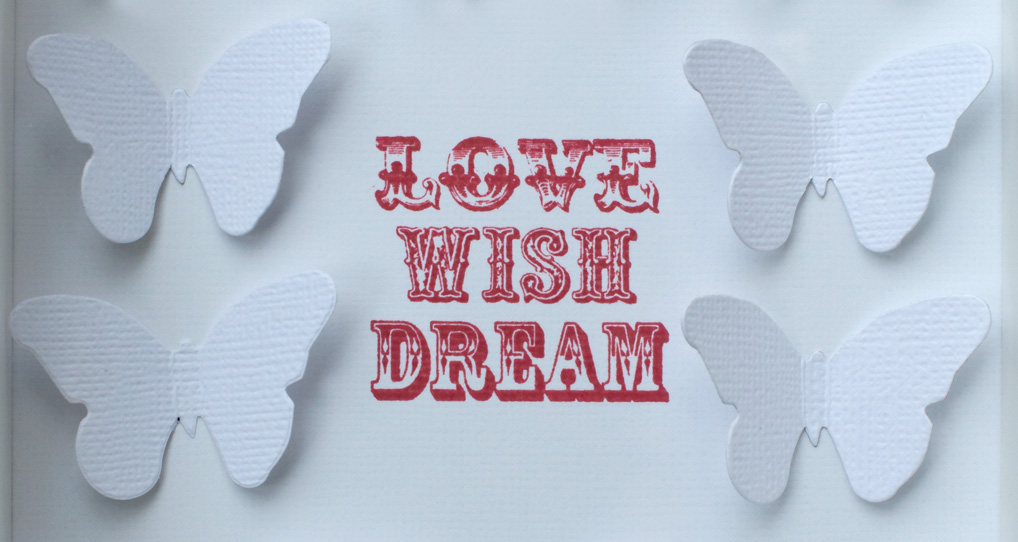
Love Wish Dream


Happy Wednesday everyone,

When looking for inspiration for paper crafting projects I don’t just browse through scrapbooking and cardmaking magazines. Home décor websites and magazines are a great source for new ideas; they are filled with beautiful styles, fresh colour combinations and insightful layouts.

A few weeks back I came across Sarah&Bendrix website and was amazed by the beauty of their designs and handmade items. I fell in love with their pure, simple and graphical designs, and when I found a white photo frame on my bedroom cabined some days later, I knew right away what to do with it:

Here’s a list of materials I used:

First I cut a 17 x 22 cm square of white cardstock for my picture background. Using the beautiful butterfly die I cut a pile of white butterflies and started positioning them on the background.
Then it was time to decide where to place the sentiment text and when the position was determined I stamped it with red ink on the background.
I folded the butterflies in half and glued them on the background. Then I placed the butterflies inside the photo frame and my new home décor item was finished.


Have a lovely week,


Tuesday, 7 August 2012

Add sweetness to any project with the embossing folders!


Hey there!

Here I am with a new inspiration Tuesday here on the Sizzix blog! :)
Today, I would like to invite you to create something that makes you smile, and add some texture to your layouts with one of my favorite Sizzix products : the Embossing Folders!

For this layout, I simply embossed a piece of white cardstock : it measures 4x6" and is perfect to be glued anywhere on my layout!

I first glued my photo, then my embossed cardstock and another piece of patterned paper.

Just add a tiny bit of machine sewing around the embossed piece of paper and you'll get a nice and texture ONE BLOG along your photo.

Here's what you'll need if you wish to emboss cardstock (seriously, once you try the embossing on the big shot, you'll fall in love) :


I really think that embossing a piece of cardstock adds something special to a layout : it is soft, textured, unique. love it!

Supplies list
Studio Calico August kit
Color Conspiracy background paper
Echo Park Stickers
ILS stamp

Take care!
céline

New designer on the blog


Hi everyone- so excited to be joining you here on the Sizzix UK blog!

I am currently living in Virginia, right outside of Washington, DC. I was born in New York- and sadly, don't have the cool accents that all of you do :-( But hope you will put up with me anyway...

I think I have the best job in the world. I get to design dies for Sizzix! Here's how it all started...

When we first got married, my husband was a LT in the army and money was tight. I made a lot of cross-stitch samplers as gifts for family and friends. I started going to the Arts and Crafts Center on post to mat and frame my work because it was much less expensive than going to a frame shop. I wound up with lots of matboard scraps that were just too good to throw away! So I started cutting and scoring, folding and layering... making books, boxes and all kinds of fun things from it. The only problem was that it took so long. Each project had to be measured carefully and cut just right. It was almost impossible to get clean and consistent cuts. So I decided to approach Sizzix at CHA to see if they might be interested in making a different kind of die that would work with thicker materials like matboard and chipboard. Much to my delight, they agreed that this was a good idea! So in 2009, my first collection of ScoreBoards were introduced. Some of my latest designs may be seen here on the Sizzix site.

ScoreBoards cut the same as all of the other Sizzix dies, except there is an additional blade that cuts halfway through the matboard, producing a nice clean score line. They come out perfectly every time- you really can't mess them up- and they are really quick and easy to make. I try to design boxes and books that are versatile and can be used for lots of different purposes. They are just waiting for you to put your special touches on them.

Here's a project I made with the ScoreBoard Index Card Holder die. I used it to hold my name badge at the Craft and Hobby Association show I attended last month. Inside, I adhered two Business Card Boxes which were embossed with the Lace Textured Impressions folder. I put my cards in one box and other people's cards in the other one. There was also room for a tiny pen. This was so handy- I was even able to carry some money and my hotel key in here!


I'll be back in two weeks with another project and tips for working with ScoreBoards. In the meantime, please stop by my blog (http://eileenhull.blogspot.com) for more project ideas and to find out what's new. Thanks so much for reading!

Eileen

Monday, 6 August 2012

Summer is here!


Hello everyone!
How are you?
I just came back home from holidays, sun and sea and long days spent with family and friends, this is amazing and this is one the reasons why I love summer! I feel relaxed and free and you?

I have made a simple layout that I want to show you today :)


You know I am deeply in love with circles and the circle framelits are one of my favorites lately! 

Materials I used:
Papers: Bella boulevard
Stamps: studio calico and cats life press
words stickers : bella boulevard and authentique
embellishments : Bella boulevard
cardstock : Bazzill
Tape : Bella Boulevard
Brads and Buttons: Bella boulevard and american crafts
3d double side tape


How to make it

This is a 8.5 x11 inches layout. A lot of time ago I didn't love this kind of size but now I adore it! With the framelits circles I have created many little circles and for every one I have created an embellishment.
You can use little words stickers, or buttons, or brads to create something really lovely. 

It's really cool to use different size of circles because you can have a very funny effect on your page. This is fun like the fun in the summer!!! I think this page is like a splash ;) LOL !
You can cut circles from card stock and patterned and glue them or stitch them or simply adhere one on the other with the 3d double side tape :)

Here some details.


Have fun using the super amazing sizzix products!!!
More layouts coming soon ;) Stay tuned!! I want to inspire you :)

Love, Lory

Pop up crazy!


Today I would like to share this card I did a few months ago using one of Karen Burniston super pop up dies, the scallop circle.


Basically what I did is to die cut four scallop circle pop up elements and attached them together, as you can see bellow in the photo that I took from the top.


I decorated the rest with the butterflies from the Magnetic movers and shapers from Tim Holtz.

I used the different pop up elements to attach the messages and also a frame that highlights the butterfly.


Of course, the only downside, is that you will have to have one side that will be like the one bellow, ie, non decorative.


 All in all, I just love it, it folds flat completely so it is easy to post but ever so dimensional.

By the way, the card was just plain card spritz with a range of pearlescent misters.

Friday, 3 August 2012

Sizzix and Prima - perfect match!

Hi there my friends!
I know I was very quiet last weeks.... it is all beacuse my awfully  BIG adventure in USA and Canada and visiting CHA in Chicago! I was so very lucky to be the part of this big event... and some of my project were displayed in Prima Marketing booth!
Of course when I only could I was visiting my friends and idols, taking photos and sneaking into my favorite Sizzix booth...oh how many beautiful things I saw there!!! woo hoo!


Of course I wouldn't be myself if I didn't use some of my favorite Sizzix dies fon the projects I made for Prima... here is one of them, based on bold, beautiful, colorful "Rosarian" collection from Prima and Sizzix Bigz Die - Flowering Plant (657713).  
I think it coresponds with this paper collection beautifully! 


 Here are some more details:


As you can see I layered 2 leaves of the palnt, one on the top of another.... 3D foam was very helpful here!


See you soon - I'll be back with more projects and inspirations next week!
Happy creating!
xoxo
Finn

Thursday, 2 August 2012

Happi Days


Here I sit, morning sunlight slanting through the window in a nation gripped by Olympic fever and I couldn't be more Happi!

I know what you are thinking "Happy is spelt with a 'Y' you idiot!". Not today; today we spell it with an 'I' because I am actually referring to the new range of Sizzix Bigz dies and just the mere thought of them makes me happy with a 'Y'..... confused?

Hopefully the images below should help to dispel any confusion. The Happi range features over a dozen Bigz dies featuring some of the cutest artwork you have ever seen. Some of them were on a QVC show recently and sold out in seconds, mainly thanks to Angela's beautiful applique work.

Below are a few free-standing cards made using simple folding techniques which you will find explained on the website at http://www.sizzix.co.uk/101 

the first two cards are made using the Single Fold Technique, the second using the Concertina Fold Technique and the three at the bottom using the Standing Fold Technique. Hope they make you as Happi as they make me.


Mini book Boys by Karine


Mini album "Boys" by Karine

Here is a mini album 100% handmade! Its size is 12x15 cms and it is so full of details: windows, hidden pages, it is full of surprises and tricks!
It has a creative, textured and asymmetric structure. It will be perfect for the nicest portraits of your children or hubby.
I taught a class with this album during the EntreArtistes training courses. I brought my Big Shot and the students discovered with great pleasure how it was fun to emboss and cut, using the magnetic dies as well!

-656931 Die rosette
-657214 little tags set
-657007 Base Tray
-657671 embossing folder 
-657115 flower

Once the structure is done, we can start decorating. We’ll need our Sizzix dies for that!

The cover is decorated with a magnificent rosette! Nothing easier to create than this rosette with the proper die! One go in the Big Shot, fold delicately following the doting lines, glue, and here we are!
I added a wooden button and a bicolored string to complete its decoration.
It always leaves a deep impression when used on a cover and I can’t resist using it

I created a window in my page by using the "tags“ die and my base tray. I like magnetic dies a lot because you can punch your shape in your page, placing it where you wish it to be. In this window, you can insert a tag or notes.


I used the "measuring“ embossing folder to go with Paul’s picture. Its design fits perfectly to the children theme. It is a symbol of the passing time and of our children growing up
I used kraft paper for embossing.


I also used a strip embossed with the same die with a picture of Maxence. I cut its edges into spears as a touch of fantasy.


You can use your embossed paper as such, or add some ink on them for more contrast. I created some shades with Distress Vintage Photo ink.


At last, using my Big Shot, I cut a flower into turquoise cloth with the floral die. Its center is decorated with a patterned paper scrap, a punchy and a wooden button.

I love using my dies as accents. They are the perfect final touch to embellish my mini albums!

See you soon!

Karine

Supply list:
Papers: Echo Park
Cardstock: American Crafts
Alphabets: Pebbles
Buttons: American Crafts
Stars: Studio Calico
Washi Tape
Turquoise acrylic paint
Ink: Black Versafine
Distress ink: Vintage Photo
Stamps: Craft Origine
Others: Cloth, tags

Mini album "Boys" par Karine

Un mini 100% fait main au format 12x15cm aux 1001 détails : ouvertures, pages cachées, un album rempli de surprises et d'astuces !
Une structure créative, texturée et asymétrique pour les plus beaux portraits de vos enfants ou votre homme.
Un nouveau mini pour aujourd'hui que j'ai donné en atelier lors des formations EntreArtistes, encore une fois la Big Shot faisait partie du voyage et les participantes ont eu le plaisir de découvrir les joies de l'embossage, de la découpe de tissu ainsi que les dies magnétiques !

-656931 Die rosette
-657214 Ensemble de petites étiquettes
-657007 Base Tray
-657671 Plaque à embosser
-657115 fleur

Une fois la structure terminée, place à la décoration et c'est là qu'interviennent les dies Sizzix !

La page de couverture est décorée d'une superbe rosette ! Rien de plus simple quand on a le die, un simple passage à la Big Shot, on plie délicatement selon les pointillés, on colle et le tour est joué ! J'ai simplement décoré avec un bouton en bois et de la ficelle bicolore.
Une découpe qui fait toujours son effet en couverture et dont je ne me lasse pas d'utiliser :)

Grâce à la découpe "Etiquettes" et à ma base tray, j'ai créé une ouverture sur ma page, j'aime beaucoup les dies magnétiques, ils vous permettent de perforer votre page en alignant votre motif selon vous souhaits. Une petite ouverture pour glisser des petits mots ou encore un tag.

Pour accompagner la photo de Paul j'ai utilisé la plaque à embosser "mesures" un design qui convient parfaitement aux enfants, symbolique du temps qui passe, nos enfants grandissent :)
L'embossage est fait dans du papier kraft.

Une petite bande du même die est utilisé plus loin avec une photo de Maxence, celle-ci est découpée est pointe pour plus de fantaisie.

Vous pouvez laisser vos dies au naturel ou les ombrer pour plus de contrastes. J'ai utilisé ici de l'encre Distress Vintage Photo.

Pour terminer mon album une fleur avec le die floral, j'ai utilisé ici du tissu turquoise que j'ai découpé à la Big Shot, le coeur est complété avec une chute de papier imprimé, une perforatrice et un bouton en bois.

J'adore utiliser mes dies en embellissements ils constituent la touche finale parfaite pour décorer mes mini albums !

A très vite,

Karine

Matériel :

Papiers : Echo Park
Cardstock : American Crafts
Alphabets : Pebbles
Boutons : American Crafts
Etoiles : Studio Calico
Washi Tape
Peinture acrylique turquoise
Encre : Versafine noire
Distress : Vintage Photo
Tampons : Craft Origine
Divers : tissu, tags

Wednesday, 1 August 2012

Urban card for a City Girl


Happy Wednesday everyone,

This week I wanted to show you a cool inking technique I used on a card background:

Here’s a list of materials I used:

- Big Shot Machine (655268)
- On the Edge Die – Townscape (656919)
- Square base cardstock, black
- Cardstock, dark grey and white
- Black stamping ink (e.g. Distress Ink: Black soot)
- Ink blending tool / sponge
- Paint dabber (e.g. Adirondack)
- Stamps: DoodleFactory: Urban collection, Sprunk. Studio Calico (Sentiment, arrow)
- Washi tape
- Two-sided tape, glue

First I die cut the ‘Townscape’ image on the top of the dark grey cardstock. The upper piece above the house roofs, which I normally throw away, became my stencil for the card background.


I started inking the background on the top of the white square cardstock. With an ink blending tool I dabbed a light layer of black ink on the white cardstock. When finished, I turned the stencil around, covered partly my first row of houses, and dabbed a second row of house roof images. This time I was using a bit more ink to get a darker result.


Then I attached the dark grey die-cut border (the lower part) below the inked houses and trimmed the card front to a size slightly smaller than my base cardstock. Before adhering the card front to the base I added some washi tape on the bottom.

The funny graffiti artist from DoodleFactory was just perfect for this card so I stamped the image on white cardstock and cut it out around the edges. I dabbed the white cloud with white acrylic paint (Adirondack paint dabber) and finished with a stamped greeting text ‘Hey Girl’. If you don’t have paint dabbers you can use normal white acrylic paint or gesso and dab it with a round sponge brush.

Especially when using black cardstock I finish the inside of the card on the same go. Then I don’t need to look for a white pen when I want to use the card. This time making the inside did not take much time: A simple white rectangle embellished with a few stamps was all that was needed for this urban city girl card.


Have a great week!