Showing posts with label Block Talk. Show all posts

Monday, 19 January 2015

Butterfly Birthday card


One thing I always have a need for is birthday cards, even though I have numerous ways to be reminded of birthdays, I always forget to make and send them in time. Like many other years before, I am trying to be better this year and what better way to start than with a few Sizzix simple but effective birthday cards.

My love affair with the intricate butterflies continues this cold and wet January.

For this card I used the Sizzix Thinlits Intricate Butterflies 659971 and the Tim Holtz Block Talk lowercase alphabet die (659442) as well as Basic Grey Kissing Booth papers, white card, gold flakes, foam pads and Scrapbook Adhesives 3L adhesive sheets.


I placed the patterned paper on the the front of my card. Then I trimmed a piece of white card to size. I place the intricate butterflies dies over as well as die cut letters to see their visual weight. Once I was happy with their placement, I die cut them using my magnetic platform to secure them in place. I used the intricate butterflies instead of the Framelits included in the same set because I did not want any residual embossing on the outside. Then I glued the white card with foam pads.
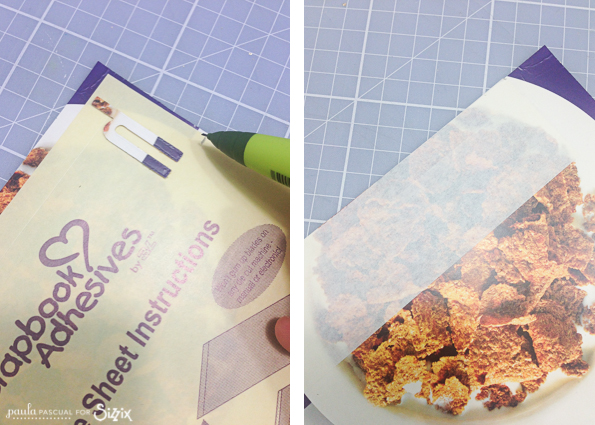

To create the gold effect letters I used adhesives sheets by 3L. They are a super fine double sided film that is much more delicate and thin than the one I usually use from Stix2. I am a fanatic o adhesives so I find different thicknesses have different uses. I apply the adhesive to both front and back of a cereal cardboard.


I die cut each letter and then position them on the card. Once I am happy with the position, I use low tack tape to secure them in place (relative to each other).


I lifted the backing of the adhseive sheet, and glue them in to position. rub down the letteres well and then I removed the low tack tape.


I removed the protective sheet from the adhesive sheet and place the card in my golden flake tub. I brushed the letters with a sponge to make sure all the adhesive is covered in gold flakes.


I then stamped the message using one of the clear stamps I have designed and then trim it to size.


Finally I added more die cut butterflies (from the same set), ribbon and golden adhesive beads.


It didn't take long at all to make, but it is quite detailed. So I hope who ever is going to receive this card this year is going to like it!


Sunday, 28 September 2014

Hello Fall


Hi it's me Bente with you here today.

I used one of my new lovely dies to make a couple of seasonal cards. Fall/Autumn is upon us and we might as well do the best we can with it,...LOL! Not a Fall/Winter person myself :-)


My two cards are fairly similar as you can see, but I often like to see how colour and texture can change the appearance of a project and achieve variation with a little less effort..


I used the Leaf die with embossing folder here. It's a wonderful Bigz die and it cut through the chipboard I used for one of my leaves like butter. Before adding the leaves to my cards, I use my sewing machine to add some stitching as extra embellisment.

These are the Sizzix products I used:

Sizzix Big Shot Starter Kit (Powder Blue & Teal)

Sizzix Bigz XL Alphabet Die - Block Talk Lowercase

Sizzix Bigz Die w/Texture Fades - Layered Leaf

Sizzix Thinlits Die Set 6PK - I Heart This

Apart from this I used papers from French manufacturer Les Papiers de Pandore.


Thanks for looking in today!! :-) 

--------------------------------------------------------------------

Hej, det er jag Bente,  som vil vise dere noe nytt idag.

Jag använde en av mina nyaste dies för att göra ett par höstinspirerade kort. Hösten är här antingen vi vill eller inte och man kan väl säga att det inte är min favoritårstid... :-)

Dagens två kort är som ni ju kan se ganska likartade. Jag kan tycka det är kul att se hur små variationer i tekstur eller färg kan ge ganska olika resultat utan att kräva så mycket extra av ansträngningar.

Jag använde den fina Bigz diesen med ett stort löv och tillhörande embossingfolder . Det är härligt att jobba med Bigz diesen som skär genom de flesta material som smör! :-) I detta fallet använda jag en bit chipboard för mitt ena löv. Innan jag satte fast löven på kortet sydde jag på dom med maskin som extra prydnad.

Dessa Sizzix produkterna har jag använt:

Sizzix Big Shot Starter Kit (Powder Blue & Teal)

Sizzix Bigz XL Alphabet Die - Block Talk Lowercase

Sizzix Bigz Die w/Texture Fades - Layered Leaf

Sizzix Thinlits Die Set 6PK - I Heart This

Dessutom har jag använt papper från sen franska tillverkaren Les Papiers de Pandore.


Tack för att ni kikar inom! :-) 


Wednesday, 17 September 2014

Scraptastic!


I know I don't often feature Scrapbook layouts on this blog mainly due to time constraints, but I do love scrapbooking, especially as it is responsible for so many great products to play with and innumerable cool techniques to learn, all of which filters into my other crafty interests.

I was going to make a card with the magnificent Thinlits Die Set Winter Borders and Rosette designed by my good buddy Paula Pascual. this is one set from Paula's new Everyday Collection released this month, I implore you to check it out (if you love delicate butterflies then look no further!!!)

When I say I was going to make a card, I promised Barbara at a show in Manchester that I would do just that, however I couldn't resist doing a little layout, I hope you will forgive me?

Below you will see the die set mentioned previously, an 8" x 8" square of card (all the card is from the My Mind's Eye Lost & Found 3 Collection) and three photo's of my daughter Poppy taken in the heavy snow we had in the UK a couple of years back.

At this point I have no idea what I am going to do!


OK! I now have a rough plan/idea so I'm going to start by die cutting a circle from Kraft card using the largest Circle Framelits die. I have combined both sets of Circle Framelits and between them I have every size I need ( 657551 and 658604). After die-cutting the first circle I place the die which is the next sized down onto the die-cut circle slightly offset. I repeat this twice more until I have three thin kraft card rings. Next, I use a brayer to apply a thin layer of gesso.

I cut a rectangle of the pale blue dotty paper and trimmed away one edge using the snowflake border die. I applied some rows of faux stitching using a pattern makers wheel and a white gel pen before attaching all the separate elements to the layout together with a die-cut silver snowflake border.
From the same dotty card I cut two halves of the snowflake rosette and proceeded to lighten the tips by dry brushing with gesso. Next, I concertina folded the two halves before attaching end to end to form a crown before folding in toward the centre to create the rosette. I usually secure this at the rear with a piece of scrap card attached with a hot glue gun to get a solid bond. I next die-cut a deep blue circle, a silver snowflake and a deep blue border strip whose edges I gently sanded to add a little contrast.

I attached all the elements to the layout together with the photos and a rectangle of green patterned card which has been lightly distressed. I covered a piece of mount board with the deep blue card and used the Block Talk Lowercase Alphabet Die to cut the letters and printed the word 'Princess' onto the green card using my PC. I have a set of similar alphabet stamps which would work equally as well. After attaching the words to my layout I started to add a little bling in the form of assorted adhesive pearls and gems.

Finally, I die cut a circle from card and used it as a template around which I attached a row of clear adhesive gems using my trusty tweezers before removing the card circle.


Here is the finished article, lots of fun to do as always, I think the green really lifts it especially as I could use pearl gems of a similar colour. I love the way the circles give it a sense of movement. 

So many photos...so little time!


Wednesday, 13 August 2014

Perfect 10


It is ten years to the day since my wonderful girlfriend became my wonderful wife. She is probably the only woman in the UK who gets dragged into craft shops by her husband so I thank her for her patience and understanding.

She does get a special handmade card every birthday/Christmas/Valentines/anniversary and she has amassed quite a collection thus far. I have made her a special card this time but I also wanted to commemorate the occasion with a little piece of framed art, the making of which I would like to share with you today.

Once again I reached for the new Jillibean Soup collection of dies and folders because I LOVE IT! but more importantly because I think she will too. I haven't itemised the dies used but if you follow the link above you will get to see them all together as it should be.

I also used the new Block Talk Lowercase alphabet die by Tim Holtz and the Decorative Strip die Antiqua Numbers by Brenda Walton which is one of my favourite go-to dies for birthday cards because it has what I like to think of as a contemporary vintage vibe! which is an oxymoron which makes perfect sense to me (and me alone probably!).

I attached a square of pure white card to a 7 inch (just over 17 cm) square of mount board before die-cutting the number 10 from thin white paper and attaching to the board with low tack spray adhesive. I then proceeded to apply Distress Ink with an applicator, this was built up gradually blending the blue and the green (Broken China and Shabby Shutters) and the orange and red in the top right (Wild Honey and Worn Lipstick). Next, I took two Distress Paint daubers  and watered the colours to a milky consistency.

After strategically splattering the paint onto the square with the paint brush I pealed off the die-cut numbers and traced around the masked area with a fine black marker pen, it doesn't have to be too accurate. 

All the decorative paper used comes from a 6" x 6" paper pad from Basic Grey featuring the fab Hipster collection and I used a sheet of pale green patterned paper to cover some scrap mount board before using it to die-cut the letters for the word 'perfect' which I then attached to the square above the numbers. That extra dimension really makes all the difference for me.
Now, this is where things get a bit crazy, random, scatter shot... take your pick!!

 I knew what I wanted to do with the photo which I printed from my PC before trimming into a Polaroid style shape before adding a few stamped sentiments using my Dear Lizzy roller stamp. After that it was just a question of cutting, stamping, sanding, inking and folding a seemingly disparate collection of designs in the vain hope that they might work together on the page... I'll let you be the judge.
Here is the finished frame, you can see that I mounted the square into the centre of a box frame bought from IKEA (I think?) I spent a long time moving the various die cut elements around the page before I found a pleasing composition which for me is all part of the fun!

Every thing is attached using double sided tape or 3D foam pads adding a sense of depth and dimension, you will also notice a random smattering of adhesive pearls/gems in a selection of hues and sizes.

I hope you like it but more importantly, I hope my wife does too!


Here is a bit of close-up detail.


Wednesday, 9 July 2014

in-flight entertainment


Tiny, huge, plain, intricate?.... it doesn't really matter when we are talking about butterflies. They are such a versatile shape and on many occasions provide the perfect finishing touch to lots of papercraft projects.

Today, I am proud to introduce a new die/embossing folder combo from that creative bottomless pit that is Mr Tim Holtz. I am sure that this will become a huge favourite for many of you as it is for me. I had the privilege to work with this die last December in preparation for our impending trade shows and the resulting projects drew quite a crowd. I have had to wait until now to finally use it again, Hurrah!!!

The sizzix products I'm going to be using today are:

I also used some of my favourite Distress Inks namely Mustard Seed, Wild Honey and Walnut Stain (if I added Crushed Olive, another favourite of mine, they would make a great salad dressing!)


I started with an A6 sized Base card made from stiff ivory card stock and applied the inks with a foam applicator starting from the top down from the light colour (Mustard Seed) to the dark (Walnut Stain). I stood the card up and gently spritzed the top of the card with water allowing it to run down before drying with my heat tool.

I die-cut a strip of paper (thin copier paper is fine) just long enough for my card using the confetti die, this is another die which will prove a useful tool whether as a stencil or for the tiny circles which are so useful. Here I'm using it as a stencil through which to create the pattern using my inks.

I die-cut the butterfly from the same ivory card that I used before and placed the butterfly into the Texture Fades embossing folder which accompanies the Bigz die. As you can see from the image on the right, the detail is superb, but the magic really starts to happen when I start to apply the inks....

 I started with the Mustard Seed (yellow) ink before inking the centre using good ol' Walnut Stain (dark brown). Next, I applied Wild Honey (orange) blending from the tips of the wings inward before adding a little depth around the edges with the Walnut Stain again. If you loved the Block Talk alphabet die then you will love the lowercase version which is a perfect companion. I love the fact that it's a Bigz die which means Heavy weight materials like mount board, leather, textiles, balsa wood etc. can be cut with no fuss or bother whatsoever. I used the die to cut the word 'hello' from mount board covered with a sheet of the ivory card...easy-peasy!


 And here is the finished card, I gently curled the butterflies wings to add a little dimension and sprayed it with a dusting of silver Spray and Sparkle from Crafter's Companion which gives it a light gloss. I always feel that butterflies should be breaking free of a card/layout, they should give the impression that they have just stopped by for a fleeting moment and will be off the minute your back is turned.... or is it just me?


Before I forget, Check out the Prima Blog this week where I am featured with a couple of cards to celebrate the launch of the new range of Sizzix dies designed in conjunction with Prima Marketing Inc. Here is a sneak preview below.


Friday, 21 March 2014

It's A Numbers Game ...


Hello it is Katie here.

This week I have had fun creating some cards featuring numbers.  Adding numbers is a great way to personalise cards for both children and adults, although as adults we would rather forget our age!!


Of course all of these can be altered using any numbers you wish. 

These large Sassy Serif Numbers are perfect for cards.  They are so versatile and great for scrapbooking too! 


The numbers and alphabet here are from the Block Talk Alphabet. Again this is a die which has so many uses.  


I have so many more ideas using these dies, maybe I will share a few more with you soon. I would love to feature some fun children's cards using numbers.

Have a lovely weekend and Happy Crafting x


Wednesday, 1 January 2014

It's a wrap!


'It's a wrap!' as they say in Hollywood. That's it for 2013, and it's time to usher in the next one. I have been working with the new Sizzix collections for the last month, so I know that's there is plenty to excite die cutting fans in 2014.

The title of this blog is also a play on words as it refers to the visual pun on the card. I adore brown paper gift wrap, it's so iconic and I love it teamed with string and Kraft card tags....Classic!

I used one of my favourite alphabet dies, namely the Block Talk Bigz XL by Tim Holtz which is an investment you won't regret, trust me! (never trust anyone who says 'Trust me'..... except for me of course!)

I started out by attaching gold glitter card to a piece of chipboard and die cutting my numbers ( I made this card last year and I have been keeping it till today, hence 2013). Next, I took a rectangle of brown paper, scrunched it in a ball and inked the edges before curling the ends of two strips of red card to look like ribbon.


I took the red card strips and attached them to the centre of the base card before mounting the brown paper.


Finally, I attached the numbers using thin strips of 3D foam pads. Simple!


Happy New Year!

Many thanks to those of you who follow my blog, I love writing it every week as it keeps me on my creative toes, I look forward to sharing any new ideas, tips and great die cutting inspiration with you all in 2014.


Wednesday, 27 November 2013

Festive Font Fun!


This week I wanted to create some really simple Christmas cards which were inspired by a Father's day card that I saw Somewhere or other and I 'kind of' adapted the idea for this weeks blog. Isn't it amazing how we take in inspiration and ideas which pop up when least expected?

I know that once December arrives we will be bombarded with Christmas tunes which is just fine by me, I can't wait to get my Christmas classics on the CD player. Would I feel differently if I worked in a shop or supermarket listening to the same CD on repeat 8 hours a day....YES! I love 'em and I thought I would steal a few choice lyrical phrases today.


I wanted to use my favourite BLOCK TALK alphabet by Tim Holtz which has all the uppercase letters and numbers on a single Bigz XL die, that's right, a single die! It's a die that you will go back to time and time again because the letters are tall and thin which means that you can fit some pretty big words on a card/tag/ layout,

I started by attaching an  A4 Double sided tape sheet (from the clever people at Stix2) to the back of a sheet of stiff white card this is a great way to add and adhesive layer to your die cuts but I want the adhesive on the front and not the rear this time. I trimmed rectangles to size to fit over the individual letters that I needed (tape sheet side against the die) and ran it all through my trusty Big Shot. Next, I placed the letters on my cutting mat against the place with the measurements and noted that the word 'MERRY' measures approximately 4 x 8cm.


At this point I turned to my PC and created a document in Publisher I drew a rectangle measuring 148.5 x 105mm (A6) as a guide for the front of my card. I also drew a rectangle measuring 40 x 80mm which represents the word 'MERRY' I then created a couple of text boxes with rest of the text and manipulated them to fit in the large rectangle. Once I had everything in place I flipped it through 90 degrees and set it in the top left hand corner before deleting the large rectangle. I sent the document to print placing an A5 sheet of stiff white card in the feed tray.


Once the card was printed I scored and folded down the centre. Next, I cut strips of double sided 3D foam pads and attached them to the rear of each die cut letter prior to mounting them onto the base card, I drew a faint guide line to help with accurate placement.


When the letters where in place I set about carefully removing the backing to the adhesive sheet on the front of each letter using the point of a craft knife. Finally I sprinkled my chosen glitter onto the face of each letter before shaking off the excess. You are probably wondering why I didn't just cut glitter card? Well, I have lots of gorgeous glitter in cool and unusual colours and I don't have the glitter card to match so it's another way that die cutting becomes a great problem solving tool.


As you can see I finished the card with a white bow and adhesive gem.


I couldn't stop at one card though.....