Showing posts with label Intricate Flowers. Show all posts

Monday, 13 April 2015

A loved layout

Spring is here and brighter colour and cheerful layouts are in order!

I often print out many photos from my mobile in smaller sizes for mini albums. Not all of them make it in to the album so I have some photos laying around that are pretty special but just simply were the wrong size. But they are perfect for my favourite size of scrapbook layout, 6 x 8. So I grab one of those photos and I started die cutting!

For this layout, I used :


I used Simple Stories papers from their collection I AM. I die cut two chevron borders out of the solid papers using one of the Decorative Trim dies. I layered them on the white card and glue them at their centres. I die cut thre banners and glue them on the left hand side.


I used the other trim die from the same set to decorate the bottom left corner. The word is from a pattered paper I had left over.


The little heart on the top right corner is from the left over of the bottom left border. The flowers is from the Flowers Intricate 2.

Simple but bright and spring full of colour! I hope you like it!

Monday, 27 October 2014

A layout with lots of flowers!


October is being a busy month for me but a great one too. In June my cousin Angela (who is one of my closest friends as well as being my cousin) and I decided we wanted to participate in this year' Ofrenda de las Flores in our native Zaragoza (Spain). It is a lovely fairly modern (sixty years or so) celebration and it consist of dressing up in our local traditional attire and take flowers to a Virgin Mary statue. We already done it together once before fifteen years ago and we felt it would be nice to do it again. So we did! We had a blast that day and the previous and after days, and because of it I felt I really needed to keep the memories with a layout.


I wanted a layout with pictures of us two. As she lives in Spain and I in London we dont have that many moments of us together, so this is more about us than the sights. I printed my favorite in a larger and then the rest in more or less half the size. I cut all the photos to size ready for later.

I like to have a border all round and a white base. It is something that I do all the time, and I always cut the bit of the patterned middle to save for a future project. Frugal? Me? Of course!


I placed all the photos on the page and started to pull different dies to see how would they look. Since I was there to bring flowers, I thought it had to have loads of them so I die cut them using my Intricate Flowers 2 dies and the Happy card from the Phrase cards set.

Finally, I added embellishments for the centers and some printed stickers from the same collection as the papers which is Spice Market from Basic Grey.


And a couple of close ups:


I treasure this moments and I think it is important to capture and preserve them. That is the point of scrapbooking, isn't it?


Monday, 15 September 2014

A crafty way to keep track of flower dies


I am not sure about you, but I do love and have loads of flower dies. So many that sometimes it is hard to keep track of all of them. For this reason, I came up with an easy reference swatch book that allows be to look through the different flower dies as well as allowing me to check whether some of them look good together even though they are from different sets.


This is the finished swatch book. Here is how I made it.


I die cut all my flowers using different scraps of paper. I printed (as my handwriting is atrocious) the name of each set for easy reference. I attached the name of the set onto thick acetate and then glue the flowers on the acetate. Each set is on a separate acetate.


Using a Cropadile, I made a single hole on the top left corner of all the acetates, and linked them all with a ball chain, which is easy to open to add more or rearrange order.


Here is some of the pages of my swatch book.


This is how it works, by layering different pages I can find out how some of them will work together.


Some of the possibilities were a complete surprise how well they look together.


One of my favorite combinations was this one above, using the Intricate flowers 1 and Intricate Flowers 2. Even though they have similar names I did not designed them to work together at all. But they work really nicely so I am very happy.
 

To make a simple card, I stamped a message on the same paper and die cut it using one of the Sentiment Tag dies. As I wanted it a little bit shorter I place the die purposely over the edge of the paper, one of the beauties of the Framelits I know exactly how it is going to look once die cut.


And that is the finished card. The flower is the central point and I would have only come up with this combo because my new flower reference booklet.


Monday, 7 April 2014

A big photo magnet with die cut flowers


I love boxes, tins and anything in between. I can't bare to throw away anything, just in case I find a function or a project for it.


So, it came to no surprise when I could not bare to throw away this canister with metallic top and bottom. It was actually the lid that first capture my imagination to create a big photo magnet. I used the Circle and Circles #2 Framelits dies through out the project to cut the circles.


The great thing about combining both framelits sets is that you can create really thin frames, like I needed to for the edge of the metal lid. I selected the right two sizes and die cut first the smallest one.


Then, I placed the larger one on to the die cut paper. Usually you can die cut both at the same time, but this two dies are so close in size that it would be impossible to do so. I secured the Framelit die with a few pieces of low tack tape. As you can see it is a really thin circle frame.


For the centre, I decided on using this photo of my husband and I at one of our favourite places in Mallorca - where I grew up. Another joy of the framelits is that you can see exactly where you die cut, no cut faces anymore! To create a small metallic frame around, I used the larger circle die cut from the Circle Wrappers die set, which contains two different sized circle dies not included in the other two.


Finally I added some flowers that I die cut using the Intricate Flowers and the Bunch of Flowers framelits sets. Finally I added a strong magnet to the back, covered it with strong tape and secure it with a piece of round paper. 


And here it it is finished, used to hold one of my nieces drawings.

Come back next week to see what I did with the other part of the box.

Sunday, 16 February 2014

Simple Layout by Gerry van Gent


Hello Sizzix friends!
I hope you all enjoyed a very special 
Valentine's Day with your loved ones!
Today I would love to share with you my
vision of a simple layout using gorgeous Sizzix dies.

Hello
657900 Sizzix Big Shot machine
658607 Sizzix Thinlits Die Set Flowers, Intricate
658551 Sizzix Sizzlits Decorative Strip Die Mini Filmstrip & Mini Tickets
659127 Sizzix Thinlits Die Set Frame Layers & Flower #2
658221 Sizzix Originals Die Curly Gate
659131 Sizzix Thinlits Die Set Labels, Long
658850 Sizzix Thinlits Die Set Conservatory Window
658780 Sizzix Bigz Die Window & Window Box

*   *   *
Because I wanted to add flowers and the collection
didn`t have any I decided to make my own.
I simply chose different pattern papers and die cut some flowers.
For the centers I die cut exactly around the tiny white hearts.
Hello 1

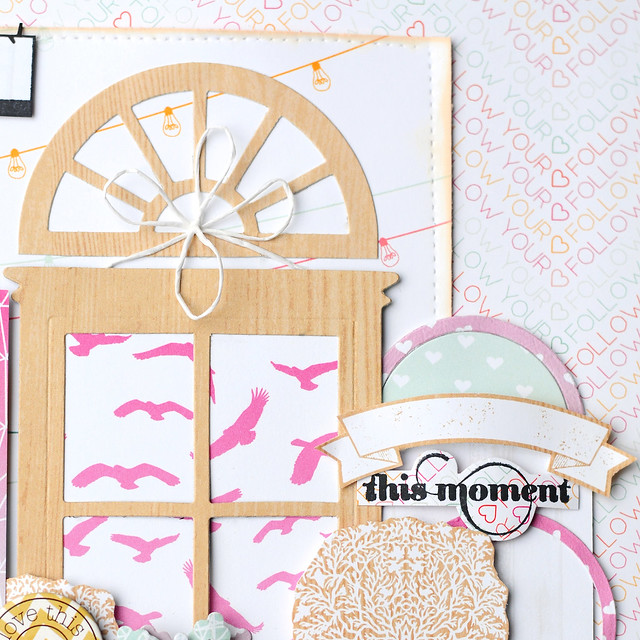
This window is a combination of two dies - 
Hello 2
The top of the Conservatory Window was used
on top of the other window.
658850_conservatory window
658780_2

The die-cut circles spread all over the page were
die cut from the Frame Layers & Flower #2.
Hello 3
OTHER PRODUCTS I USED:
Webster's Pages - "Sprinkled with Love" collection

Thank you for your visit today!
Have a creative day!

Saturday, 29 June 2013

Floating banner card


Hello!

I am back with a floating card, one of my favourites effects using acetate for that effect.

For this card you will need:
657900 Sizzix Big Shot Machine Only
658293 Sizzix Framelits Die Set 2PK w/Stamps - Labels, Flourish
658297 Sizzix Textured Impressions Embossing Folders 2PK - Banner & Flowers Set
658607 Sizzix Thinlits Die Set 13PK - Flowers, Intricate


The above embossing folders match the die set, also is worth notting the Lovely flowers match the embossing folder that come with the Banner folder.


You can see here, on the left, how it works. I die cut the largest banner and then embossed using the banner texture embossing folder.


Because it matches the die it has anice framing effect. Then I added some solour by using distress inks.


 I then die cut the flourish, I was only interested on the centre of the die, because it matches perfectly the inside of the embossed banner. This is great because I usually get unwanted distress in the centre and this way I can perfectly cover it up.


I attached the banner to the front of a folded acetate card - just a piece of acetate folded in half and then trim to the desired size. I die cut another white banner and attached it to tje inside of the folded acetate card. Finally I added the sentiment and a flower I made using the Intricate Flowers framelit set.


I hope you like it!

Sunday, 17 March 2013

"Spring Time" by Gerry


Hello Sizzix Friends!
I`m here today to share with you my latest Sizzix project.
On the photos (taken in April, 2012)  my daughter is
enjoying a Barbie Magazine and making her "dress" wish list ;-)
I can`t wait for Spring to come - love all the blossoming flowers and
all the freshness and colours. And to get into the Spring mood
 I created my layout..."Spring Time"
655268 Sizzix Big Shot Machine
658948 Sizzix Thinlits Die - Frame, Fancy Rectangles
658607 Sizzix Thinlits Die Set 13PK - Flowers, Intricate
657773 Sizzix Framelits Die Set w/Stamps - Butterflies #3
657751 Sizzix Sizzlits Dies - Decorative Vintage Set
657786 Sizzix Textured Impressions Embossing Folders - Dress Form Set
657522 Sizzix Sizzlits Die Set - Card Phrases Set

I chose light pink pattern paper to emboss the dress form.
Once it was embossed I fussy cut only the right side and the bottom one.
I inked the embossed parts with (old rose colour) ink 
and added pearl drops to the dress form as a final touch.
The flowers were die cut from from the pattern paper & white cardstock.


Butterflies were die cut twice by using two different pattern papers

I love the cute little circles from the New Thinlits Flowers, Intricate.
You can not only use them for the centres of your flowers
but also to make them part of your background. And this is how I used them...
I chose different colours pattern papers and die cut all five sizes.
Then randomly adhered them on my white background.

Other Products I used:
Webster's Pages - "Girl Land" Collection
Webster's Pages - "Best Friends" Collection
Webster's Pages - "Composition & Color" Collection

Dutch Translation

Hallo Sizzix Vrienden!
Vandaag heb ik weer een pagina om met jullie te delen.
Op de foto's (van april, 2012) geniet mijn dochter van een Barbie tijdschrift
en maakt haar keuze voor een jurkje.
Ik kan niet wachten tot lente komt - ik hou van alle frisse en bloeiende bloemen en kleuren.
Deze pagina heb ik gemaakt in een lente stemming te komen.
* * *

655268 Sizzix Big Shot Machine
658948 Sizzix Thinlits Die - Frame, Fancy Rectangles
658607 Sizzix Thinlits Die Set 13PK - Flowers, Intricate
657773 Sizzix Framelits Die Set w/Stamps - Butterflies #3
657751 Sizzix Sizzlits Dies - Decorative Vintage Set
657786 Sizzix Textured Impressions Embossing Folders - Dress Form Set
657522 Sizzix Sizzlits Die Set - Card Phrases Set

* * * 

Ik heb een licht roze patroon papier gekozen voor het Dress Form Set.
Toen deze klaar was heb ik alleen langs de rechter en onderkant geknipt.
Daarna heb ik inkt en pearl drops aangebracht. 


* * *
De bloemen zijn gestanst uit het patroon papier en de witte cardstock.

* * * 
Ik ben gek op de schattige kleine cirkeltjes van de New Thinlits Flowers, Intricate.
Je kunt ze zowel voor het midden van de bloemen als decoratie voor de achtergrond gebruiken. En dat heb ik dus ook gedaan. Ik heb verschillende kleuren patroon papier gebruikt en alle 5 beschikbare maten gebruikt. Vervolgens heb ik ze willekeurig aangebracht op mijn witte achtergrond.
* * * 

I hope you enjoyed my project today!
Have a Creative Sunday!