Showing posts with label Stephanie Barnard. Show all posts

Thursday, 1 January 2015

New Year New Dies


Happy New Year to you all, and yes I really am writing this on New Year's Day!
I've decided this year that I'm going to make just one resolution - I'm not going to the gym or starting a diet - I may do these later in the year - but not while outside is cold, and lovely stews and deserts with custard are so much more appealing than a salad!!! - so this year I am going to delay these things until the weather is warmer.
So what am I changing this year? - I'm going to make a real effort to keep my sewing room tidy - now that may not seem much of a challenge - but then I've never let you have a glimpse of it have I now. I am still in the process of tidying and sorting - but with the purchase of one more shelf I'm quite confident that the muddle will be a thing of the past. The significance of this will be that I will be able to put my hand on any die that I want to use, and be able to sort quickly through my fabric to find just the right one for a project - instead of spending ages trying to sort through the chaos - I may even be able to show you my sewing room soon!!!
But for today I want to show you  new dies - well they came out in the Autumn - all are designed by Stephanie Barnard and I can't wait to start decorating things with them -
 

 http://www.sizzix.co.uk/product/659960/sizzix-bigz-die-flower-4
 http://www.sizzix.co.uk/product/659961/sizzix-bigz-die-flower-5
I love the slightly quirky flowers and the irregularity of the hearts and with Valentines day only about 6 weeks away, and then Mother's Day and Easter I am sure these dies are going to become firm favourites. I know I will be featuring them in future blogs - so watch to see what I create with them.
That's all for this week - now back to the sorting and tidying.
Angela


Monday, 9 June 2014

Card Card for a child!


I can take or leave pick-up cars, but it seems that men like them very much. So when I saw a cars set by Stephanie Barnard (659204 Sizzix Framelits Die Set 8PK w/Stamps - Cars) I knew I would made some cards with it.


I started by creating an aperture on a A6 card with one of the medium sized rectangles (  658610 Sizzix Framelits Die Set 10PK - Rectangles #2). On the left over I stamped the pick up stamp using green ink.


I placed the matching Framelit die over it  and die cut it. I then create a frame using two of the larger rectangles. I attached those to the front of the card.


I die cut the wheels also included on the same set. Then I stamped the message and trimmed it down as a banner.


And this is the finished card. Simple but effective!


Wednesday, 7 May 2014

Instant Favourites!


Sometimes you see a set of dies or embossing folders and you fall head over heals in love with them, often because the aesthetics of the design really appeal to you and sometimes because you just know that you will get constant use from them all year round. These sets fall into both of those categories, particularly the Thinlits borders set.

The two sets I am talking about are The Framelits set Labels,Regal and the Thinlits set Borders both of which are designed by that clever, clever lady Stephanie Barnard and released this month. There are seven dies in each set representing great value for money too.

I started by designing and printing a sheet of phrases using my PC before die cutting them with my labels dies.

One of the great things about Framelits is that you can crop text or pictures with great accuracy and to help you in that quest the boffins at Sizzix have developed a magnetic platform which holds the wafer thin dies in place so that there is no chance of any movement as the die passes through the machine resulting in loss of registration, we've all been there and it is very frustrating!

Next, I die cut one of the borders and took a couple of rectangles of patterned card to add to the base card. I also used a faux stitch effect on some of the cards by running my pattern makers wheel over the card and joining the resulting line of holes with a fine tip marker. Black markers can be a bit overpowering so I used a pale blue Distress Marker (Weathered Wood to be more accurate)


Here is the first card that I made in a fresh, modern collage style. I also added random adhesive gems and pearls as well as a threaded button.

All the coloured cardstock comes from assorted 6 x 6 pads made by the lovely people at Doodlebug Design.


I couldn't stop at one card so here are a few more starting with this nautical one where I used the negative of the scallop border to create the waves together with a wavy border from silver card. I used a Circle Framelits die as a template to help me attach the gems accurately.


Next up the wicked diamond border.....


And here's the scallop border again....


And last, but by no means least.......


The great thing about this little collection is that it took me only two hours from start to finish. These dies lend themselves to so many styles because they are simply classic shapes. I hope you fall for them too!


Thursday, 18 April 2013

Birthday Card


Hi everyone,

Today let’s work on a red & beige birthday card that has been made for a Grande Dame of scrapbooking The new Sizzix dies designed by Stéphanie Barnard were of a great help to me with this card 15x15 cms.

Here is the supply list:

Papers: Jenni Bowlin Studio
Thread: Divine Twine
Stamps: Sizzix
Inks: Black & Satin Red Versafine
Embossing powder: American Crafts Red
Versamark
Others: doily

Dies:

657000 Big Shot
658690 Sizzix Framelits Die Set 4PK -Circles, Zig Zag
658696 Sizzix Framelits Die Set 8PK with stamps-Banners2

Start by preparing all the elements you will need to realize your card: The small pennants, the red butterfly and the title.

The pennants are stamped with black & red inks then cut out with the Big Shot. Follow the same process for your title “Happy Birthday”.

A starry circle (die zigzag circle) will be cut out of a beige patterned paper scrap and will be added to the doily.

The butterfly is embossed with red powder.

Now that everything’s ready, all you need to do is assemble the elements. Finish with the title by gluing it with 3D adhesive.


A matching thread has been added for more texture. Here you go, the card is done, ready to be sent!

Have a wonderful day!

Karine

Bonjour tout le monde

Aujourd'hui une petite carte d'anniversaire rouge et beige pour une grande dame du Scrap :) Les nouveaux dies Sizzix designés par Stéphanie Barnard m'ont bien aidé pour réaliser ma carte au format 15x15cm.

Voici la liste du matériel utilisé :

Papiers : Jenni Bowlin Studio
Cordelette : Divine Twine
Tampons : Sizzix
Encre : Versafine noire et satin red
Poudre à embosser : American Crafts Rouge
Versamark
Divers : napperon

Dies utilisés :

657000 Big Shot
658690 Sizzix Framelits Die Set 4PK -Circles, Zig Zag
658696 Sizzix Framelits Die Set 8PK with stamps-Banners2


Commencez par préparer tous les éléments dont vous aurez besoin pour réaliser votre carte. Les petits fanions, le papillon rouge et votre titre.

Les fanions sont tamponnés en noir et rouge puis découpés à la Big Shot. Procédez de même pour le texte "Hppy Birthday".

Un rond étoilé (die cercle Zig-zag) sera également découpé dans une chute de papier imprimé beige et viendra compléter le napperon.

Le papillon est embossé en rouge.

Maintenant que tout est prêt il vous suffit simplement d'assembler tous les éléments. Terminez par le titre monté en 3D.

Une cordelette assortie est rajoutée pour apporter un peu de texture. Et voilà ma carte est terminée, prête à être postée !

Très bonne journée à vous

Karine

Wednesday, 27 March 2013

Simply Easter!


Notice how I resisted using any terrible Easter puns in the title. Nothing about our egg-citing new die ranges or how egg-static I am to be working with the latest Stephanie Barnard collection!

I am, however enjoying working with the aforementioned range, especially the flip-its card dies, the Easter themed stamp/Framelits sets and the Easter egg Framelits dies, check out the website and run a search under the name Stephanie Barnard...Clever lady!

Check out some of the eggs-amples below....DOH!


Wednesday, 20 February 2013

Flipping Cards!


I know the title of this blog sounds like I'm fed up of my job but it couldn't be further from the truth. I am of course referring to the fab ,new Flip-its cards from the wonderfully talented Stephanie Barnard who is a licensed designer and spokesperson for Sizzix over in the USA. 

We were lucky enough to Have Stephanie join us at our trade show in Birmingham last year and she was a great success largely down to the fact that she is a first rate demonstrator who's passion shines through when sharing her ideas and techniques.


The Flip/its cards sit alongside sets of coordinating Framelits dies and sets of Framelits/stamps which all work together beautifully making my job easy, as I was gifted the task of creating all the samples for our recent trade shows.

You can see from the images above that the dies are of the Movers & Shapers variety allowing you to use magnetic drop in dies should you wish to create an aperture in your card. The smart thing about these dies is that they create a card which 'flips' on it's axis allowing you to place a message/design front and back making them great fun to create and receive.

Below are a few examples using the various dies and stamps in Stephanie's new collection, to see more of Stephanie's work follow this link

each pair shows the same card flipped so that you can see both sides......Enjoy!


Wednesday, 25 July 2012

Quick and easy Circle card


Today I would like to share a simple technique on how I make folded cards using framelits.

I love shaped cards but only if either are all four sides shaped, two sides (top and right) or just the one edge. I am weird like that! I can't stand cards that have three edges fancy and then the odd one without it.
Besides, sometimes I like to use really thick card (300gsm) card and to cut two layers of that thickness at once, the framelit may struggle. So cutting two (one at a time) seems like a good idea. Usually I take tow pieces that have been cut with the same die but in this case since I use a framelits set, I decided to change things up.


I die cut two circles using the Framelits plain Circles die set. I decorated the smaller one with a swirl and a leaf, both from Stephanie Barnard stamp and dies sets.


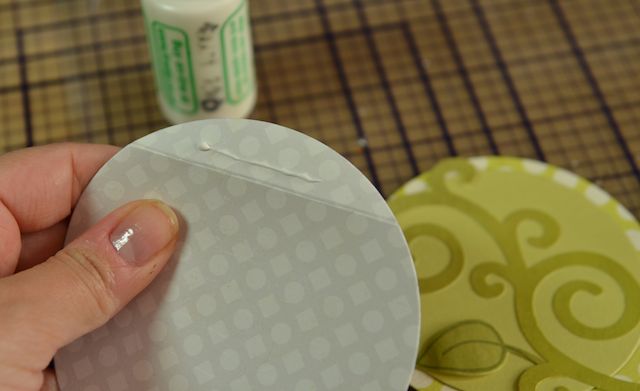
Then I took the larger circle and scored it about 1/2 ".


Added glue to only a small area of the scored flap.


And attached the top on.


Really simple


And it even stands up.