Showing posts with label Everyday. Show all posts

Tuesday, 5 February 2013

Play with BIGZ die today!


Hello everyone!

I thought that Spring would be around the corner with the beautiful temperatures we had here the last couple of days but cold is back! :( So, for today's layout, I have decided to scrapbook a Winter photo with Spring product!

I added turquoise, pink, a tiny bit of yellow and GOLD (to bring on the sun!) for this spring-inviting layout!

You will need these supplies to create that layout : 


First of all, tear a piece of vellum and glue it down on top of your background.

Mount your picture with a patterned paper and start layering lots of different papers : the more layers, the better!


I then layered tags and journaling cards on top of my papers.

With my Big Shot, I cut my two different BIGZ dies to add a shiny look to my page : I used gold paper for this one! It's rather thick but the thickness of the BIGZ dies makes it VERY easy to cut through thick materials.


You can then add badges, tickets, wood embellishments and such and your layout is done! :)

Take care and thanks for watching!
Céline

Tuesday, 29 January 2013

Make your own background!


Hello!

Embossing has been a very popular technique in my scrapbook classes over the last few years. People like that you can emboss paper and turn any piece of paper into a new one, adding texture and a 3D effect to your crafty projects.

Today, I would like to show you a 8x8 layout I made, mixing patterned paper with white cardstock that I previously embossed and inked!

But first of all, here's what you'll need for this layout : 


  • Big Shot (655268)
  • Sewing and measuring Tape Embossing Folder set (657671)
  • Papers (Studio Calico)
  • Stamps (Studio Calico, Technique Tuesday)
  • Badge (October Afternoon)
  • Wood veneers (Studio Calico)
  • Alphas (American Crafts)
  • Inks (Versafine)
  • Mists (Studio Calico)
  • Cut'n'Dry foam (Ranger)


First of all, you need to cut a piece of white cardstock size 4x4". Then, insert it once inside the embossing folder and run it through your Big Shot.

As the width of the embossing folder is 4", you just have to run it through your Big Shot once.

Once your white cardstock is embossed, grab your favorite Studio Calico mists and add colors to the top embossed designs, using a cut'n'dry foam.

While you let this dry, start glueing your picture on the upper right side.

You can start stamping your background (here I used a ROAD TRIP stamp by Technique Tuesday) and create embellishments with title stamp (like the I love this life stamp by Technique Tuesday).

Once your embossed paper is dry, glue it at the top of the paper, near your photo.

Use your sewing machine and sew all around the edges.

Add your title, wood veneer embellishments, badge and label and you're good!

I am loving this size more and more so you might see more of these layouts in the near future! :D

Have a great day!
Céline


Tuesday, 22 January 2013

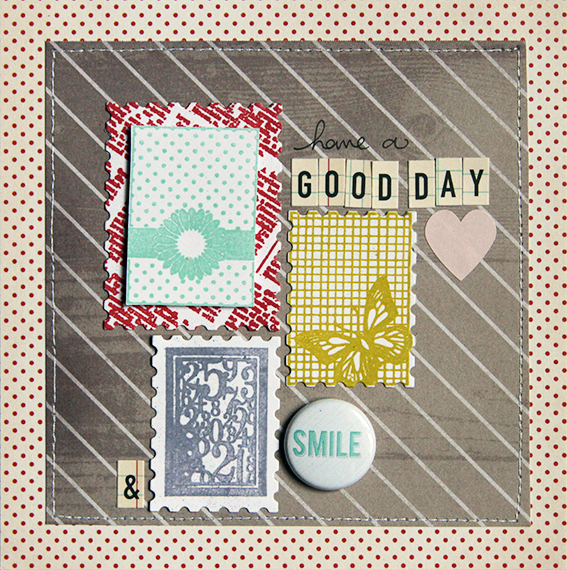
Have a good day and SMILE card


Hello everyone!

Even though it's been VERY colld everywhere in Europe these past weeks, I have a feeling Spring is just around the corner (or maybe it's just a thought to pretend WINTER should be over!) :)

I've been playing and testing the Exclusive Paula Pascual Framelits w/stamp die set and all I can say is WOW! They are so versatile, easy to use and pretty, you're going to love them!

Here's a cute card that you can make within 20 mns! Gather all the supplies below and get ready to have fun!


Now let's start! You'll see, it's very easy!

First of all, stamp each stamp from the Exclusive Paula Pascual Framelits w/stamp die set with a different ink color : a pale blue for the one with the flower, an olive green for the one with the butterfly, a lavender one for the small one with the numbers, and a deep red for the newspaper-like one.

This way, you'll get a nice colorful paper quilt to organize on your card background.

Once you are done with the stamping part, simply choose the dies and decide which shape you want each shape to look like : rectangle with stamp-like borders, simply a rectangle, rectangle with a white frame and stamp-like edges? It all depends on your mood and creativity!


Then, once you have run it all through your Big Shot, adhere the little rectangle die-cuts and embellish your card!

What I love about those Framelits w/stamps is that they all coordinate and it's so fast and easy to use : perfect for invitations, cardmaking, wedding invitations...

Have a great day!
céline

Tuesday, 15 January 2013

Keep laughing! Layout


Hello everyone!

How are you doing today?!

Here I am with a brand new layout full of wintery colors again! I told you I've been inspired by these color combos lately!

Today, I would like to show you this layout on which I played with two different Sizzix dies, and show you that these dies can be used such as pure embellishments, and bring extra contrasts and texture to your layout!

First of all, this is what you'll need to create this layout : 


Choose the paper you want as a background. Add some mists here and there.

Then cut two strips off of two different patterned papers and glue those two at the top and at the bottom of your background.

Cut your Card Decorative insert die into a double-sided patterned paper : glue the frame and add the inside after turning it upside down - you'll get a full frame with two different designs!


Do the same with the Frame Fancy die and mount it with 3D foam tabs.

 
Add some embellishments here and there, still sticking to the same color combo.


Hope you liked it!
Take care
Céline

Tuesday, 8 January 2013

Waiting for Albane layout


Hello everyone!

Here I am with a new layout to inspire you to create with your favorite cutting machine! :)

For this new layouts, I used very Wintery themed products as I've been in the modd for some blues and reds lately!

Here's what you'll need : 


First of all, cut a piece of patterned size 10x10" - that one will be glued in the center of your 12x12 background paper, and matted with white cardstock.

Cut a strip of patterned paper (the red one) to create your Winter Rosette - you will need your extended specer plateform and your 12" cutting pads to cut with the Decorative Strip die.

Place a sticker and a badge in the middle of the Rosette (and mount it with 3D foam tab).

Then cut a nice lace doily into a patterned paper and place it under your paper rosette.

Add your photo and a couple of embellishments here and there and you're good!


Make your die-cut embellishments, like your lace doily and your paper rosette, be the center piece of your layout by placing them right in the center and in the middle - your eyes will see them at first, along with the photo!


Thanks for watching!
Have a gorgeous day!
Céline

Tuesday, 25 December 2012

It's Christmas today!


Hello everyone!

First of all, I would like to wish you all a WONDERFUL and MERRY Christmas! May your day be filled with love, happiness, creativity and your loved ones! 

Today, I'd like to share with you the front page of my December Daily journal - a journal in which you create a page a day during the whole month of December. This concept was created by Ali Edwards.

The most important in this project is take a photo (or more!) a day and then, add them to your project!

This is what I used to create this album : 


First of all, what you have to do is prepare your album : cover the entire cover (outside only) with black chalkboard paint - it is very important that you let it dry for at least 12 hours.

Add several layers (I'd say 3) and let dry between each layer.

Once it's dry, you can start drawing and doodling with white chalk on your cover! It's VERY fun! :)


Then you have to embellish it!

What I did is cut the snowflake first, but I used my Big Shot to create the Snowflake Rosette into newspaper paper!

Simply add a thin layer of gesso onto a scrapbook newspaper -like paper and let it dry.

Grab your extended pads and your Snowflake Rosette and cut the design into the paper.

Fold and glue.

Then place it on your cover using 3D foam tabs.


What I love with BIGZ dies is that they cut into almost everything! Those Glitter papers are just amazing for this time of the year - it's festive, fun and adds sparkle and joy to any kind of project!

I cut my Tattered Poinsettia flowers die into my Silver Glitter paper and love it!

Simply use them in several different pages, not to overwhelm the eyes too much with too much glitter, and then it's going to be perfect! :)


Voilà!

Are you making a December Daily album too? I want to see :)
MERRY CHRISTMAS!
Céline


Saturday, 1 December 2012

A Very British Christmas Card - Festive Blog Hop


Welcome to the Sizzix Festive Blog Hop - for one day only! It's great to be a part of it! Firstly because it's the first time the European and US bloggers have come together for an event like this, and secondly because it's the countdown to Christmas!


Here's the line up for the day, make sure you check them all out to get some truly festive inspiration...


WIN - If you'd like to be in with a chance of winning a pack of Textured Impressions Embossing Folders, simply comment on this post on our blogspot page or Tammy's post on the US Sizzix blog (depending on your location), telling us which is your favourite item from our Christmas collections! 10 lucky winners will be chosen at random from each blog on Wednesday 5th December. Check back on Thursday to see if you're a winner!

This 2012 has been a beautiful year for Britain, with the diamond Jubilee and the Olympics. It has been a pleasure to be living in the UK and be able to participate in these events. It seems fitting to make some of my Christmas cards to fit withe Britannia theme, and what better to do that with that using the Union Jack die.


I took a landscape Fabriano folded card, a beautiful handmade Italian paper, which is my preferred card for my Christmas cards as well as for the wedding stationery I have done in the past. I place the cover facing down on to the Bigz die and secure it in place with low tack tape.


This is how it looks. I love the tone on tone effect, but today I wanted something more in the colours of the season.


Then , I made an insert out of patterned paper. All the papers I used for this card are from Basic Grey's Aspen Frost collection.


 Now it is starting to look more colorful!


Then I place a thin acetate on the back of the front. This is important as without it the next step would not work.


I die cut then once again the Union Jack flag using a soft blue patterned paper. Then I place the elements carefully attaching to the acetate using vellum glue.


I chose an old rub on with a Christmas message on as I wanted the sharp white that you can not replicate with anything else but a rub on. The message is directly on to the acetate so when the card opens it looks like the message floats.


Tuesday, 13 November 2012

Emboss your title and make your layout shine!


Hey there!

How are you today? Have you been busy scrapping this weekend? I was teaching last weekend and it's been so much fun!

Today, I would like to inspire you to both use paper stars as embellishments and create your own alphas with dies AND embossing!

First of all, these are what you'll need to create this layout :


First of all, cut your white ledger paper a little smaller and glue it on top of your yellow background paper.

Add some tiny red splashes here and there.

Start adding your photos and layer some paper and fabric adhesive papers on your background.


Then, cut some stars into the same patterned papers and mount them on your layout with 3D foam tabs.


My title was first cut using an old alpha set I had - you can easily use these following alpha sets for your title : XL Alpha Die set Word Play (657837), the Strip alpha set Inside Out (657827) or the Alphabet Set 7 dies Serif Essentials (655128).

Once your whole title is cut, emboss each letter (you can put a lot of letters inside one embossing plate, repeat if needed, in case your title is very long) with your big shot. Here, I used the Dots embossing folder from the Christmas Words and Dot set.


Add some stamps here and there...


Don't forget some sewing here and there!


And finish your layout by mixing your title with cut and foam alphas!

Hope this inspired you!
Have a great day!
Céline

Monday, 15 October 2012

A QVC outing!


Last wednesday I had the pleasure to be presenting my dies on QVC UK during Stephanie Weightman's weekly craft hour.


IA few years back I used to go often to QVC to help out the craft team behind the scenes and did a few hours on air, but this was the first time on the new HQ in Chiskwick Park. The place is great.


And look at the lovely Craft Studio, where the talented Caroline Blanchard preps for most of the QVC craft shows.


This is I prep my area with all the samples for the everyday samples. I was a bit nervous but much less than previous times, after all I knew the product inside out and had done all the prep. And thanks to every one who bought the sets, which meant that both the Flowers and Butterflies sold out during the presentation!

It all went really fast, 5 minutes is not a lot of time to demo and showcase all the samples, so I am sharing here some of the ones from QVC.


And these are some of Caroline's samples.


I love to see what other crafters do with the dies.


I adore this card.


And a bit of grunge style. Love it!


Love the colours in this one.


And just using the dies to cut without stamping works well too, dont you think?


And finally, on my way back home I found Bond's old white Rolls. Rather telling, two stunning beauties where seated on the back, but no Daniel Craig unfortunately.