Showing posts with label greetings. Show all posts

Tuesday, 21 April 2015

POIS gift bag


Hi crafter!
Each day the new big shot grows in me a lot of ideas ..!
It's bigger, easier to use and faster. Is adorable.

Today I prepared a gift for my friend and as usual I never find a shopper that I like.
So I said to myself: why not use some dies to make the POIS?
And then a flower, a word, a tag ... and here's a gift bag ready in 5 minutes.
Would you like to try ??
A beautifully packaged gift is a gift more ;)

NECESSARY
- Color Cardstocks and paper craft
- Simple paper bag
- Glue
- Rattles
- Twine for crafting (optional) 

Have a lovely week!

Manuela
Pasticci di carta


* per i lettori italiani *

Ciao crafter!
ogni giorno la nuova big shot mi fa venire in mente un sacco di idee..!
E' grande e più facile da usare, e anche più veloce. E' adorabile.

Oggi preparavo il regalo per un'amica e come al solito non trovo mai una shopper che mi piace.
Mi sono detta: perché non usare qualche fustella per fare i pois?
E poi un fiore, una parola, una tag…ed ecco una gift bag pronta in 5 minuti.
Volete provare anche voi??
Un regalo ben confezionato è un regalo in più ;)

OCCORRENTE:
- Cartoncini colorati e carta craft
- Sacchetto di carta semplice
- Colla 
- Pinzette
- Nastrino craft (facoltativo)

Una buona settimana a tutti!

Manuela
Pasticci di carta


Sunday, 10 November 2013

"Congratulations" Card by Gerry van Gent


Happy Sunday Sizzix friends!
Gerry here today to share with you a greeting card
I created for my blog post today.


657900 Sizzix Big Shot Machine
658373 Sizzix Pop 'n Cuts Magnetic Insert Die Label, Funky 3D
658356 Sizzix Textured Impressions Embossing Folder Rose Vines & Trellis Set
657007 Sizzix Movers & Shapers Accessory Base Tray, L
656938 Sizzix Movers & Shapers L Die Tag & Bookplates
659069 Sizzix Thinlits Die Set Butterfly, Flowers & Lattice

*   *   *
Card Size: 13.5 cm x 13.5 cm
I used sand paper to distress the embossed parts of my background paper
so it will pop up. 

The title was the the last touch I added to my card.
I didn`t have the size and font I liked to use as a title
so I used a computer font and printed the word "Congratulations",
distressed it with ink and adhered it on the card.

I used Karen Burniston's Funky 3D Label as a base of the bookplate.

My card has dimension as I use different layers and....generous amount of foam squares :-)

OTHER PRODUCTS I USED:
Maja Design "Walking in the Forest" collection
Webster's Pages Silhouette resin
Prima Marketing fabric flower
*   *   *
Thank you for visiting us today!

Friday, 8 November 2013

Christmas card and tag - Unusual colours


Hi Everyone! This is Anna.
The two installment of countdown to Christmas is here! I hope you enjoyed last week. As a reminder, the plan is to share a new Christmas project made with Sizzix dies each week.
Here are the card and tag I created using some items from Winter Moments collection. Unusual colours for Christmas cards but I really like the result!

cafe creativo - Anna Drai - sizzix big shot - card tag christmas (1)

I love how they look together and I love this snowflakes! Aren't they great? Ok I think they are great! The die gives you more different snowflakes! They are super detailed and look awesome layered up like this. A little strass in the center is perfect.

cafe creativo - sizzix big shot - card tag christmas (2)

cafe creativo - sizzix big shot - card tag christmas (3)

cafe creativo - sizzix big shot - card tag christmas (4)

Tip: use this design with different patterned papers to completely change the look of this card.

I hope you enjoyed my project today. Have a great week end, see you next Friday!
 
Items used:
cardstock: white, light pink, pink, kraft
patterned paper: Prima - Paper Wishes and Dreams – 11:11 – 970024, Prima - Paper Wishful Thinking - Dreams Blossom - 970352
polka dot fabric
white fabric
snowflake charm
button
strass
glue, hot glue, foam board tape

**************************************
Flag_of_Italy Per le amiche italiane! :)
Ciao! Ecco un nuovo appuntamento con Anna.

Ecco la seconda parte del countdown per il Natale. Spero vi sia piaciuto quello della scorsa settimana. Ecco la card e la tag che ho creato con alcuni prodotti della collezione Winter Moments ed altre fustelle.Colori insoliti per il Natale, ma volevo provare qualcosa di diverso e il risultato non mi dispiace.

Per realizzare la card ho embossato i fiocchi di neve sul cartoncino rosa, ho ritagliato un angolo del fiocco di neve più grande per infilarci un rettangolo di carta fantasia e la scritta con l'augurio. Ho completato con un altro rettangolo a pois e una striscia fucsia nel centro. Ho creato un fiore bianco di stoffa tagliando diverse forme di fiori poi sovrapposte e l'ho abbellito con un bottone e un charm. Infine ho aggiunto strass qua e là.

Per la tag ho incollato due strisce differenti (di carta fantasia e stoffa a pois) al centro della tag base. Ho quindi sovrapposto un cerchio Charm di carta kraft. Ho sovrapposto alcune forme di fiocchi di neve, incollandole con scotch spessorato, per dare volume e tridimensionalità. Ho terminato con uno strass al centro.

Spero vi sia piaciuto il mio progetto oggi. Buon fine settimana, ci vediamo venerdì prossimo!
 
Materiali:
cartoncino: bianco, rosa chiaro, rosa, kraft
patterned paper: Prima - Paper Wishes and Dreams – 11:11 – 970024, Prima - Paper Wishful Thinking - Dreams Blossom – 970352
tessuto rosa a pois
tessuto bianco
charm fiocco di neve
bottone
strass
colla, colla a caldo, scotch spessorato

Friday, 1 November 2013

Autumn greeting card with layers


Hi, it's Friday again - time for inspiration from me:)
I promised myself to work on my "small project" skills - I really prefer to create at bigger formats and cards, tags or ATC cards look always a bit too tight for me. There isn't simply enough of space to play with layers and texture - and that is what I love the most, right?
Here is one of my "tryings" - autumn greeting card I've made using my favorite supplies - Mechanicals, vintage papers, some Prima papers and flowers and finally some Sizzix Dies of course. I hope you will enjoy!


As you can see I did my best to put as many paper layers as possible - 2 of them are cut-out elements which I cut into halves to match my composition.


Here are the dies I've chosen for this project:
- Sizzix Bigz Die - Ornate Frame (658720)
- Sizzix Thinlits Die Set 2PK - Doily & Doily Border (658947)


Layers of paper a bit of trim, a bit of lace cut into smaller pieces, some metal and paper flowers and trinkets - this is all what you need to create a card like this! How cool is this?
If you have a feeling you need a bit more "vintage touch" you can always spray the composition with some inks or stains!


I wish you all a great creative weekend!
Finn


Tuesday, 22 January 2013

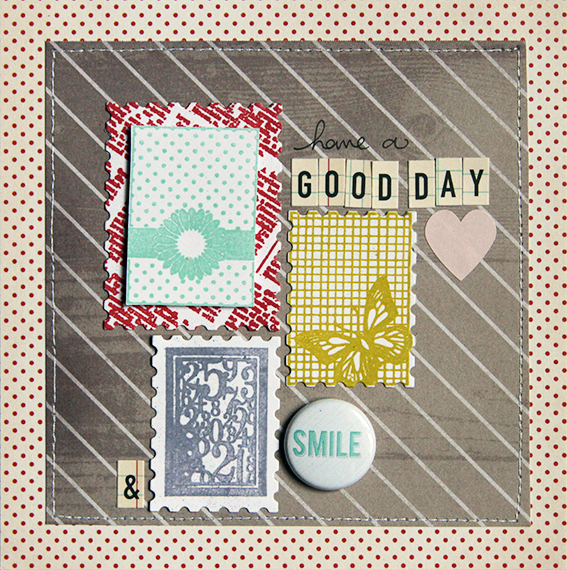
Have a good day and SMILE card


Hello everyone!

Even though it's been VERY colld everywhere in Europe these past weeks, I have a feeling Spring is just around the corner (or maybe it's just a thought to pretend WINTER should be over!) :)

I've been playing and testing the Exclusive Paula Pascual Framelits w/stamp die set and all I can say is WOW! They are so versatile, easy to use and pretty, you're going to love them!

Here's a cute card that you can make within 20 mns! Gather all the supplies below and get ready to have fun!


Now let's start! You'll see, it's very easy!

First of all, stamp each stamp from the Exclusive Paula Pascual Framelits w/stamp die set with a different ink color : a pale blue for the one with the flower, an olive green for the one with the butterfly, a lavender one for the small one with the numbers, and a deep red for the newspaper-like one.

This way, you'll get a nice colorful paper quilt to organize on your card background.

Once you are done with the stamping part, simply choose the dies and decide which shape you want each shape to look like : rectangle with stamp-like borders, simply a rectangle, rectangle with a white frame and stamp-like edges? It all depends on your mood and creativity!


Then, once you have run it all through your Big Shot, adhere the little rectangle die-cuts and embellish your card!

What I love about those Framelits w/stamps is that they all coordinate and it's so fast and easy to use : perfect for invitations, cardmaking, wedding invitations...

Have a great day!
céline

Thursday, 27 December 2012

Greetings Cards


Hi everyone!

December is already at our doorstep and it’s time to start creating our greeting cards! Today we’ll create two cards created around a same die: Welcome Mr Snowman!

Here are the dies I used for these two cards:

-Snowman 658278
-Tags by Hero Arts 658279
-Framelits 657938


Supply list:

Papers: Echo Park
Cardstock: American Crafts
Stamps: Hero Arts
Inks: Black Versafine, Satin Red

I totally fell for this snow man and its pretty face!

For the first card, I used a 20x20 cms kraft cardstock that is folded in half. 2 scraps of patterned paper decorate the front and back of the card.

I used white cardstock for the body of the snow man, kraft for the hat and green & red patterned paper for the scarf and the holly.

Start by stamping your shapes with black Versafine. Then cut each shape with your Big Shot.


Don’t hesitate to glue some elements with 3D adhesive (ie the hat).

The nose and berries are colored with a felt-tip pen.


The title "Best Wishes" is made with stamps.

For the second card, I only used the round head of the snow man! The tag is a Framelits die cut.
The title "Happy Holidays" comes from the stamp that’s part of the "Tags by Hero Arts" set.


Here are two cards easy to realise with few supplies! But they will be liked for sure!

See you next Thursday!

Karine

Variations autour d'un même die !

Bonjour tout le monde !

Nous sommes déjà au mois de décembre il est grand temps de préparer vos cartes de voeux ! Pour aujourd'hui deux petites cartes de saison autour d'un même die : Welcome Mr Snowman !

Voici la liste des dies utilisés pour réaliser ces deux cartes :
-Snowman 658278
-Tags by Hero Arts 658279
-Framelits 657938

Matériel :

Papiers : Echo Park
Cardstock : American Crafts
Tampons : Hero Arts
Encres : Versafine noire,Satin Red

J'ai complétement craqué pour ce bonhomme de neige et sa jolie bouille !

Pour la première carte, j'ai utilisé un cardstock kraft au format 20x20 que j'ai plié en deux. Deux morceaux de papiers imprimés décorent l'avant de la carte.

J'ai utilisé du cardstock blanc pour faire le corps du bonhomme, du kraft pour le chapeau et des imprimé rouge et vert pour l'écharpe et le houx.

Commencez par tamponner vos formes à la Versafine noire, puis découpez chaque forme à la Big Shot.

Pensez à monter certains éléments comme le chapeau en 3D.

Le nez et les baies sont colorés avec un stylo feutre.

Le titre "Best Wishes" est fait au tampon.

Pour la seconde carte, j'ai simplement utilisé la tête toute ronde du bonhomme de neige ! L'étiquette est une découpe de die Framelits.
Le titre "Happy Holidays" provient du tampon prévu dans le set " Tags by Hero Arts".

Voici deux cartes très simples à réaliser avec très peu de matériel mais qui feront sans nul doute plaisir !

A jeudi !

Karine