Showing posts with label altered book. Show all posts

Tuesday, 26 February 2013

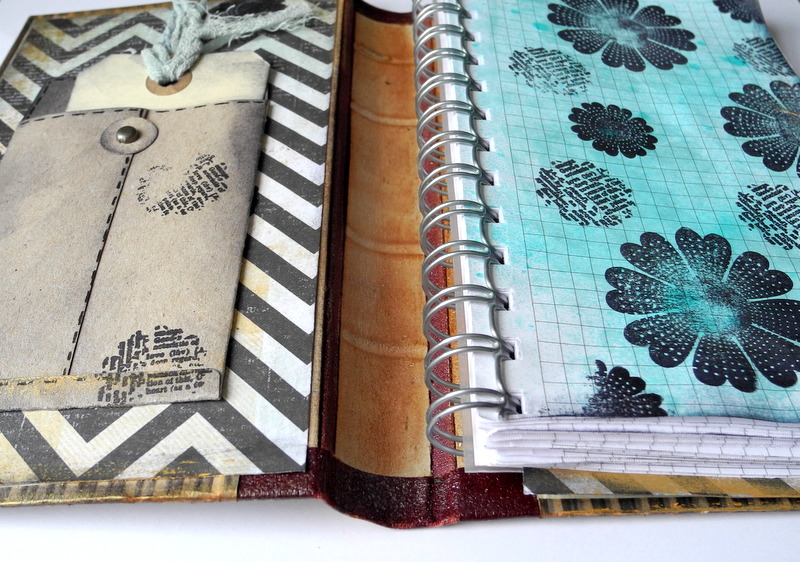
Notes Book


Hello everyone
Today I will show you an altered book
 I have used  different sorts of Sizzix dies and a  cover from  a old book
Supply list:
Paper: Kaiser craft, 75 cent collection-Tuppence-
Cardstock
Ink: Distress ink, Vintage Photo, Hero Arts-soft Pool-
Viva: Inka Gold, pearl pen-Ice White-
Glossy accent
Glimmer Mist: Tattered Angels-Pearl and Turquise blue


How to make:
I have used a cover from an old book, decorated it with pattern paper. Cut out banners, letters and heart in patterned paper. Cut two butterflies in recycled cardboard and in patterned paper - glue it together. Ink around the edged with Inka Gold and spray glimmer mist over the cover and use glossy accent on the letters, banners and butterfly to give it a beautiful effect. Put the envelop inside the book and the first side in my notes book is decorated with stamps and glimmer mist.
Have a nice day. See you next Tuesday
Pia
Hej alle Sizzix fan
I dag vil jeg vise hvordan jeg har genbrugt omslaget på en gammel bog
Jeg har brugt forskellige Sizzix dies

Andre materialer:
Pair:KaiserCraft , 75 cent collection-Tuppence-
Karton, genbrugs
Ink: Distress ink, Vintage Photo, Hero Arts-soft Pool-
Viva: Inka Gold, pearl pen-Ice White-
Glossy accent
Glimmer Mist: Tattered Angels-Pearl and Turquise blue
Jeg ønsker dig en god dag. Vi ses næste tirsdag
Pia 

Wednesday, 30 January 2013

Small Mixed-Media Love-Notebook


Hi!

I love to create a mixed-media projects, and thus work with paints, stamps, spray, stencils, etc. And Sizzix helps me to create interesting backgrounds. Also I often use the resulting figures as key elements of collage. This is very convenient, because I do not need to suffer and cut with scissors.

So today I want to show you a small notebook, which was made with mixed-media techniques.

Items used:
Craft paper
My Mind's Eye paper – Stella&Rose (6x6 pad)
Acrylic Paint – Yellow, Turquoise
Decoupage Glue – Art Potch
Adirondack Color Wash – Sunset Orange
Glitter Making Memory – Buttercup
Crystals
Different Stamps and Rub-Ons

1. I used the Curly die to make more textural background. I cut out of the paper curl, and then used it as a mask with yellow paint.

2. I sprinkled orange spray and smeared it across the collage to change a shade. And then I used the spray to created drips.

3. I cut a flower-heart using Heart, Stem & Leaves  die.

4. I glued the parts of the flower-heart on the collage with decoupage glue.

5. Then I added shadows using paints and a permanent marker. Then I added decorative elements (rub-ons, stamps).
6. I cut a text using Inside Out die. Then I glued it using decoupage glue.
7. I covered the entire surface of the collage by decoupage glue, added glitter around the heart and in the middle of the flowers.

And notebook cover is ready. The notebook size is 6.5x15,5 cm.

Have a nice day,

Daria.

Всем привет! 

Я очень люблю создавать миксд-медиа проекты, а значит работать с красками, штампами, спреями, трафаретами и т.д. И продукция Sizzix очень часто помогает мне создать интересные фоны (например, я использую получившиеся вырубки в качестве масок). Так же я часто использую получившиеся фигуры в качестве основных элементов коллажа. Это очень удобно, т.к. не нужно мучиться и вырезать ножницами.


Итак, сегодня я хочу показать вам небольшой блокнот, у которого обложка сделана в коллажной технике.

Материалы:
Крафт-бумага
Бумага My Mind's Eye – коллекция Stella&Rose (набор 15*15 см)
Акриловая краска – желтая и бирюзовая
Декупажный клей – Art Potch
Спрей Adirondack Color Wash – цвет Sunset Orange
Глиттер Making Memory – цвет Buttercup
Стразы
Различные штампы и натирки

  1. Для придания большей фактурности фону я использовала нож с завитками. Для этого вырезала из бумаги завиток, а затем использовала его как маску с желтой краской.
  2. Побрызгала оранжевым спреем и размазала его по поверхности коллажа, чтобы изменить немного оттенок. А затем этим же спреем создала потеки.
  3. С помощью ножа вырезала цветок-сердце, подбирая бумажки, подходящие под цвет фона. Сердце из одной бумаги, стебель и листья из другой.
  4. С помощью декупажного клея, приклеила детали цветка-сердца. От декупажного клея спрей может размазаться, поэтому наносим клей аккуратно. И даже если он размажется и попадет на ваш цветок, то ничего страшного в этом нет. Цветок просто еще лучше впишется в общую цветовую гамму коллажа.
  5. Добавила тени с помощью краски, обрисовала контуры тонким перманентным маркером. Добавила декоративные элементы (такие как штампы и натирки).
  6. Вырезала надпись, используя нож с алфавитом, и приклеила ее на декупажный клей.
  7. Промазала всю поверхность коллажа клеем. Добавила глиттер вокруг сердечка и в серединки цветочков. Дождалась пока всё высохнет и обвела буквы.

Обложка для блокнота готова. Размер блокнота 6,5х15 см.


Хорошего дня!

Дарья.

Tuesday, 1 January 2013

Altering a travel journal


Hello! HAPPY NEW YEAAAAAAAAR! May 2013 bring you happiness, inspiration, creativity, lots of Sizzix goodies and more! :)

Back in November, I went to teach scrapbook classes in New Caledonia, a little French island near Australia and New Zealand - it was FANTASTIC! Girls played with Big Shots, Bigz dies, Sizzlits, inks, embossing folders and more! :)

I had so much fun that I took hundreds and hundreds of photos - which now found a new home into this album!

New Caledonia is paradise - white sand beaches, turquoise lagoons, wild forests and more. I wanted to use the same color palette.

Here's what you'll need to create such a cover for a mini album or album.


First of all, you'll need o cover your entire album with gesso. Add at least two layers so that you can work on a very smooth and white surface.

Then, add some water (with a brush or with a spray if you have one).

Mist some of your favorite Mists onto your cover - here I used Studio Calico Audrey, Doris and Gold to create this fun effect.

Be sure to add lots of water afterwards in order to mix the colors together.

Grab your album and make it stand - you'll get those fun dripping marks on the cover!

Finish the painting with tony dots here and there with black ink.


Once your background is dry, cut a pice of vellum with the Scallop Circle Sizzlits Die and glue it on your cover.

Then, cut into a patterned paper to create a cute paper rosette using the Paper Rosette die and the appropriate items (listed above).

Fold and glue in the center of the Scallop Circle.


Embellish with whatever items you want :)

I created another page using the Paper Rosette (probably my #1 die of all time!).


Do you make a lot of mini albums or albums like Project Life?

Have a gorgeous day!
Céline

Tuesday, 25 December 2012

It's Christmas today!


Hello everyone!

First of all, I would like to wish you all a WONDERFUL and MERRY Christmas! May your day be filled with love, happiness, creativity and your loved ones! 

Today, I'd like to share with you the front page of my December Daily journal - a journal in which you create a page a day during the whole month of December. This concept was created by Ali Edwards.

The most important in this project is take a photo (or more!) a day and then, add them to your project!

This is what I used to create this album : 


First of all, what you have to do is prepare your album : cover the entire cover (outside only) with black chalkboard paint - it is very important that you let it dry for at least 12 hours.

Add several layers (I'd say 3) and let dry between each layer.

Once it's dry, you can start drawing and doodling with white chalk on your cover! It's VERY fun! :)


Then you have to embellish it!

What I did is cut the snowflake first, but I used my Big Shot to create the Snowflake Rosette into newspaper paper!

Simply add a thin layer of gesso onto a scrapbook newspaper -like paper and let it dry.

Grab your extended pads and your Snowflake Rosette and cut the design into the paper.

Fold and glue.

Then place it on your cover using 3D foam tabs.


What I love with BIGZ dies is that they cut into almost everything! Those Glitter papers are just amazing for this time of the year - it's festive, fun and adds sparkle and joy to any kind of project!

I cut my Tattered Poinsettia flowers die into my Silver Glitter paper and love it!

Simply use them in several different pages, not to overwhelm the eyes too much with too much glitter, and then it's going to be perfect! :)


Voilà!

Are you making a December Daily album too? I want to see :)
MERRY CHRISTMAS!
Céline


Friday, 16 November 2012

Altering book with Sizzix:)


:) Hi again Sizzix fans!
I love journals and altered books - they give me more freedom and less time pressure than mini albums, which - in my opinion - should be planned as a limited project, focused on one color palette and topic. I enjoy creating pages in different styles in one book, trying new ideas, new colors... or swap the journals with friends and inspiring and challenge each other.
The project I'm sharing today is one of those "Travelling Journals" - also called "Round Robins" and it is made on the base of the very old and very beautiful book I bought in the charity shop in Ireland. I did't want to over paint it - rather underline and enhance it's natural beauty and Sizzix dies were very helpful with that!


Here is my book before I started:


And here is the final version - Travelling Journal inspired with old family photos - altered cover and a double page with an envelope for photos which I'm sending to my friends with the book.


The products I used are listed below:
- 657837Sizzix Bigz XL Alphabet Die - Word Play
- 657828Sizzix Sizzlits Decorative Strip Alphabet Die - Stenciled
- 658289Sizzix Framelits Die Set 6PK w/Stamps - Banners
- 658295Sizzix Framelits Die Set 4PK w/Stamps - Postage Stamps
- Ranger: Glossy Accents, Crackle Accents, Archval Ink: Library Green, Jet Black, gesso.
- Tim Holtz: Metal Tabs, Corners and stickers, metal embellishments
- Luminarte: Silks  - acrylic paints
- other: lace, twine, washi tape, tea stain, pencil, crafting glue, piece of kraft paper and chipboard, circle punch, brown paper bag.

The letters on the cover are cut out from thick chipboard, glued, painted with metallic acrylic paints (Silks), soft pencil and finally coated with Crackle Accents (Ranger). 


The floral motive on the cover is coated with Glossy Accents - just like the metal embellishments I used for this part of project. It works perfectly both as solid, clear glue and glossy coating. 


Inside of the book I made a freestyle page with envelope that contains the photos for this travelling journal project. I wanted to leave as much as possible of the natural color of the old paper - I only added some tea stain, stamping in 2 colors and a bit of gesso.


Stamping and free-hand doodling reflect the style of the book - when I bought it it was already having a lot of handwritten notes inside, highlights and underlined texts. I loved that and it was my inspiration for the pages in the book
The letters were made using Tim Holtz "Stenciled" Decorative Strip used as a stencil - fun and easy technique!


The background under the photo and decorative elements are made with Paula Pasual Framelits dies and stamps: Banners and Postage Stamps together with a bit of gesso, pencil doodling and shading.


I hope you found some inspiration in my project - it is packed now and ready to go - I will give it to my friend on Sunday! Yay!
xoxo
Finn

Thursday, 1 November 2012

Altered book by Karine


Hi everyone!

Let’s start the month with a mini-album in the manner of an altered book. That’s an album that I teach in my classes (and I will be teaching it in Liege in Belgium next week-end by the way).

Here are the dies I used to embellish my mini-album:

-657708 Flower Garden with Scallops
-657811 Sizzix Textured Impressions Embossing Folders 2PK - Bohemian Lace Set
-657188 Tiny Tabs and Tags 

I really like using the border die in my mini albums. It brings fineness and femininity, especially in this ink-based album.
I cut the shape out of a patterned paper then glued it with double-sided tape. I used masking tape to hide the unwanted tape marks.

The Tim Holtz die is one of my favourite dies to use in mini albums! It allows me to create small accents: tags, and eyelets that match with my kit! I love it, and it is definitely a classic!

I always work on the cover of my mini album at the end of my creation process. Here I created an opening in which I inserted a white Bristol sheet that is embossed with nice patterns. I applied Adirondack and Distress inks on it to make it stand out.

Here are some pictures of my album with some of the dies I used. You won’t see the full album as it is still a surprise for those who will attend the classes.


Have a nice day,

Karine

Supply list:

Paperback book
Papers: Sultane
Alphabets: October Afternoon, Jenni Bowlin
Stickers: Jenni Bowlin
Stamps: Craft Origine
Spray inks: Tattered Angels
Black Versafine ink
Others: tags, flowers

Bonjour tout le monde !

Ajourd'hui nous commençons le mois avec un mini album façon livre altéré que je propose un peu partout en ce moment et notamment le week end qui arrive à Liège en Belgique :)

Voici les dies que j'ai utilisé pour décorer mon mini album :

-657708 Flower Garden with Scallops
-657811 Sizzix Textured Impressions Embossing Folders 2PK - Bohemian Lace Set
-657188 Tiny Tabs and Tags
J'adore utiliser le die bordure dans mes mini, il apporte finesse et féminité notamment à cet album travaillé à base d'encres.
J'ai découpé ma forme dans un papier imprimé que j'ai ensuite collé au double face, un morceau de masking tape vient camoufler les traces de scotch indésirables !

Le die Tim Holtz est aussi un de mes die indispensable pour mes mini ! Il me permet de créer des petites décoration : des tags, des oeillets assortis à mon kit ! J'en raffole et il est indémodable !

Je termine toujours mes album par la page de couverture, j'ai crée ici une ouverture dans laquelle j'ai glissé une fiche bristol blanche que j'ai embossé avec une jolie plaque. Afin de bien la faire ressortir, je l'ai travaillé avec des encres Adirondack et Distress.

Voici quelques visuels de mon mini avec les dies utilisés, je ne vous montre pas tout, vous aurez la surprise en atelier !


Bonne journée !

Karine

Matériel :

Livre de poche
Papiers : Sultane
Alphabets : October Afternoon, Jenni Bowlin
Autocollants : Jenni Bowlin
Tampons : Craft Origine
Encres en spray : Tattered Angels
Encre Versafine noire
Divers : tags, fleurs