Tuesday, 25 June 2013

So Much More Than Paper...


Today I want to share with you some home decor ideas using the new Big Shot Starter Kit. It is so easy to forget that as useful as the Big Shot is for creating cards and scrapbook layouts, it is capable of creating so much more...my ideas are relatively simple and I am certainly not an expert when it comes to stitching but that goes to show that if I can achieve projects like this then anyone can!


 The heart used here to decorate the cotton reel was cut out of an old cork tile, I thought it may struggle going through the Big Shot but I needn't of worried!


Butterfly Frames are all over the high street and this one uses the Butterfly from the Bigz die in the Starter Kit which is a really useful size and gorgeous shape. I have cut out 9 different materials including cork, craft metal, fabric, sandpaper, thick felt, marquetry wood, tissue paper and leather.


To create this simple appliquéd cushion couldn't be easier. Attach iron on adhesive to the reverse of your chosen fabric and then using the Bigz die in the Starter Kit cut out a series of hearts. Peel off the backing and then use the iron to secure into position as shown above. Leave one space empty and simply draw around a die-cut heart shape with a light pencil mark. 


Fill the inside of your drawn heart shape with different sized buttons sewn on with neutral coloured thread.
I have created a very random running stitch, deliberately (honestly!) inaccurate around the perimeter of each heart shape using a deep yellow thread. Obviously all of these items can be created in colours to suit your home, maybe use remnants of curtain fabric that you have or scraps of left over wallpaper to tie the items in with your home.

I really hope that you like my ideas, have fun crafting!

...one of a kind....


Hi everyone... hope you all had a great week...today I have a card with  butterflies   from Sizzix Bigz Die - Mariposa . ... to show you. I just LOVE these beautiful butterflies ♥


Supply list:

658300 Sizzix Big Shot Starter Kit (Powder Blue & Teal)
658530 Sizzix Bigz Die - Mariposa
658519 Sizzix Sizzlits Decorative Strip Die - Bordeaux
658571 Sizzix Movers & Shapers Die - Pocket Watch Frame
658566 Sizzix Movers & Shapers Magnetic Die Set 3PK - Sized Circles
658526 Sizzix Bigz Die - Elisse

Papers: Pion Design - Vintage Garden
Stamps: Stampers Anonymous tim HOltz Collcetion, Vilda Stamps
Inks: Archival Ink - Jet Black 
Other: Seam Binding Ribbon, Cheesecloth


Die cut the butterflies x2 wiht patterned paper.
I have used my sewing machine on this card to sew the butterflies and border to the card.
 

Die cut the clock with chipboard and patterned paper.
 

Thanks for stopping by!
Anne Kristine

Hei alle sammen...håper dere har hatt en fin uke...i dag har jeg et kort med sommerfugler.
Disse sommerfuglene er bare SÅ søte ♥

Produkter:

658300 Sizzix Big Shot Starter Kit (Powder Blue & Teal)
658530 Sizzix Bigz Die - Mariposa
658519 Sizzix Sizzlits Decorative Strip Die - Bordeaux
658571 Sizzix Movers & Shapers Die - Pocket Watch Frame
658566 Sizzix Movers & Shapers Magnetic Die Set 3PK - Sized Circles
658526 Sizzix Bigz Die - Elisse

Papir: Pion Design - Vintage Garden
Stempler: Stampers Anonymous tim HOltz Collcetion, Vilda Stamps
Inks: Archival Ink - Jet Black 
Annet: Seam Binding bånd, osteklut.

Stans ut sommerfuglene i to forskjellige mønsterark. Sy sommerfuglene og borden til kortet sammen med ostekluten. Stans ut klokken i chipboard og mønsterark.

Takk for at du stikker innom her.
Anne Kristine

Gold wedding album


Hi Everyone
Today I will show you a page from an album 14,5x20 cm. My brother and his wife celebrated their golden wedding,50 year. The album should contain a lot of photo that I took during the party.

 Items used:
Bigz  Alphabeth set Sherif Essentials 656616
Albany Rose 658522
Abor:658523
Supply list:
 Paper: Prima-Devine collection-Epigram-, black cardstock and recycled cardstock
Stamp: Vilda stamp
Ink:Arhival ink-jet black-
Embossing: Gold from Ranger

.
I hope you enjoyed my project today. Have a great week, see you next Tuesday
Pia
Hej alle
I dag vil jeg vise et album jeg har lavet til min storebror og svigerindes guldbryllup, det skal  fyldes med billeder jeg tog under festen.
 Dies jeg har brugt:
Bigz  Alphabeth set Sherif Essentials 656616
Albany Rose 658522
Abor:658523
Andre materialer:
 Papir: Prima-Devine collection-Epigram-, black cardstock and recycled cardstock
Stempel: Vilda stamp
Ink:Arhival ink-jet black-
Embossing: Gold fra Ranger
Du må have en dejlig uge, vi ses næste tirsdag
Pia

Monday, 24 June 2013

Fresh window banner card


We are officially in summer, Yay! I love summer with all the bright colors, warm weather and its easy going life. Every summer I like to craft this way, making projects very simple and with a bright fresh look.

Today I'm showing you a window banner card, very easy to make and so summery.


Supply list:
In this case I'm using the negative space of the banner framelit to create the window, and then I glued the acetate on top and frame it with cardstock. I placed a smaller banner in the middle of the window and I have embellish it with a die cut flower from the Starter Kit. I'm really loving those dies, they are so versatile!


And don't forget to adhere another banner in the inside of the card to hide all the adhesive :)

Happy Monday!

.....................

Ya estamos oficialmente en verano ¡bien! Me encanta el verano con sus colores brillantes, el clima cálido y su vida más relajada. Cada verano scrapeo de esta manera, creando proyectos simples y con un aire fresco. Hoy os enseño una tarjeta con una ventana en forma de banderola, muy fácil de hacer y muy veraniega.

Materiales:
En este caso estoy utilizando el espacio negativo del troquel para crear la ventana y después he pegado el acetato encima y he creado un marco con cartulina. En el medio de la ventana he puesto otro banner y lo he adornado con una flor hecha con los troqueles del Starter Kit. Realmente me encantan estos troqueles, ¡son súper-versátiles! 
Y no olvidéis poner otro banner en la parte interna de la tarjeta para ocultar cualquier adhesivo que se pueda transparentar.

¡Feliz lunes!

teaching with a big shot


For the past couple of Sundays I've been at a knitting and patchwork shop just outside of Leeds called The Skep teaching Bonnie Hunter's scrappy trips around the world blocks.

This pattern is perfect for using up random fat quarters or strips of fabric that you have in your stash that you don't like too much (it's also perfect for those favourite fabrics too).I've made quite a few of these quilts now, they're fast, they're fun and they use up a lot of fabric.

When you use the 2.5" strip die to cut your strips it's also really REALLY fast to get all of your fabric prepared. I've got to admit I get a bit carried away when I'm cutting strips and end up cutting far too many every time!

We had a whole basket of strips to play with, some were lovely, some were quite interesting (to put it politely!)

skep2


But I encouraged everyone to grab a mix of colours and prints to get the full effect of the pattern

skep1

and I think you'll agree, the results were lovely! There's no such thing as a fabric that's too ugly in a scrap quilt - when it's pieced into a scrappy block you don't notice the 'ugliness' and instead you see the colour or the tone. The big shot is perfect for cutting scraps, and keeping them under control in smaller pieces that can be easily sorted and stored.

You can make your own 'jelly rolls' with the 2.5" strip, or mini charm packs with the square dies, sort them into colours and keep everything nicely organised. Believe me, it makes you feel ever so slightly smug and pleased with yourself when you turn a big pile of scraps into manageable pieces for easy use!

skep3


Sunday, 23 June 2013

Doilies, flowers, bits and pieces...


Hi, i hope you had a great, creative week!
I'm back with some more inspiration for you... and I hope you will like it :)
Today I'm sharing with you another layout  - effect of my work in the classroom in France, in Massy near Paris.
During "Space, Media, Dimension" class we use a lot of paper scraps, plain paper cut-outs (mostly from Thinlits, Sizzlits and Sizzlits Decorative Stirps) and as lot of 3D Foam (Scrapbook Adhesives by 3L). All that helps the students to create a dimensional, cleanproject like this:


Here you can see some more details: Sizzix cut-outs ripped into pieces and layered together with tons of little paper bits...


 This kind of project is effect for those of you who have far too much of paper scraps and cut outs which you want to get rid of. Layering gives so many possibilities!


For this project I used Sizzix products listed below:
- 658502 - Sizzix Sizzlits Die - Flower, Daisy
- 657996 - Sizzix Sizzlits Die - Card, Scallop Circle Insert
- 658001 - Sizzix Sizzlits Decorative Strip Die - Interlocking Circles

Other supplies:
Papers - 7 Dots Studio - Dreamer Collection, Domestic Goddess Collection
Adhesives: Scrapbook Adhesives by 3L
Embellishments, stencils and stamps - Prima Marketing
Color - Luminarte Primary Elements
Ink - Ranger - Archivals - Jet black

Sending warmest hugs - I hope to see you back soon here on the blog!
xoxxo
Finn

A Canvas Project by Gerry van Gent


Happy Sunday Sizzix Friends!
Today I prepared for you a canvas using Sizzix 
die-cuts and embossing folders.

657900 Sizzix Big Shot
658524 Sizzix Bigz Die Classique
658521 Sizzix Sizzlits Dec. Strip Die Venice
657176 Sizzix Sizzlits Dec. Strip Die Typeset Alphabet
658948 Sizzix Thinlits Die Frame, Fancy Rectangle
658947 Sizzix Thinlits Dies Doily & Doily Border
658951 Sizzix Thinlits Die Ornate Hanging Sign
658945 Sizzix Thinlits Die Set Damask & Scallop Borders
658356 Sizzix Textured Impressions Embossing Folders - 
657667 Sizzix Textured Impressions Embossing Folders -
*  *  * 
I cut the big swirl from Sizzix Bigz Die Classique into parts so
I can spread it all over the canvas.
I used the Rose Vine Embossing folder with a pattern paper.
I embossed the pattern and then cut out only a few leaves for decoration.
The Fancy Rectangle was used here not as a frame.
I cut out the ornate parts and used them to decorate the canvas.

Behind the photo I used an embossed oval frame which
was embossed from the Loving Thoughts Set.

Other Products I used:
Webster's Pages - Modern Romance
Prima Marketing - flowers
Imaginarium Designs - chipboard
Ippity Unmounted Stamps set  - "Bloom & Simplify"

I hope you enjoyed my project today!
Have a great day!
Gerry

Saturday, 22 June 2013

Canning Jar Favors


My daughter called us to say she was engaged on Christmas Day. They were in the Cayman Islands scuba diving and Galen gave Pam the ring. Yes, 60 feet under water! However, we are still waiting to hear when the big event will take place.

I created this wedding favor in hopes it might get the ball rolling...

Supplies:
658453  Sizzix ScoreBoards XL Die - Canning Jars, 3-D
658443  Sizzix Bigz Die- Flower, Trinity's
658457  Sizzix Textured Impressions Embossing Folders 2PK - Rosebuds & Seed Packet Set
656491  Sizzix Little Sizzles - 6" x 13" Mat Board Pack, 6 Cream Sheets
657900  Sizzix Big Shot
656657  Extended Cutting Pads

This die is a great value because it comes with a two sizes of jars- quart and pint, two lids and an inner well to hold treats. 

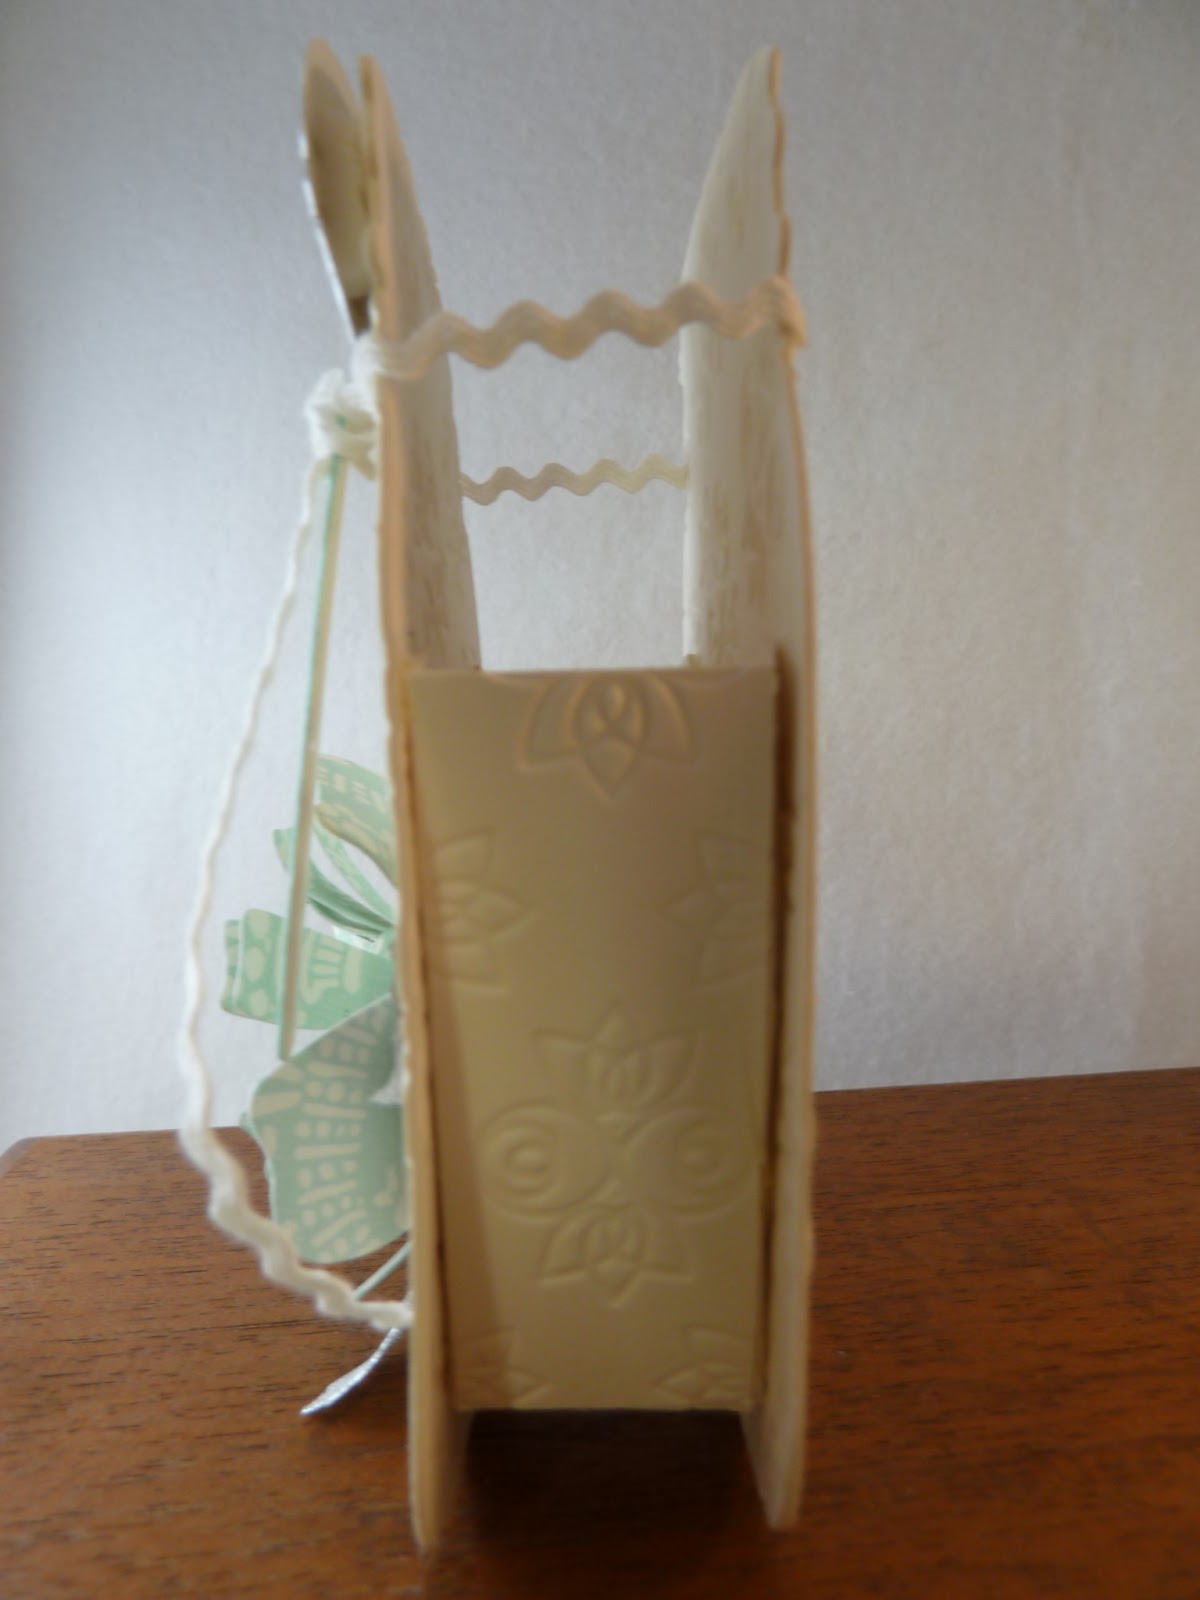
Die cut Canning Jar. To create a three dimensional project you will need to cut a second jar piece. Emboss all pieces using Rosebud Textured Impression folder. You might have noticed, I debossed the inner well section and embossed the front of the jars. Oops. That's OK...
ASSEMBLY TIP: 
Lay the back sides of the jars facing down and place the middle section (right side down) across the middle of the two jar bottoms. Mark with pencil. This will make both jar bottoms level when you stand it up. Apply strong double sided adhesive or use glue gun to adhere bottom tabs to jars.
Now adhere sides to jar. The sides may be adjusted to the width and height you desire on the jar. 
All taped up!
The jar stands about 5" tall, 3" wide and 1 1/4" deep. 
Side view...
For this project, the jar lid was used as a tag and tied it on with rickrack. Write in the couple's names with pencil.

Cut the lid from heavy silver cardstock. On the back of it, pencil in lines.
Place on a piece of foam and trace over the lines with an embossing stylus. Adhere to the top of the jar using foam dots for dimension.
This die would also make a great card if you folded over a piece of cardstock and laid the fold  inside the cut line of the die. I think it would also make a cute recipe book...

What would you use this die for? I'd love to hear... Thanks for coming by!

Friday, 21 June 2013

Flavor: Lavender Strawberry Sachet


Hi Everyone! This is Anna. Today I wanted to show you some strawberry love I made using the Sizzix dies. These spring strawberries can be enjoyed all year long: each strawberry bags filled with fragrant lavender... perfect to be given as favors.
 
 
Anna Drai - fabric scented lavander - strawberries -  favor (1)


Wherever you find to use this strawberry lavender sachets know that they are natural the scent that can last for months. When the sachet is lightly crushed it will give more of its scent and when this is diminished the scent can be replenished with a drop of lavender essential oil.

One strawberry is cute...

Anna Drai - fabric scented lavander - strawberries -  favor (2)

But a dozen strawberries is berry cute!!!
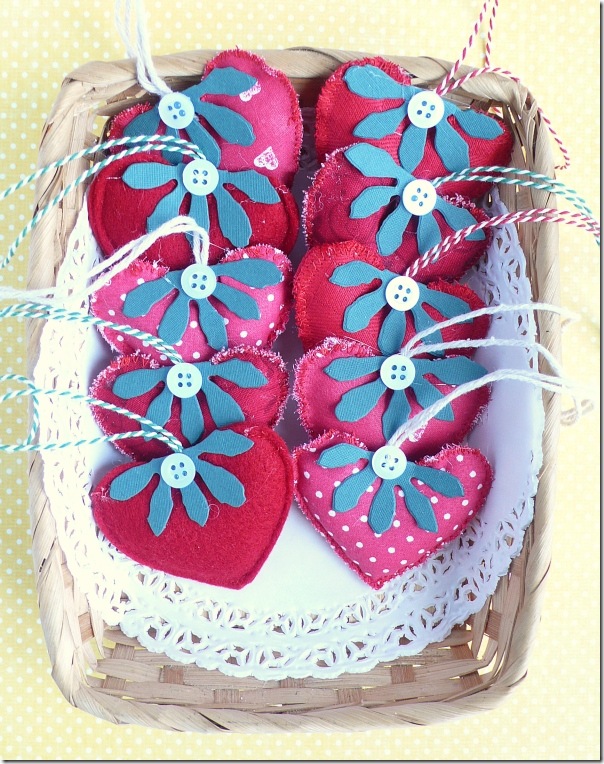
Anna Drai - fabric scented lavander - strawberries -  favor (3)


To make the bag of favor I used a pretty doily Thinlits die, Wow..I love this!
Items used:

Sizzix Big Shot Machine (657900)
Sizzix Bigz Die - Heart, Stem & Leaves (657691)
Sizzix Bigz Die - Tiny Tabs & Tags (657188)
Sizzix Movers & Shapers Magnetic Die Set 2PK - Mini Tattered Florals Set (657488)
Sizzix Movers & Shapers Die – Ornamental (656641)
Sizzix Thinlits Die Set 9PK - Doilies, Lovely (658605)

scrap of cardstock: green, white, kraft
scrap of red fabric or felt
dried lavender
button
twine
mini wax paper bag
mini clothespin
sewing machine, yarn

Anna Drai - fabric scented lavander - strawberries -  favor (4)

How to make:

For the strawberry

1- Cut out two hearts from the red fabric.
2- Layer and sew around the edge of the heart, leaving a small gap. I found it easier to sew the curved parts in this step and leaving a straight side open for filling the hearts. 
3- Using a paper cone or teaspoon, fill the heart with dried lavender as desired. My method is to fill it about a third with lavender, and then put is some pillow stuffing as well to make it plumper.
4- Stuff the heart about half way, then add a few of the dried bits of lavender.
5- Once you have sewn the heart completely shut, you can thread your needle again with some twine. At the top center of the heart, sew a loop so that you can hang the sachet.
6- Cut out the flower from the green cardstock. Make the hole in the center and fold in half. Thread the flower in the twine of strawberry. Glue and apply a button.

For the flavor package

1- Use Thinlits Die Doilies, Lovely (658605) to cut out a doily from white cardstock.
2- Apply the doily, folded in half, on the top edge of wax paper bag.
3- Insert the twine of strawberry into a hole of doily.
4- Cut out a mini tag for write name.
5- Apply the tag with a little clothespin.

You’re done! You have a lavender filled strawberry sachet favor. They smell delicious and are sure to wow your guests!
I wish you all a great and inspiring weekend!

**************************************
Flag_of_Italy Per le amiche italiane! :)

Ciao! Ecco un nuovo appuntamento con Anna. Oggi volevo mostrarvi delle deliziose fragoline che ho creato utilizzando alcune fustelle Sizzix.
Queste fragole si possono godere tutto l'anno: ogni fragola è imbottita di lavanda profumata... sono quindi perfette come bomboniere, per questa stagione ricca di matrimoni e altri eventi festosi.
I vostri ospiti vi ringrazieranno perchè il profumo naturale della lavanda può durare per mesi. Se si schiacciano leggermente emaneranno nuovamente il profumo e quando questo venisse meno, si può aggiungere una goccia di olio essenziale.
Per chiudere il sacchetto della bomboniera ho usato una bellissima fustella centrino Thinlits. Adorooo!

Materiali

Sizzix Big Shot Machine (657900)
Sizzix Bigz Die - Heart, Stem & Leaves (657691)
Sizzix Bigz Die - Tiny Tabs & Tags (657188)
Sizzix Movers & Shapers Magnetic Die Set 2PK - Mini Tattered Florals Set (657488)
Sizzix Movers & Shapers Die – Ornamental (656641)
Sizzix Thinlits Die Set 9PK - Doilies, Lovely (658605)
ritagli di cartoncino: verde, bianco, kraft
avanzi di tessuto fantasia rosso o feltro
lavanda secca
bottone
cordoncino
mini sacchetto di carta oleata
mini molletta
macchina da cucire, filo

Procedimento:
 
Per la fragola
 
1 - Tagliare due cuori di tessuto rosso, possibilmente a pois.
2 – Sovrapporre i due cuori e cucire a zigzag lungo il bordo esterno, lasciando un piccolo spazio. Ho trovato più facile cucire le parti curve lasciando un tratto di lato rettilineo aperto per riempire i cuori.
3 - Utilizzare un cono di carta o un cucchiaino per riempire il cuore di lavanda secca. Il mio metodo è quello di riempire circa un terzo con lavanda e poi mettere un po' d'imbottitura per renderlo più cicciotto.
4 - Imbottire il cuore a metà, quindi aggiungere la lavanda.
5 - Una volta cucita l'apertura del cuore, è possibile infilare di nuovo l'ago con un po' di spago in alto, al centro del cuore per poterlo appendere.
6 - Tagliare un fiore con molti petali dal cartoncino verde. Fare un buco al centro e piegare a metà. Infilare il fiore nello spago del cuore, per creare la fragola. Non avevo feltro verde, così ho usato la carta, ma decidete voi cosa è meglio. Incollare il fiore verde e applicare un bottone.
 
Per il sacchettino dei confetti (o caramelle, cioccolatini...)
 
1 – Utilizzare un centrino del set di fustelle Thinlits, Lovely (658605) per tagliare un centrino dal cartoncino bianco.
2 - Posizionare il centrino, piegato a metà, sul bordo superiore del sacchetto di carta oleata.
3 - Inserire il cordoncino della fragola in un buco del centrino.
4 - Tagliare una mini etichetta per scrivere il nome.
5 - Fermare la tag con una mollettina.

Voilà! Così avrete una fragola riempita di lavanda, da usare come bomboniera o pensierino per un'amica.
Auguro a tutti voi un buon fine settimana!