Showing posts with label Frameworks Die - Courtyard. Show all posts

Sunday, 5 October 2014

Fall Family Fun.

Hello, it's me Bente here with an Autumn/Fall inspired page.
The air is much crisper now than only a couple of weeks ago and up here in the Scandinavian countries the days have grown much shorter.


 I think you can tell I had a lot of messy fun with this page. I added a couple of my all time favourite dies. As you probably know by now, the Tattered Floral die is just perfect for making your own flowers and the Frameworks dies are all wonderful to use both as a background or as a special feature on their own.


I took the picture yesterday when we went for a stroll in the beechforest looking for any remaining delicious chanterelles. We came home pretty emptyhanded, but we all ejoyed our little outing very much.


I used the large Tim Holtz Leaf die with its embossingfolder. I think it is absolutely beautiful. In my previous post I used it as well, on a couple of cards.


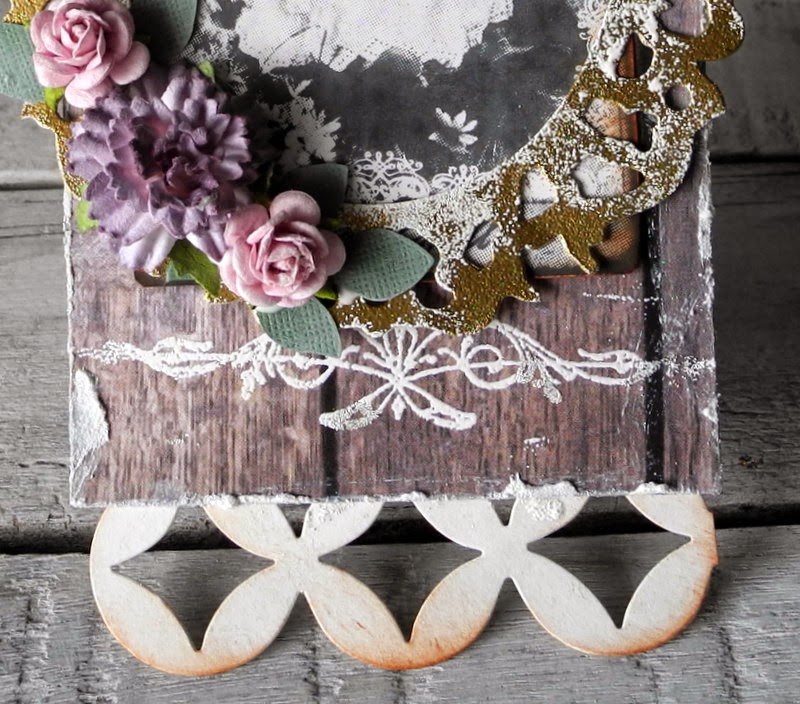
Finally a little close up of one of my Tattered Florals (medium sixed).

So today was an explosion of colour. I hope you enjoyed my Fall inspired page and I will be looking forward to seeing you same place and same time next Sunday! :-)

The Sizzix products I used are:
Sizzix Big Shot Starter Kit (Powder Blue & Teal)
Sizzix Frameworks Die - Courtyard
Sizzix Bigz Die - Tattered Florals
Sizzix Bigz Die w/Texture Fades - Layered Leaf

Papers are Prima and Les papiers de Pandore. Flowers are Prima, Petaloo, Magnolia

Have a nice new week!

Bente

Sunday, 21 September 2014

Happy mail, Snailmail, Penpals.


Hi, it's me Bente here today to show you a little of a fun 'new' thing I discovered from my eldest daughter. Yup, I'm sure you have heard about it before ; SNAILMAIL. 
Admit it, for most of you it has an oldfashioned ring to it and you probably have not sent one for years. For the young people (and even slightly older :-) ) there is something cool and fun about snailmail. There are several clubs where you can connect with likeminded to correspond with eachother. -This is much like the old penpal-clubs I remember from my highschool days.

 Here is the set I prepared and we are sending it off  to DD's friend Hillevi who's in London:


As you see we have not written the letter yet at this point, -maybe because we did not want it published all over the internet,...LOL!  Of course it looks alot cooler with the text in place, but at least the base for the letter is there. 
One thing not to miss when you send a snailmail is the ever popular 'tuck in' -the little something that you add to the envelope to make it all more interesting. I have made a few 'bagatelles' with my Sizzix dies to tuck in as well as added some old book pages, doilies and some pretty flair buttons.

I started by cutting down the 12X12 paper to a good letter size. I misted it and added a strip of paper where I wanted the name to go. Hillevi is really into movies and all that stuff so I thought the filmstrip die was a good one to grab and the chipboards for the name was made with a Bigz alphabet. Then I added some black chalk to make them stand out more.
Take a look at those dainty little butterflies, die cut from an old book page. Those belong to one of Paula Pascual's new die sets. They are so precious!


Below is the birthday baner I made to tuck in and I will present it in a small vellum envelope. You can also see the cute frame made with one of the new awesome cool thinlits sets. I added a couple of those cut from different papers. The 'smile' and the couple cut from red cardtock in the main photo are also from one of the new thinlits sets.
These are all rather nice little 'gifts' for those who don't own a Big Shot machine (or other,... gasp!)


I actually made some decorative chipboard decorations using my frameworks dies.  The fact that you can cut 'almost anything' with them is one of the many easons to love the Bigz dies. These chippies have been painted with gesso and then  misted with Prima's new Color Bloom mists and I think they look really nice. Especially considering they were made from an empty box of dishwasher tablets :-D I think they have certainly come up in the world :-)


Another cute little something that I made is a small sign for her to hang somewhere in her room. I imagine it dangling from a key for a cupboard or a wardrobe.


I diecut the quote and backed it with different coloured papers. Then I added a red frame all around before glueing it to a piece of thin cardboard. I used a heavy embroidery needle to add the red and white bakers twine.

Gorgeous Sizzix products that I have used:


The papers I have used are from  Prima Marketing ledger paper pad.  Buttons are by Lemoncraft.

Thanks for dropping by! Maybe you'll jump on the snailmail train yourself soon! :-)

Hugs!

Friday, 12 September 2014

Autumn greetings


Hello Sizzix UK friends! Today I want to share with you some ideas for autumn greeting cards. This upcoming season is full of warm colors and wonderful textures. That's why I decided to use browns, greens and some orange or salmon hues with an emboss twist and a "butterfly effect". 

For my first card I decided to use one of the special background with wooden texture that I receive from very special person - Pete Hughes (thanks a lot, Pete!). I was always under impresion how perfectly he use such patterns. This time, on my 1st layer I put 2 different diecuts: an oldie, but still absolutely fantastic On the Edge Die - Butterflight and one of the Frameworks designs (absolutely love each of them!) - Frameworks Die - Courtyard.


On my second card, in a tag shape, I used large, embossed butterfly as a main decoration. I cut out and emboss it using Bigz Die w/Texture Fades - Layered Butterfly and another interesting paper from Pete - the golden one. It is similar to metallic foil, that' why looks like embossed metal sheet. Amazing, huh?


Sizzix supplies used:
658300 Sizzix Big Shot Starter Kit (Powder Blue & Teal)


Thank you for visit us today! 
Have a lovely, creative weekend! 
~~ Karola ~~ 


****************************


Witajcie polskojęzyczni fani Sizzix! Dziś chciałabym podzielić się z Wami kilkoma pomysłami na jesienne kartki. Nadchodząca jesień pełna jest ciepłych kolorów i cudownych tekstur. Właśnie dlatego postanowiłam wykorzystać kolory z palety brązów, zieleni, pomarańczy oraz kolory łososiowego wraz z elementami wytłaczanymi oraz motywem motyli.

Jako tło w mojej pierwszej kartce wykorzystałam specjalny gruby i sztywny papier z motywem i teksturą drewna, który otrzymałam od wyjątkowej osoby - jednego z projektantów Sizzix - Pete'a Hughes'a. Zawsze jestem pod wrażeniem z jaką łatwością i perfekcją wykorzystuje on podobne motywy. Tym razem jako pierwszą warstwę w mojej kartce połączyłam wycinanki z 2 różnych wykrojników: nieco starszego, ale wciąż fantastycznego On the Edge Die - Butterflight oraz jednego z wykrojników Frameworks (absolutnie uwielbiam wszystkie wzory z tej serii!) - Frameworks Die - Courtyard.

W przypadku drugiej kartki w kształcie taga, wykorzystałam dużego, embossowanego motyla jako główną dekorację. Wycięłam i wytłoczyłam go za pomocą zestawu wykrojnika oraz foldera do embossingu Bigz Die w/Texture Fades - Layered Butterfly w kolejnym ciekawym tle od Pete'a - tym razem złotym. Tło jest podobne w kolorze i strukturze do metalicznej folii, dlatego tak wspaniale imituje wytłaczaną cienką blachę. Niesamowite, prawda?


Wykorzystane produkty Sizzix:


Dziękuję za dzisiejsze odwiedziny na naszym blogu!
Życzę Wam cudownego, kreatywnego weekendu!


~~ Karola ~~


Sunday, 24 August 2014

A feminine and romantic card.


Hi there Sizzix friends!!
Today I have a card to share in a romantic and slightly shabby style.


I have used one of the the frameworks dies here as well as one of the framelits sets with both stamps and dies.


Almost no combination is as feminine and romantic as pink with light blue. I cut out my leaves from both cardstock and a patterned paper and quite like the effect of the patterned leaves.


I like to paint on my diecut pieces with gesso. Here I have diecut a piece of chipboard and I find the gesso makes it look a little softer.

Thank you all for looking today and for any sweet comment you like to leave me. It's so nice with a little feed back here on the blog!!

The Sizzix products I used are: 

Sizzix Big Shot Machine Only (Powder Blue & Teal)
Sizzix Frameworks Die - Courtyard
Sizzix Framelits Die Set 5PK w/Stamps - English Garden

Other products; Lemoncraft, Prima, Melissa Frances

----------------------------------------------------------------------------

Hej Sizzix vänner!
Idag vill jag visa er ett kort i romantisk og shabby chic stil.
Jag har använt en av framework diesen och ett set med tunna dies och stämplar, som heter 'English Garden'.
Rosa och ljusblått är nog den mest romantiska kombinationen av alla. Jag stansade ut löven både i enfärgad vit cardstock och i mönsterpapper. Jag gillar jättemycket effekten av de mönstrade löven.
jag gillar att måla på mina stansade bitar med gesso. Här har jag stansat ut från en bit chipboard med en Bigz die och tycker att gesson mjukar upp intrycket lite.
Tack för att ni tittar in idag och för eventuella kommentarer ni lämnar mig.
Det är så trevligt med lite feedback här på bloggen!

Sizzix produkterna jag har använt: 

Sizzix Big Shot Machine Only (Powder Blue & Teal)
Sizzix Frameworks Die - Courtyard
Sizzix Framelits Die Set 5PK w/Stamps - English Garden

Andra produkter; Lemoncraft, Prima, Melissa Frances


Wednesday, 23 July 2014

Notepad dressed up


A few weeks ago I bought a small notepad (on sale) at a new favourite store. My idea was to have the pad stay on my work table and be the place where I jot down lists of various kinds so I was slightly disappointed when I couldn't remove the sales sticker from the front.
 
 
Since it is just a little pad I decided to dress up the front covering the sticker with a fairly simple design and not a lot of bulk.
 
 
I cut an ombre paper the same size as the notepad and then I die cut a white delicately patterned paper and a bright green cardstock using the Frameworks Die - Courtyard. I began by attaching the white die cut and then I used a roller stamp to stamp multiple sentiments haphazardly across the paper. Finally, I added a few green diamonds to the white die cut.


I liked the idea that the green diamonds stand out due to the fact that I didn't stamp on them. It adds some contrast to the entire project.
 
Supply list:
Notepad
Roller stamp (Hema)
Stickers (Søstrene Grene)
VersaFine, black ink
Paper (American Crafts)
Cardstock
 
---o---
 
For et par uger siden købte jeg en lille notesblok i en ny favoritbutik med den intension, at den skulle bo på mit skrivebord, så jeg kunne bruge den til diverse lister. Derfor var min skuffelse også stor, da jeg ikke kunne fjerne tilbudsklistermærket.
 
Løsningen blev at give blokken en ny og relativt enkel forside uden at tilføje for mange lag til den.
 
Jeg skar et stykke papir i samme størrelse som notesblokken, og derefter udstansede en hvid og en hidsig grøn figur ud med Frameworks Die - Courtyard. Først limede jeg den hvide figur fast, og stemplede med et rullestempel mere eller mindre tilfældigt over en stor del af forsiden. Herefter monterede jeg nogle af de grønne diamanter, hvilket gav en fin kontrast, fordi de ikke er blevet stemplet på.
 
Ingredienser:
Notesblog
Rullestempel (Hema)
Klistermærker (Søstrene Grene)
VersaFine, black ink
Papir (American Crafts)
Karton

Tuesday, 15 July 2014

YOU ARE BEAUTIFUL.......

Hi everyone
I hope you all had a great week, today I will show you a layout. I have used the amazing Tim Holtz dies and a photo of our lovely granddaughter.
Items used:
Supply list:
Paper: Paperstash Tim Holtz WallFlower 12x12 Menagerie 8x8
Ink: Archival ink Coffee
Stamp: Design Stempelglede.com -Follow Your Heart-
Glossy accent

Thanks for stopping by and thanks for the kind comments in my last blog post, it makes me so happy
Wish you a beautiful week
Pia
Hej alle
Jeg håber du har haft en dejlig uge, i dag vil jeg vise et layout hvor jeg har brugt de fantastiske Tim Holtz dies, fotoet er fra vores smukke barnebarns konfirmation.
Items used:
Supply list:
Papir: Paperstash Tim Holtz WallFlower 12x12 Menagerie 8x8
Ink: Archival ink Coffee
Stempler: Design Stempelglede.com -Follow Your Heart-
Glossy accent
Tak fordi du kiggede forbi og tusind tak for de søde kommentarer i mit sidste blogindlæg , det gør mig så glad
Pia
 

Tuesday, 24 June 2014

Wooden block....


Hi everyone...hope you had a great week...today I have made a wooden block with Frameworks, cheesecloth and Gesso. Very easy to make and a nice gift to a dear friend ♥


Supply list:
657900 Sizzix Big Shot machine
659424 Sizzix Frameworks Die - Courtyard 

Papers: Pion Design - My Precious Daughter
Other: Wooden block, Gesso, cheesecloth, Flowers - Kort & Godt, Tissue Tape - Tim Holtz idea-ology

How to do:
Find a  wooden block and Die cut Framework in patterned paper with Sizzix Frameworks Die - Courtyard 
"Glue" it to the wooden block with Gesso and cheesecloth. Add flowers, Tissue Tape and text. 


Thanks for stopping by and I wish you a great day!
Anne Kristine

♥♥♥♥♥♥

Heisann... I dag har jeg laget en trekloss  med Frameworks og osteklut.

Materialer:
657900 Sizzix Big Shot machine
659424 Sizzix Frameworks Die - Courtyard 

Papir: Pion Design - My Precious Daughter
Annet: Trekloss, Gesso, osteklut, blomster - Kort & Godt, Tissue Tape - Tim Holtz idea-ology

Beskrivelse:
Finn en trekloss og stans ut  Framework i mønsterark med Sizzix Frameworks Die - Courtyard 
"Limes" til treklossen med Gesso og osteklut. Lim på blomster, Tissue Tape og tekst. 

Takk for at du stikker innom her og ha en herlig dag!
Anne Kristine

Tuesday, 10 June 2014

Vintage baby tag

Hi everyone
Today I have a vintage tag to share with you.
Items used:
Supply list:
Paper: Wood texture paper bloc 15x30 from Joy crafts
Ink: Arhival ink Watering Can and Coffee
Stamp: Stempelglede-Vintage baby-
Ribbon, button,embossing creme White / Viva, flowers, embossing Gold and White / Ranger
How to make:
I have die cut a tag using Tag & Bookplates, paint using embossing creme round the edged.Die cut using Courtyard glue to the buttom of the tag, die cut using Ornate Frame embos using gold and White embossing, stamp using the sweet baby glue to the centre of the tag. decorate using ribbon and flowers


Thanks for stopping by, wish you a great week
Pia
Hej alle
Jeg håber du har haft en dejlig Pinse. I dag vil jeg vise en vintage tag
Sizzix dies jeg har brugt:
Andre materialer:
Papir: Wood texture paper bloc 15x30 from Joy crafts
Ink: Arhival ink Watering Can and Coffee
Stempler: Stempelglede-Vintage baby-
Bånd, knapper,embossing creme White / Viva, flowers, embossing Gold og White / Ranger
Fremgangs måde:
Jeg har udstanset Tag & Bookplates, malet kanterne med embossing creme .Udstanset Courtyard limet den til bunden af tagen, udstans Ornate Frame embos med gold og White embossing, stempel med det søde foto af baby lim begge dele til midten af tagen. dekorer med blomster og bånd
Tak fordi du kiggede forbi, ønsker dig en dejlig sommeruge
Pia

Tuesday, 27 May 2014

Vintage postcard

Hi everyone, i hope you all had a great week. Today I have a vintage card to show you using Sizzix
  Frameworks Courtyard and Gardens Greens
Items used:
Supply list:
Paper: Tim Holtz Idea-Ology stash 12x12 wall Flower,Giro Flee, Alheli
Stamps: Stempelglede-Postcard from Paris-
Ink: Distress ink- Vintage Photo-Peacock feathers from Ranger
Ribbon, flowera, Pountura Paint Blue, 3 D foam and Glossy accent
The card is 14,5x14,5 cm
 Here i used the top of courtyard die
Here I used glossy accent
 I have cut out the leaves from the bigz die garden greens and decorate using glossy accent

Thanks for stopping by, wish you a lovely week
Pia
Hej alle
jeg håber du har haft en fantastisk uge og nydt det gode vejr. I dag har jeg et vintage kort at vise hvor jeg har brugt Sizzix Frameworks Courtyard and Gardens Greens
Sizzix dies jeg har brugt:
Andre materialer:
Papir: Tim Holtz Idea-Ology stash 12x12 wall Flower,Giro Flee, Alheli
Stempler: Stempelglede-Postcard from Paris-
Ink: Distress ink- Vintage Photo-Peacock feathers fra Ranger
Bånd, blomster, Pountura Paint Blue, 3 D foam og Glossy accent
Kortes størrelse er14,5x14,5 cm
Tak fordi du kiggede forbi, ønsker dig en dejlig uge
Vi ses næste tirsdag
Pia

Monday, 26 May 2014

Jumbo and Tattered Florals for Home Decor projects


One of the most popular Sizzix dies has to be Tattered Florals. They are fantastic as there are four flowers in different sizes and shapes and being a Bigz die means that versatility is warrantied. Loads of us crafters cheered when Tim Holtz released the Jumbo Tattered Florals.
I adore flowers, layering them, using them in different sizes and making them 3D.  That is why I was really looking forward to the opportunity to use the original Tattered Florals and the Jumbo ones. 

There are plenty of tutorials out there on how to assemble the Tattered Florals, but here is a quick reminder.


I die cut four large flowers. Then I made some cuts (clockwise): On one made just a cut, on the second I cut a petal off, on the third one I cut two petals off and finally on the fourth flower I cut three petals or cut in half.
Then I glued each end petals to each other and shaped the ends of the flowers using the Susan's Garden Tool Kit.


To assemble the layers I started with the centre (but you may want to start with the larger layer) rolling up the single petal and then added the other layers of petals. Trim the bottom ends of the flowers to be able to layer the petals closely together. To glue the layers, I used a cold melt glue gun. Quick and strong hold.


I repeat the same process with the largest flower from the original Tattered Florals. And the final results on the right hand side. Top is the Jumbo one and bottom the original Florals, quite a big difference is size.


I did the same with the rest of the flowers in both the Tattered Florals and the Jumbo ones.


All in all, six fine 3D flowers. I attached them to this nice wooden coat hanger, added the leaves using the Jumbo Florals I finished the decorating by adding a die cut Frameworks Courtyard.