

Didn't see too much sunshine on the Llyn Peninsula last week but that's OK because we didn't see too much rain either!
I'm back from holiday refreshed and raring to go and this week...... I'm bringing my own sunshine!
A couple of weeks ago I used a Bigz heart die as both a stamp and a stencil. This week I am using die-cut letters as stencils but in a completely different way.
I am using an old favourite in the form of the Bigz XL Word Play Alphabet Die which is not the cheapest die on earth but it is an investment that you won't regret. I am also using one of the Bigz dies from the recent Echo Park collection namely the Sun and Clouds die.
I found a wooden plaque in a local charity shop and sanded off the sentiment which was printed on the front, if that proves too much of a challenge you can always paint over it. Next, I die-cut the word 'sunshine' from textured paper. I chose textured paper because I wanted to apply it to the plaque as shown using a thin mist of adhesive spray, having a slight texture makes it easier to remove when I'm finished with the die-cuts as you will see.

 After removing the stencil I applied move colour to cover the letters. Now it's time to dig deep into my box of goodies and reach for some of my favourite Tim Holtz Layering Stencils, I chose Speckles, Splatters and Dot Fade, they should do the trick.


I'm back from holiday refreshed and raring to go and this week...... I'm bringing my own sunshine!
A couple of weeks ago I used a Bigz heart die as both a stamp and a stencil. This week I am using die-cut letters as stencils but in a completely different way.
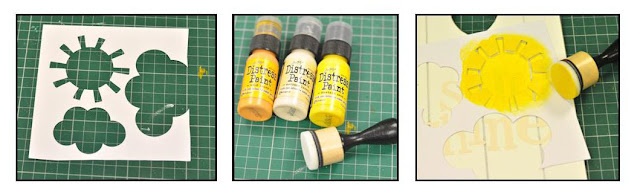
I am using an old favourite in the form of the Bigz XL Word Play Alphabet Die which is not the cheapest die on earth but it is an investment that you won't regret. I am also using one of the Bigz dies from the recent Echo Park collection namely the Sun and Clouds die.
I found a wooden plaque in a local charity shop and sanded off the sentiment which was printed on the front, if that proves too much of a challenge you can always paint over it. Next, I die-cut the word 'sunshine' from textured paper. I chose textured paper because I wanted to apply it to the plaque as shown using a thin mist of adhesive spray, having a slight texture makes it easier to remove when I'm finished with the die-cuts as you will see.

I took a rectangle of card and die-cut the sun stencil. I used Acrylic Distress Paint but any acrylic paint will work just fine for this project, the colours I have chosen are Wild Honey, Mustard Seed and Antique Linen. I placed my die-cut sun stencil just above the letter 'N' and used a sponge applicator to apply the colour.


I was quite happy how this turned out so far but now it's time to remove the die-cut letters using the tip of my craft knife. Once the paint is completely dry I'm taking a fine line marker and drawing around the inside of each letter. Hand lettering is all the rage at the moment and it's not as easy as it looks but this technique is so simple because it's the imperfections that make it special!

Once I had finished the letters it was time to complete the sentiment using a typewriter alphabet stamp set to spell the word 'You are my...' and again the imperfect placement of the letters is..... Perfect!!!


