Thursday 30 April 2015

Tessellations for fun


I’ve been very busy this weekend, but I haven’t finished the quilt from the last blog. I’ve been a little distracted because I suddenly thought that I need to get some quilts finished for my grandchildren – before the next one is born ( due around 20th May)!!
You see I’ve made one for Oona the youngest, and Daniel, the eldest already has a couple of quilts, but Kieron and Abi  are still waiting for me to complete theirs, and I haven’t started one for Eve – until today.
So I hope you’ll bear with me.
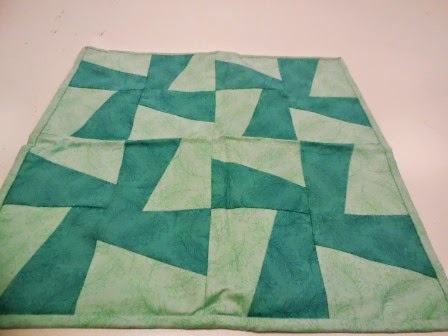
I’m featuring just one die – Tessellating Pinwheel 659584 http://www.sizzix.co.uk/catalog#q=tessellating% – but with about 5 different layouts/colours.
You do need to be careful cutting - if you are using patterned fabrics you will need to make sure that the fabric is always the same way up so that all the pinwheels tessellate in the same direction - for plain fabrics it doesn't matter ( but you do need to make sure that you stitch plain fabrics to keep the tessellation correct)
The first 2 samples are of cushion covers – the first shows the easiest layout – just using 2 fabrics, so each block is the same.
The second cushion cover uses more fabrics but they are laid out in rows - so it’s still really easy.
 
Now this quilt is for Abi – she loves elephants – so these fabrics are ideal for her – and the quilt will be bordered with fabric with just elephants. This is the most challenging layout – you need to lay all the pieces out in rows – so that all the blocks make interwoven pinwheels – you need to do careful pinning and labelling (and even so I still needed to relay the last 3 rows again before stitching.
I think it's worth the effort - at least I do now all the rows are stitched!!
The next photo shows the beginning of Kieron’s quilt – now he decided that he wanted the pieces to be put together in a random design – I couldn’t quite cope with that so I’m creating pinwheels with random fabrics around each one – it’s easier – but I’m not sure how it will look when it’s complete – I guess the important thing will be that Kieron likes it.
It will be interesting to see this progress!
Now Eve has said that she would like to make her own quilt, and she can use my sewing machine quite confidently, but at the age of 6, I think this might take her quite a while – so I’ve started this quilt – and it’s so easy!
As long as I make sets of 4 matching pink with 4 white pinwheels – then the lay out is so simple because the blocks can just be joined together –
The great thing about this one is that I'm using some of the fabrics from my stash, and I also think Eve will love it.
So 5 looks from 1 die – I reckon that’s very good value for money.
Will I have them all finished by next week – no – but I’ll keep you updated, and hopefully complete them before the newest member of our family arrives!
So enjoy this Bank Holiday weekend, and I’ll be with you again next week.
Angela


Baby basket


Hello Sizzix friends!
Happy thursday!
Do you have already downloaded Free New Baby Paper Downloads?
They are so beautiful, adorable and particularly suitable for babies.
Today we use them to create lovely baby basket to use as favors!

I used:
Scissors
Glue

Chose two different pattern and die cut the boxes using the thinlits included in Sizzix Big Shot Plus Starter Kit 660515.
Decorate the boxes with different embellishments chosen from Free New Baby Paper Downloads.
I chose the stars banner for the handle of the basket.
I chose baby boy and baby girl banners to decorate the boxes. And again stripes, pois, hearts and more banners.


I think they are adorable!!!
See you next week!

Giovanna

-PER LE LETTRICI ITALIANE-

Ciao carissime amiche e buon giovedì!
Avete già scaricato le splendide Free New Baby Paper Downloads?
Sono bellissime, adorabili e particolarmente adatte a creazioni per i più piccoli!
Oggi vedremo come usarle per creare dei carinissimi cestini da usare come porta confetti!
Per questo progetto ho usato:
Sizzix Big Shot Plus Starter Kit 660515
Free New Baby Paper Downloads
Forbici
Colla

Scegliere due diversi pattern dalle carte che avrete scaricato e poi stampato su cartoncino bianco. Fustellare le scatoline con la fustella adatta inclusa nello starter kit della nuova big shot. Come vedete, acquistando soltanto lo starter kit è possibile già ottenere tante creazioni!! Basta davvero solo la fantasia!
Decorate le scatoline così ottenute scegliendo diversi abbellimenti dalle carte scaricate. Io scelto il banner con le stelle per creare il manico del cestino blu e il banner con i fiocchetti per il cestino rosa. E poi cuori, pois, strisce.....
Io penso siano davvero adorabili!!
Non credete anche voi???

Vi ringrazio per la visita!
Alla prossima!

Giovanna

Back to NYC by Karine


Hello,

Here I am back from a wonderful trip with my son! My son and I spent 5 days discovering this fantastic town that is New York City! We had barely left the plane on our way back home and I already felt like creating a scrapbooking lay-out with the pictures I made!

I chose an A4 format inspired by an American Craft ring binder.

Papers: American Crafts, Studio Tekturek
Alphabets: 7Gypsies
Flower: Florilèges Design
Stickers: Crate Paper
Inks: Adirondack Clover, Versafine
Stamps: Florilèges Design, Stampers Anonymous, Bloomini Studio
Stabilo Pen68

Die:

650515 :  Sizzix Big Shot Plus Starter Kit
669963 :  Sizzix Bigz Alphabet Set 4 dies-Fresh Blossoms Alphabet

I am a big fan of the dies that go with the new Big Shot machine! Here I used the smallest doily heart, the pretty foliage pattern that I love so much and the beautiful openwork flower! The dies are cut out of various green pattern papers to create contrast with my blue sky background paper.

One of the two leaves is cut out of white paper and shaded with the Adirondack Clover green ink.

The pretty flower is cut in half and each part is glued in a different area of my page.

To create some harmony and link the different elements together, I made some splashes all over my lay-out with the help of watercolour felt-tip pens.

My title is mostly composed of stickers (the black letters). The letters GO come from the Fresh Blossom alphabet die set. Each letter will be outlined with a thin-tipped black pen.


See you soon with new lay-outs from my New York City album!


Karine

Bonjour

Me voici rentrée d'un superbe voyage avec mon fils ! 5 jours à New York tous les deux à la découverte de cette merveilleuse ville ! A peine sortie de l'avion, j'ai eu envie de scrapper les premières photos !

Je suis partie pour l'occasion sur un format A4 d'après un classeur American Crafts.

Matériel :

Papiers : American Crafts, Studio Tekturek
Alphabets : 7Gypsies
Fleur : Florilèges Design
Stickers : Crate Paper
Encres : Adirondack Clover, Versafine
Tampons : Florilèges Design, Stampers Anonymous, Bloomini Studio
Stabilo Pen68

Dies utilisés :

650515 :  Sizzix Big Shot Plus Starter Kit
669963 :  Sizzix Bigz Alphabet Set 4 dies-Fresh Blossoms Alphabet

Je suis fan des dies qui accompagnent la nouvelle Big Shot ! J'ai utilisé ici le petit coeur dentellé, les superbes feuillages dont je raffole et la belle fleur évidée ! Pour contraster avec mon fond de page bleu ciel, mes découpes sont faites dans divers papiers imprimés à dominante verte.

Une des deux feuilles est découpée dans du papier blanc puis ombrée avec une encre verte Adirondack Clover.

La jolie fleur est découpée et envisagée en deux parties sur ma page.

Afin de lier mes différents éléments ma page est éclaboussée de feutres aquarellables.

Mon titre composé en partie de stickers ( en noir ) les lettres GO sont découpées avec le die alphabet Fress Blossom. Chaque lettre sera ensuite réhaussée avec un tracé au stylo noir fin.

A très vite pour de nouvelles pages de mon album NYC !

Karine

Wednesday 29 April 2015

Barbecue days


Hi everybody!

The good weather is here, and soon will start the barbecue season! and this makes me very happy.

Cook and eat outdoors, enjoy with friends, laugh ... Isn't that great?

I love going to barbecues with friends, and I love bringing a bottle of wine as a gift (usually we tasted with the food cooked on the barbecue)


How could it be otherwise, it is better when we make a handmade decoration for the bottle of wine we're giving away.


I always had difficulty sticking die cut elements in the glass, until I found this little tip: Put double-sided tape on cardstock before you die cut.


There will be no barbecue without you if you carry a gift like this!


Sizzix products used in this project:
660515 Sizzix Big Shot Plus Starter Kit (White & Gray)
660370 Sizzix Thinlits Die Set 3 PK - Phrase, thank you with hearts

Be happy!

---------------

Hola a todo el mundo!

El buen tiempo ya está aquí, y pronto comenzará la temporada de barbacoas! y esto me hace muy feliz.

Cocinar y comer al aire libre, disfrutar con los amigos, reír ... ¿No es genial?

Me encanta ir a barbacoas con amigos, y me encanta llevar una botella de vino como regalo (por lo general la degustamos con la comida cocinada en la barbacoa)

Como no podía ser de otra manera, es mejor cuando hacemos una decoración hecha a mano de la botella de vino que vamos a regalar.

Siempre he tenido dificultades para pegar elementos troquelados en el cristal de la botella, hasta que encontré un pequeño truco: Poner cinta adhesiva de doble cara en la cartulina antes de troquelar.

No habrá barbacoa en la que no estéis si llevas un regalo como este!

Productos Sizzix utilizados en este proyecto:
660515 Sizzix Big Shot Plus Starter Kit (White & Gray)
660370 Sizzix Thinlits Die Set 3 PK - Phrase, thank you with hearts

Sed muy felices!

Little animal!


Leo is a little animal! He is the eldest son (almost five) of one of my best friends and since he was born I have called him 'Leo the lion'. when we meet, rather than exchange pleasantries we both bare our claws and growl at each other which is swiftly followed by a fight to the death (I always lose).

For his birthday this year I have bought him a lion watch but what I really needed was something cool to wrap it in which brings me neatly to this weeks blog post.

As you are all probably aware by new Sizzix have unveiled the Big Shot Plus which is the same as your beloved Big Shot but in A4 format. You can use all your existing library of Sizzix dies but now you can also use larger format dies and embossing folders. 

It also comes as a starter kit which has everything you could ever wish for to set you on your creative journey including a fabulous Thinlits box die and I know that there will be many more box dies released in the near future.

For my project I needed to cut two cream coloured boxes from a good heavy weight card, I know that the illustration below shows a box cut from kraft card but I used this because it photographs better! As you can see, the die both cuts and creases the box which is all one piece with a hinged lid....Ingenious!!!


I took one of the cream boxes and added some Distress Ink in a random fashion (Tea Dye and Wild Honey). I flipped the box over and labelled the parts before cutting it up along the crease lines using a craft knife.


I started with the top of the box which I cut into 3 separate strips. Next I placed them into the new wood grain folder designed by Doodlebug and debossed the wood grain texture.


I darkened the edges of each strip slightly using Vintage Photo Distress Ink and applied a rubber stamp which comes from a set called Sentiment Circles by Autumn Leaves. I attached the three strips to the top of the other assembled cream box. Next, I applied the same treatment to the front and sides of the lid before working my way around the whole box.


After popping the watch into the box on a bed of paper straw I applied the finishing touches. Firstly a length of chain from a piece of old costume jewellery wrapped twice around the box to secure the lid. Secondly, a mini padlock charm and finally a tiny tag printed with my PC. I love the overall effect and I hope both you and Leo do too?


Tuesday 28 April 2015

Thank You Card


Welcome on the Sizzix blog today!
Sizzix has recently released several gorgeous new dies, among which the beautiful 'Thank You with Hearts' phrase from the Thinlits series. 
I used this die set to create a clean & simple card and tag set. 


This beautiful die set consists of the phrase 'Thank you', two branches and a pretty heart. I used all three dies on my card. 
On the smaller tag I used only the heart and branches dies.


I cut out the heart from pink paper and the heart with branches from a green sheet of pattern. 
I used foamtape to make the pink heart stand out more. 


The scalloped border on the bottom of my card was made with the starter's kit dies that are included in the Sizzix Big Shot Plus starter kit
I also cut out two more hearts to add on the left and right side of my card. 


I love the fact that this die set allowed me to create a card and tag set in very little time. 
It's just perfect if you need to whip up a card just before heading off to a party. 

Thank you for stopping by on the Sizzix blog!

In Dutch:
Welkom op het Sizzix blog vandaag!
Sizzix heeft laatst een aantal mooie nieuwe stansen uitgebracht, waaronder ook de 'Thank You with Hearts' phrase uit de Thinlits serie. 
Ik heb deze mooie stansset gebruikt om een clean & simple kaart en tag te maken. 

Deze mooie stansset bestaat uit de tekst 'Thank you', twee takjes en een leuk hartje. Ik heb alle drie stansen op mijn kaart gebruikt. 
Op de kleinere tag heb ik alleen het hart en de takjes verwerkt. 

Het hartje heb ik uit roze papier gesneden en het hart met takjes is gestanst uit groen papier.
Ik heb foamtape gebruikt om het roze hartje meer te laten opvallen. 

De schulprand onderaan op mijn kaart is gemaakt met de starter's kit stansen die bij de Sizzix Big Shot Plus kit horen. 
Ik heb nog twee extra hartjes uitgestanst om links en rechts op mijn kaart toe te voegen.

Ik vind het zo fijn dat je met deze stansset een kaart of tag in heel weinig tijd kunt maken.
Het is de perfecte set om nog snel een kaartje te maken voordat je naar een feest gaat.

Dankjewel voor je bezoekje aan het Sizzix blog!

'Flying Geese' Zippy Sewing Pouch


Hello Sizzix friends! I'm SO excited to receive the new Sizzix machine this month! I've been having a blast playing around with it. I really love the new simplistic design, don't you? And it's such a great size! It sits nicely in the window of my sewing room now. I love having it out in easy reach so I can use it regularly.


I've just come back from 'Pour L'Amour du Fil' quilting show in Nantes, France last week, I viewed some incredible work on show and took a couple of workshops, which has got me all fired up to create! One thing I noticed in my classes was the array of adorable sewing bags and organisers that everyone was pulling their supplies from. I had my little handmade zippy organiser with me and my trusty vintage tin to carry supplies. Though I thought my new Sizzix machine could come to the rescue here and help me step up my handmade game ;-)

Today I'm showing you how to make this cute Flying Geese Sewing Pouch. It has a zip - but do not be afraid of zippers - with my method they are easy peasy. It's ideal for holding your scissors and mini rotary cutters for on-the-go sewing.

Finished size: 11" x 5" 

Dies Used: 
Half-Square Triangles, 1 1/2" Finished Square #659983

Strips, 1 1/2" Wide #658327


Squares, 1" Finished (1 1/2" Unfinished) #659987


Materials:
Fabric in two colours / roughly Fat Eighth of each
6" Zip / or larger trimmed to size
Interfacing / scraps
Batting / scraps
Binding clips

Cutting:
Lining fabric // 
(x1) 6" x 5.5" square - main panel
(x1) 2" x 5.5" rectangle - top panel
(x1) 11.5" x 5.5" rectangle - back panel

Outer fabric //
(x1) 11.5 x 5.5" rectangle - back panel
Using Sizzix: (x20) 1-1/2" HST's / (x1) 1-1/2" strip. Subcut (using rotary cutter) into; 
(x4) 2.5" rectangles
(x2) 5.5" rectangles - zip binding
(x2) 2" rectangles - zip ends
(x1) 1.5" square

Contrast outer fabric (yellow) //
Using Sizzix: (x20) 1-1/2" HST's / (x1) 1-1/2" square

1. Sew your HST's together and layout your block as follows. 


2. Sew your HST units together, and then join together to form rows and then sew the rows together to complete your block. 


3. For the top of the pouch, assemble your HST's and 1-1/2" square as above. 


4. Sew your zip end pieces and fold in half and place on either end of your zip. You will have a 4-1/4" zip opening. Topstitch the zip ends in place. 


5. Take your zip bindings and press in half and then press the edges to the centre to create the bindings.


6. Place the zip bindings so they are wrapped around the zip. It's really helpful to use clips to hold in place here. Use your zipper foot on your sewing machine and sew a topstitch very close to the edge of the binding. 


7. Repeat for opposite side. Your zip is ready for sewing!

8. (Optional) Fuse interfacing to your font panel lining, top panel lining, back panel lining. 

9. Take your front panel lining fabric piece and press the longer edge over by 1/4", place your scrap batting inside the folded edge - then place your front panel block sandwiched on top. Pin in place to secure and quilt as desired. 

10. Repeat steps as above for the top panel section, ensuring the lining fabric is folded over with batting inside - to not expose raw edges. 

11. Place your two front sections right sides up and sew the sections either side of the zip. You will have no exposed raw edges on show, inside and outside. 

12. Sandwich the outer backing fabric right sides down with the batting and then the lining fabric right sides up. Quilt as desired. 

13. Place your front and back sections right sides together (trim to size if required) and sew around the edge with a small seam allowance, but enough to catch all the layers. 

14. Clip the corners of the pouch and turn right sides out. Pouch is complete! 


See you next month for more fun Sizzix sewing! Jessie

A flowery card


Hello!

For our Tuesday meeting, I propose a small card easy to realize. I chose a landscape format for this card.


First I cut a square, which I then folded in two, in order to only scrap the horizontal part.
I added a white background then I decorated with papers from the Craft Asylum collection, included in the start-up kit of the Big shot Plus.


I decorated with small fagnons, cut thanks to the "Speech Bubbles" die, some leaves and flowers also included in the kit.


To finish, a bit of sewing and some little dowries.
See you soon!
Supply list:


660515Sizzix Big Shot Plus Starter Kit (White & Gray)  NEW! 
660801:  Sizzix Thinlits Die Set 4PK - Speech Bubbles NEW! 

Paper: Bazzil, Craft Asylum Sizzix
Dots: Scrapboukits
Wooden words: Boanita


Thank you


*************

Bonjour,

"Une carte fleurie"

Pour notre rendez-vous du mardi, je vous propose une petite carte facile à réaliser. J'ai choisi un format horizontal pour cette carte.

J'ai d'abord découpé un carré, que j'ai ensuite plié en deux, pour ne scrapper que la partie horizontale.

J'ai ajouté un fond blanc puis j'ai décoré avec les papiers de la collection Craft Asylum, compris dans le kit de démarrage de la Big shot Plus.
 J'ai décoré avec des petits fanions découpés grâce au Die speech Bubbles, des feuilles et des fleurs compris dans le kit également dans le kit.

Un peu de couture pour finir et quelques littles dots.

 A bientôt