Showing posts with label Wedding Favors. Show all posts

Tuesday, 5 May 2015

Wedding Box

Hi crafter!
Today I have a project I'm working on this spring full of weddings:
a small wedding box, to thank our guests.
Why not try ??
It 'really easy !!


About the new big shot, you will find it much easier to work than the past editions, it is more spacious and has a better manual.

And so on with many small boxes !!

NECESSARY:
- tag punch
- twine for crafting
- scissors
- bi-adhesive
- candy

have a lovely day!

Pasticci di carta
manuela


* per i lettori italiani*

Ciao a tutti!
Oggi ho un progetto a cui sto lavorando in questa primavera piena di matrimoni!
E allora una piccola wedding box, per ringraziare i nostri invitati.
Perché non provate??
E' davvero facile!!

Oltre quello che già sapete sulla nuova big shot, troverete molto più facile lavorarci rispetto alle edizioni scorse, è più spaziosa ed ha una manualità più semplice.

E allora avanti con tante piccole scatole!!

OCCORRENTE:
- perforatore per tag
- nastro craft
- forbici
- biadesivo
- confetti

Una buona giornata!

Pasticci di carta
Manuela


Friday, 10 April 2015

Favor Boxes for Wedding or Party - tutorial


Happy Friday everyone, It's Anna posting today.
I hope you had a great creative week! Today I'd like to introduce the new Big Shot Plus Starter Kit, that offers the chance to expand on creativity. With a stylish new look and A4 cutting capabilities, the Big Shot Plus Machine caters for all abilities, from beginner to expert.
With this tutorial I will show you how to easily create a... two delicious favor boxes, using some dies of Starter Kit Plus.

cafe creativo - sizzix big shot plus starter kit - favor box - scatolina bomboniera (1)

The Box is perfect to use as a party favor for weddings, baby showers...

cafe creativo - sizzix big shot plus starter kit - favor box - scatolina bomboniera (2)

cafe creativo - sizzix big shot plus starter kit - favor box - scatolina bomboniera (3)

Here’s a video - tutorial for you! In the video I explain how I made the first box. Enjoy! The supply list is below ;)


A very simple project, but if you’re making a large quantity, it’s a great excuse to get your friends together and have a little crafty afternoon ;)
 
1st Box - Items used:
Sizzix Big Shot Plus Starter Kit (White & Gray) (660515)
patterned paper
cardstock
strass
 
2nd Box - Items used:
Sizzix Big Shot Plus Starter Kit (White & Gray) (660515)
patterned paper
cardstock
vellum
tissue paper
sequins
 
Thanks for stopping by. I hope you enjoyed today's inspiration.
 
**************************************
Flag_of_Italy
Per le amiche italiane! :)
 
Buon Venerdì a tutti, sono Anna ed oggi tocca a me postare qui.
Spero abbiate avuto una bella settimana creativa! Oggi vorrei presentarvi il nuovo Big Shot Plus Starter Kit, che offre la possibilità di allargare gli orizzonti e... la creatività! Con un nuovo elegante look e la possibilità di tagliare in formato A4, la nuova macchina è adatta a tutti, dal principiante all'esperto.
Con questo tutorial vi mostrerò come creare facilmente una ... anzi due deliziose scatoline da usare come bomboniere, utilizzando solo alcune fustelle dello Starter Kit Plus. Le scatoline sono perfette per ogni cerimonia od occasione (matrimonio, battesimo ecc).
Nel video tutorial di pochi minuti spiego, attraverso tutti i passaggi, come ho creato la prima scatolina. Fatemi conoscere il vostro parere ;)
Un progetto molto semplice, come vedete. E se pensate di farne una grande quantità, potrebbe essere una scusa per chiamare in aiuto le vostre amiche e passare, così, un bel pomeriggio insieme a giocare con la nuova macchina ;)

Ciao, a presto!
 
1a Scatolina - materiali:
Sizzix Big Shot Plus Starter Kit (White & Gray) (660515)
carta scrap
cartoncino
strass
 
2a Scatolina - materiali:
Sizzix Big Shot Plus Starter Kit (White & Gray) (660515)
carta scrap
cartoncino
carta da lucido
carta velina
paillettes

Thursday, 26 March 2015

Favor box


Hello everyone and welcome back with a new tutorial!! 
Today I want to introduce some features of the new Big Shot Plus. It is fantastic in the new white and gray colors! 
The Starter Kit already offers great possibilities to create immediately cards, invitations, scrapbook pages, home décor, fashion, altered art, quilting and much more! The much larger plan allows to use sheets of A4!

With this tutorial I will show you how to easily create a delicious favor box.

I’ve used: 

Sizzix Big Shot Plus Starter Kit (White & Gray) 660515
Glue
Sissors
Cardstocks (white, yellow, green, light blue, pink, cardstock Craft Asylum included in Starter Kit.
Glitter (pink)
Ink

Die cut the little box with Tinlits Plus Die Set included in the Sizzix Big Shot Plus Starter Kit (White & Gray) 660515, using Craft Asylum Cardstocks. 
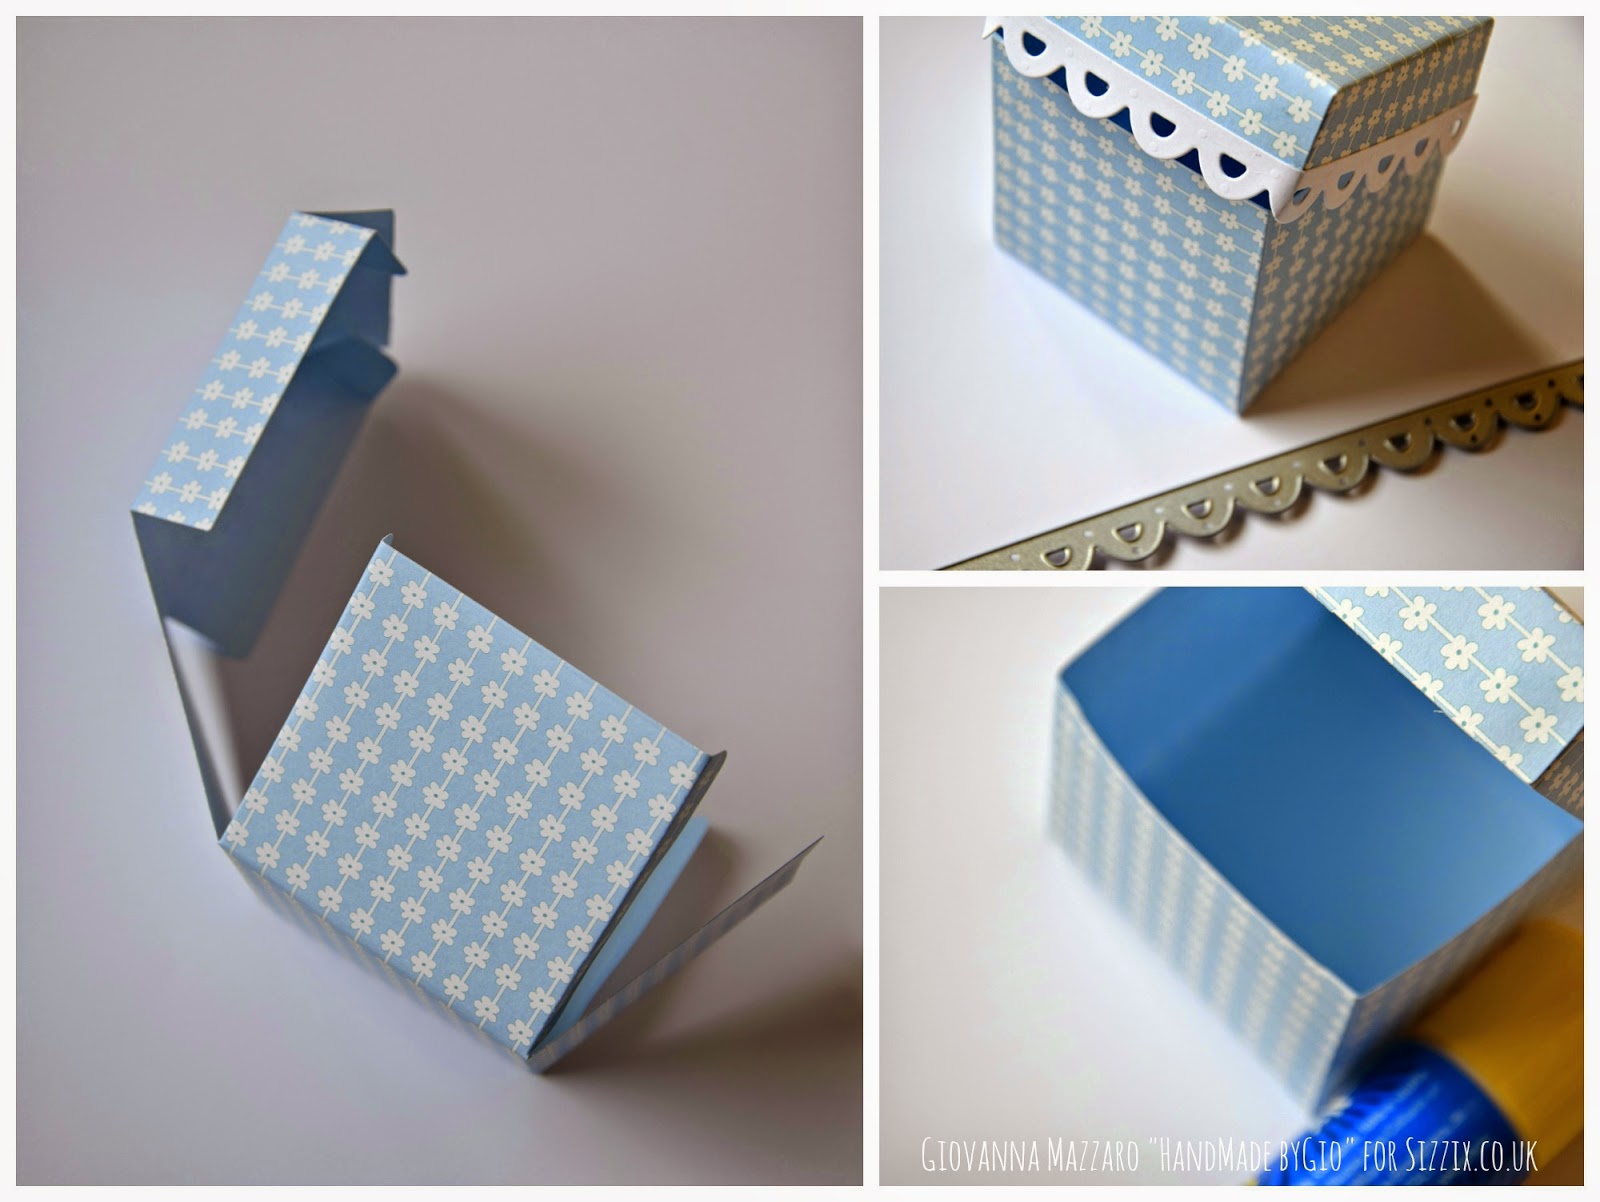
Die cut the wavy edge using the white cardstock.
Die cut the flower using the pink cardstock.
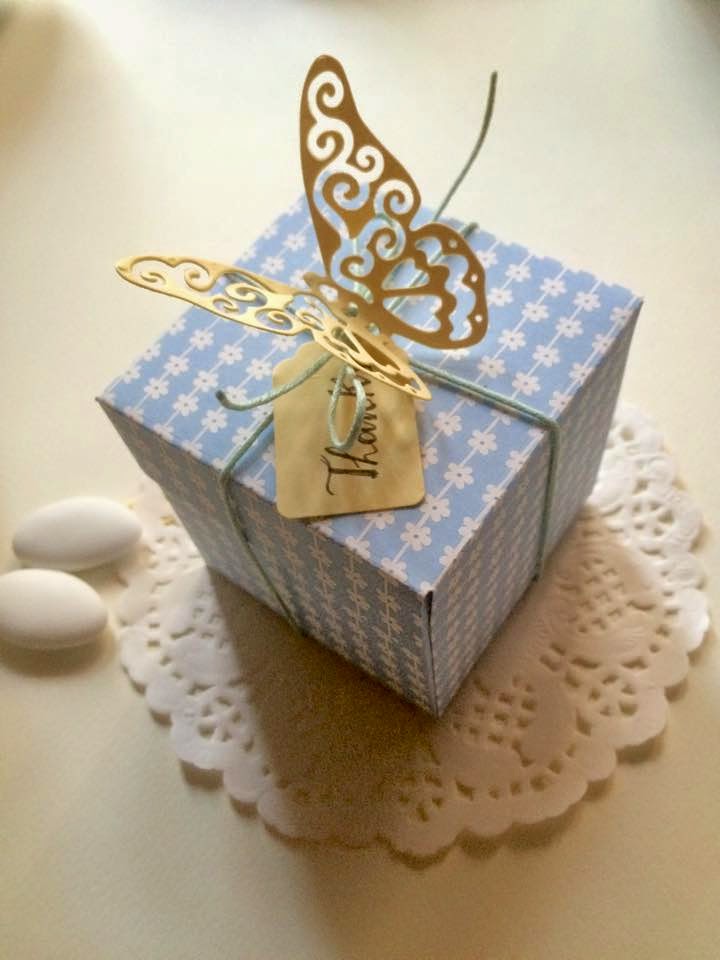
Die cut the tag using thle light blue cardstock.
These steps you can do thanks to the Tinlits Plus Die Set included in the Sizzix Big Shot Plus Starter Kit (White & Gray) 660515.
Now you have everything you need to create the favor box.
Fold the carstock helping with the marks clearly visible than paste parts.
Paste the white border.
Die cut the other flower with Sizzix Bigz Die - Flourish, Floral w/Leaves 656520, using white yellow and green cardstocks.
Compose the flower following the steps.
Give some color to the flower with ink.
Paste glitter to the center of the flower.
Now the favor box is ready to contain the sweets, with the tags will be perfect!!!
Thanks to all!!

 PER LE AMICHE ITALIANE

Ciao a tutte e ben ritrovate con un nuovo tutorial!!
Oggi voglio presentarvi alcune caratteristiche della nuova Big Shot Plus. E' fantastica nei nuovi colori bianco e grigio!

Lo Starter Kit offre già grandi possibilità per creare fin da subito carte, inviti, pagine di album, home decor, altered art, quilting e molto altro ancora! Il piano molto più grande permette di usare fogli di tipo A4!!

Con questo tutorial voglio mostrarvi come creare una deliziosa bomboniera.

Ho usato:
Colla
Forbici
Cartoncini
Glitter

Fustellare la piccola scatola usando il cartoncino Celeste con fiori bianchi della Craft Asylum.
Fustellare il bordino ondulato con il cartoncino bianco, il fiore con il cartoncino rosa, la tag con quello celeste. Tutte queste operazioni le potrete fare usando semplicemente il Tinlits Plus Die Set e i cartoncini Craft asylum, tutti inclusi nel Sizzix Big Shot Plus Starter Kit (White & Gray) 660515!!

Ora fustellare l'altro fiore con Sizzix Bigz Die - Flourish, Floral w/Leaves 656520, usando i cartoncini bianco giallo e verde.

Ora hai tutto per creare la tua scatola porta confetti!!
Piegare il cartoncino della scatola seguendo le pieghe ben visibili, dopo incollare le parti.
Incollare il bordino bianco.
Comporre il fiore sulla scatola seguendo gli steps nelle foto.
Dare un pò di colore al fiore con dell'inchiostro.
Al centro del fiore incollare i glitter.

Ora la tua scatolina è pronta per accogliere i confetti, con la tag sarà perfetta!

Spero vi sia piaciuto questo semplice tutorial.
Grazie a tutti!!!


Saturday, 12 April 2014

Love is in the Air


My daughter is getting married in two weeks! We are in the middle of a kitchen remodel and hope that it will be finished before the family arrives for the big day...

Here are a few projects for all of the spring brides.


You will need:
Sizzix ScoreBoards Cupcake Stand and Pennants by Eileen Hull
Flower Layers #9 by Eileen Hull
Flower with Heart Petals by Eileen Hull
Borders and Hydrangeas by Eileen Hull
Birds and Butterflies by Eileen Hull
Leaves by Eileen Hull
Serif Essentials Alphabet 
Little Sizzles Matboard Pack, cream
Prima papers, twine, aqua tulle, adhesives, silver glitter paper

  1. Cover a 12" x 12" piece of foamboard with scrapbook paper.
  2. Coat two sheets of matboard with spray adhesive and place 4 sheets of 6" x 6" papers on the matboard. Die cut four scalloped square bases of the Cupcake Stand with the paper side facing UP. Bend the sides up and position in a square on the bottom right side of the page.
  3. Die cut L-O-V-E from silver glitter paper and adhere inside each square.
  4. Add die cut 3D fluffed flowers, birds, flourishes, and borders to page.
  5. Wrap a length of tulle about one third of the way down the page and tie a bow.
  6. String some twine across the top of the page and add pennants die cut from the Cupcake Stand die from paper.
  7. You could also add photos to the page for a personalized wedding layout.
I am very excited to share some other truly beautiful wedding projects by my talented friends
Jenny Marples of Pushing the Right Buttons and Anne Redfern of Redanne blog from the UK. They have been creating Artist Trading Block wedding favor boxes from my Block/Cube/Bank die like there is no tomorrow! Every one of their projects is impeccable and beautiful! Which one is your favorite? I love them all! Please visit Anne and Jenny on their blogs to see how they created these beautiful favor boxes...

I can just picture them working together in one of their studios, bouncing ideas off each other- isn't it fun to work with a creative buddy on a project together? Do you have a crafty friend that you can show your work to? Sometimes I think that is half the fun- to make something and then share it with someone who gets what you do...


I hope you are inspired by these projects- I sure am! For lots more ways to use this die, make sure to visit The Artists on the Block. We are always looking for artists to feature so don't be shy- post your projects on our Facebook wall so we can ooh and ahhh over them!


OR you can join our Art With Heart challenge over on my blog. The theme for this month is April Showers. Do you have a project you would like to share? There's a nice Sizzix prize that will go to someone who enters the challenge!

Thanks for reading and hope you all are having a happy spring!

Saturday, 15 March 2014

DIY Wedding Favor Boxes


Wedding bells are ringing! My daughter is getting married in six weeks! The replies are starting to come in and Pam and I are gearing up to start making the wedding favor boxes. 

I happen to have a few Sizzix boxes for her to choose from :-). She decided that she would like to give Jordan almonds in a little net bag. This is the same favor that my mother gave at her wedding many years ago!


The almonds will be packaged in the 2" square box from the Blocks/Cubes ScoreBoard die. (I haven't bought them yet- afraid I will snitch them)


These blocks above are decorated in a Baby theme but they can easily be changed to accommodate any style- the block are a blank canvas to decorate! By adding paper, embellishments and trims, you can make boxes for any occasion.

The colors in Pam's wedding are white, aqua and violet. Her invitations are thick white cardstock that are embossed with the new Polka Dot and Starflower folders and then lightly inked over in aqua to show off the embossing. The boxes will match that theme.

You will need:
 
  1. Die cut boxes from white matboard. You will need to cut 2 strips to make one box. 
  2. Place strip in embossing folder and run through Big Shot. You will notice that it takes a little more effort to roll this through but it works fine. The matboard is thicker than paper so there is a bit more resistance.
  3. Lightly ink over embossing in aqua.
  4. Add 2" black and white photo to top of box. (*I used a product called Craft Attitude which is a film that you can print on, trim and glue directly to the box and it looks like the image is printed right on the surface- cool stuff!) 
  5. Add double sided tape to three of the four tabs. Remove the release paper and assemble box, leaving the top flap without adhesive to open and close the box. Here's a video of the Square Box being assembled- same idea for this one.
  6. Add almonds to box!
And now for some more great news... drumroll please! The Eileen Hull Inspiration Team has been announced! 

Meet the Eileen Hull Inspiration Team! | Eileenhull.com #lovesizzix

I can't believe how much talent we have in this group! Check out my blog to see a bio of each designer and links to their sites. Every month we will have an Art With Heart Challenge with a certain theme. You are invited to post your creations along with the team. At the end of the month, someone will win a prize package.

Many thanks to my Inspiration Team Coordinator, Amy Bowerman of Plucking Daisies for making this all happen. I am looking forward to seeing what these amazing designers create!

Please LIKE my Facebook page. That's where I will be posting my travels. In two weeks, I am headed off in my vintage camper for Phase 1 of the #PaperTrail, a teaching extravaganza. The camper is my mobile studio and will be crafting my way around the US. Stay tuned for updates on my blog! Yes, I know it's right before the wedding- it's just how things worked out... 

Thanks for stopping by...I think life is about to get a little crazy!

Saturday, 22 June 2013

Canning Jar Favors


My daughter called us to say she was engaged on Christmas Day. They were in the Cayman Islands scuba diving and Galen gave Pam the ring. Yes, 60 feet under water! However, we are still waiting to hear when the big event will take place.

I created this wedding favor in hopes it might get the ball rolling...

Supplies:
658453  Sizzix ScoreBoards XL Die - Canning Jars, 3-D
658443  Sizzix Bigz Die- Flower, Trinity's
658457  Sizzix Textured Impressions Embossing Folders 2PK - Rosebuds & Seed Packet Set
656491  Sizzix Little Sizzles - 6" x 13" Mat Board Pack, 6 Cream Sheets
657900  Sizzix Big Shot
656657  Extended Cutting Pads

This die is a great value because it comes with a two sizes of jars- quart and pint, two lids and an inner well to hold treats. 

Die cut Canning Jar. To create a three dimensional project you will need to cut a second jar piece. Emboss all pieces using Rosebud Textured Impression folder. You might have noticed, I debossed the inner well section and embossed the front of the jars. Oops. That's OK...
ASSEMBLY TIP: 
Lay the back sides of the jars facing down and place the middle section (right side down) across the middle of the two jar bottoms. Mark with pencil. This will make both jar bottoms level when you stand it up. Apply strong double sided adhesive or use glue gun to adhere bottom tabs to jars.
Now adhere sides to jar. The sides may be adjusted to the width and height you desire on the jar. 
All taped up!
The jar stands about 5" tall, 3" wide and 1 1/4" deep. 
Side view...
For this project, the jar lid was used as a tag and tied it on with rickrack. Write in the couple's names with pencil.

Cut the lid from heavy silver cardstock. On the back of it, pencil in lines.
Place on a piece of foam and trace over the lines with an embossing stylus. Adhere to the top of the jar using foam dots for dimension.
This die would also make a great card if you folded over a piece of cardstock and laid the fold  inside the cut line of the die. I think it would also make a cute recipe book...

What would you use this die for? I'd love to hear... Thanks for coming by!