Showing posts with label snowflakes. Show all posts

Thursday, 29 January 2015

Snowflakes and winter layout by Karine


Hi everyone,

Here is a seasonal winter page with a picture of my son & me taken a few years ago

Supply list:

Cardstock: Scrap Plaisir
Glitter paper: American Crafts
Papers: 4heures37, Carta Bella
Stickers: Very Merry Kit EntreARTistes
Stamp: Bloomini Studio
Ink: Black Versafine
Masking Tape
Spray ink: Mister Huey's Studio Calico

Dies:

658300 :  Sizzix Big Shot Starter Kit
659994 :  Sizzix Bigz Die-Snowflakes #3

Select a soft colour combo: beige, pink and icy blue. Sprinkle the whole with glitters by inserting an American Crafts paper. Splash some white spray ink and your page is done!

The two snowflakes are cut out of a Glitter Pow! Paper from American Crafts. It is really the ideal paper to use on your winter lay-outs. The snowflakes are stapled (not glued) for more volume. Simply add some golden stickers and some masking tapes strips put down here and there.

Finish by creating fake snowflakes with the help of your Mister Huey’s ink spray.


Have a lovely day!

Karine

Bonjour tout le monde,

Une petite page hivernale ce jour, bien de saison avec une photo de mon fils et moi-même prise il y a quelques années :)

Matériel :

Cardstock : Scrap Plaisir
Papier Paillettes : American Crafts
Papiers : 4heures37, Carta Bella
Autocollants : Very Merry Kit EntreARTistes
Tampons : Bloomini Studio
Encre : Versafine noire
Masking Tape
Encre en spray : Mister Huey's Studio Calico

Dies utilisés :

658300 :  Sizzix Big Shot Starter Kit
659994 :  Sizzix Bigz Die-Snowflakes #3

Sélectionnez un combo couleur tout doux à savoir : beige, rose et bleu glacial, parsemé le tout de paillettes en intégrant un papier American Crafts, saupoudrez d'encre en spray blanche et votre page est prête !

Les deux flocons sont découpés ici dans un papier Glitter Pow! American Crafts juste parfait pour illustrer et accompagner vos pages hivernales. Les flocons sont agrafés et non collés pour plus de relief. Complétez simplement avec des autocollants dorés et des petits bouts de Masking Tape collés ici et là.

Terminez en simulant des flocons blancs avec votre encre en spray Mister Huey's.

Bonne journée !

Karine

Friday, 23 January 2015

Homemade Cookies Layout by Anna


Hi friends, how are you doing on this pretty Friday morning? It's Anna here to share some ideas using Sizzix products.
I hope you are feeling creative today because my hands were busy preparing an inspirational layout for you!
The Sizzix Bigz L Die - Stacked Snowflakes by Tim Holtz is so incredibly cute, and I thought it would be perfect to record my small love affair with these Christmas cookies. Let's be honest, with gorgeous well put together items like these...scrapbooking has gotten a whole lot easier :)

cafe creativo - sizzix big shot - scrapbooking christmas cookies (1)

Soothing colors, layers of doilies, die-cuts & tags with gold foil accents...
Mix polyester fabric & paper glitters, creating the feeling of a chilly, snowflake filled page.

cafe creativo - sizzix big shot - scrapbooking christmas cookies (2)

Use a large die-cut snowflake with doily & sequins, adding further Christmas/ Winter Ambience.
The word Cookies was die cut using Tim Holtz’s Word Play XL Bigz alphabet die.

cafe creativo - sizzix big shot - scrapbooking christmas cookies (3)
cafe creativo - sizzix big shot - scrapbooking christmas cookies (4)

Thanks for joining me today! Happy Friday!
 
Items used:
Sizzix Big Shot Machine (657900)
Sizzix Bigz L Die - Stacked Snowflakes (660052)
Sizzix Bigz XL Alphabet Die - Word Play (657837)
cardstocks
cardboard
scrap of paper patterned
glitter paper
polyester fabric
paper doily
stamps
gold tags (Ikea)
twine
sequins
paper clip
foam board tape
stapler and staples
sewing machine and thread
 
**************************************
Flag_of_Italy
Per le amiche italiane! :)

Ciao, sono Anna e sono qui per condividere alcune idee utilizzando i prodotti Sizzix.
Questa settimana le mie mani sono state impegnate a preparare un layout, che spero possa essere di ispirazione per voi!
La fustella Sizzix Bigz L Die - Stacked Snowflakes di Tim Holtz è talmente carina, che ho pensato fosse perfetta per creare gli abbellimenti della mia pagina, che documentano la realizzazione dei biscotti regalati agli amici a Natale. Onestamente, con fustelle splendide come queste... lo scrapbooking è molto facile! :)
Per realizzare questa pagina ho optato per colori rilassanti come il turchese-verde acqua, sovrapposizioni di centrini, candidi fiocchi fustellati e tag con effetto oro metallizzato.
Ho inoltre mescolato pezzetti di tessuto poliestere (quello finto organza, per le tende!) e tocchi di carta glitter, per creare la sensazione di una giornata invernale, riempiendo la pagina di fiocchi di neve.
Ho aggiunto al centro della composizione un grande fiocco di neve fustellato, che insieme al centrino ed alle paillettes, contribuisce a creare l'ambiente natalizio/invernale.Sapete poi che a me le cuciture sulle pagine mi piacciono sempre molto e fatico a non metterne qualcuna ;)
La parola Cookies l'ho creata tagliando del cartone con la versatile fustella di Tim Holtz Bigz XL Alphabet Die - Word Play.

Grazie per avermi seguito fin qui! Felice Venerdì!
 
Materiali:
Sizzix Big Shot Machine (657900)
Sizzix Bigz L Die - Stacked Snowflakes (660052)
Sizzix Bigz XL Alphabet Die - Word Play (657837)
cartoncini
cartone
strisce di carta scrap
carta glitter
tessuto di poliestere (simil organza)
centrino di carta
timbri
tag oro (Ikea)
spago bicolore
paillettes
graffetta
scotch spessorato
cucitrice e graffette
macchina per cucire e filo

Wednesday, 10 December 2014

Wreath of Snowflakes


I love to make and hang wreaths for all seasons and for this week I've created a wreath of snowflakes. It can be hung now at Christmas time but that can also stay up well into the new year because it is more wintery than Christmassy.
I needed a hoop to work as base for my wreath and I had a metal hoop in my stash that I chose to use. You could cut one out in cardstock if you wanted to create a similar wreath. Using Sizzix Bigz Die - Snowflakes #3 makes this project a breeze because you can die cut multiple snowflakes in one go. For my wreath I went with three different versions of the same snowflake: 5 in silver foil, a lot in white cardstock and a little fewer made from old book pages.
Now it was just a question of using the hot glue gun to attach the various snowflakes to the metal hoop. I started with a layer of white snowflakes, then a layer of the book page snowflakes and my final layer is a combination of white and silver snowflakes.

I wanted to make sure that my wreath had some dimension and I achieved this by adhering some of the flakes using foam adhesive but I also discovered that I could fold up the ends of some of the snowflakes and thereby get more dimension. I did this to some of the white snowflakes as well as all of the silver ones.


My final step was to tie a large white bow and adhere it using the hot glue gun. I made sure that there weren't any silver flakes under the bow. I also added some silver tread behind the bow so I'll be able to hang the wreath.
Supply list:
Sizzix Big Shot Starter Kit (Powder Blue & Teal)
Sizzix Bigz Die - Snowflakes #3
Cardstock
Silver foil cardstock
Old book pages
Metal hoop
Hot glue gun
Foam adhesive
Ribbon
Thread

---o---

Jeg holder meget af at lave og hænge kranse op til alle anledningen, og til denne uges post har jeg lavet en krans af store snefnug lavet med Sizzix Bigz Die - Snowflakes #3. Den kan komme op og hænge nu her til jul, men den kunne såmænd nemt blive hængende ind i det nye år, fordi den er mere vinterlig, end den er decideret julet.

For at kunne forme kransen havde jeg brug for noget rundt, og heldigvis havde jeg en metalring liggende på lager. Man kunne dog også have klippet en krans i karton (gerne lidt kraftigt), hvis man ikke har en lignende ring liggende. Jeg udstansede mængder af snefnug med Sizzix Bigz Die - Snowflakes #3, hvilket gjorde det her projekt nemt og hurtigt, fordi en Bigz Die kan skære gennem flere ark papir på én gang. Til denne krans valgte jeg udstanse snefnuggene i tre forskellige slags papir: sølvfolie, hvidt karton og gamle bogsider.

Da alle snefnug var udstanset, var det jo bare at sætte i gang med limpistolen og lagvis lime snefnuggene på metalkransen. Jeg startede med et lag hvide snefnug, så et lag i gamle bogsider, og det tredje og sidste lag er et mix af hvide og sølv snefnug.

For at sikre mig at kransen havde noget ekstra dybde, besluttede jeg mig for at montere nogle af fnuggene med 3d-puder. Ydermere fandt jeg ud af, at jeg kunne folde enderne af nogle af fnuggene op, og derigennem få mere dybde. Det sidste gjorde jeg på nogle af de hvide og alle af de sølvfarvede snefnug.

Sidste skridt var at binde en stor hvid sløjfe og lime den fast med limpistolen. Jeg sikrede mig, at der ikke var nogle sølvfnug under sløjfen. For at kunne hænge kransen op bandt jeg tynd sølvtråd i kransen.

Ingredienser:
Sizzix Big Shot Starter Kit (Powder Blue & Teal)
Sizzix Bigz Die - Snowflakes #3
Karton
Sølv foliekarton
Gamle bogsider
Metalcirkel
Limpistol
3d puder
Bånd
Tråd

Thursday, 4 December 2014

Snowflake placemat


It's December - and the Christmas quilt is complete -  not only am I pleased with myself for completing it - I also really like the quilt -
 
and so to these little cuties -
 
 - as you can imagine  the excitement is growing - I think the Christmas tree might have to be put up and decorated this weekend!!!
So now the adrenaline is flowing and maybe just a touch of panic can be felt - how about a really quick easy present to make?
I have 'discovered' this beautiful snowflake die - http://www.sizzix.co.uk/product/660052/sizzix-bigz-l-die-stacked-snowflakes - which cuts fantastic snowflakes -
 
So I have bought some ready made place mats, and a table runner, and with the aid of some fusible web, and my sewing  machine I have embellished the mat in a matter of minutes -
Now if this colour co-ordinated with my china I would be keeping this and not giving it as a gift!
If you can't find the colour you need in ready made then there maybe time to make it all - it depends just how crazy your life is at the moment!!
I love this die so much I'm going to play with some other ways of using it.
We also have another snowflake die that I have used to make some bunting - http://www.sizzix.co.uk/product/659994/sizzix-bigz-die-snowflakes-3 -

 This is again a very quick make - I fused to layers of fabric together to make it double sided - and then I stitched them together using  machine - stitching down the middle of each snowflake and leaving a space between each one.
Honestly I could just keep using these 2 dies over and over again!!!.
So next week I  hope to have some more quick makes for you to enjoy - until then I think it's an evening with some mulled wine and soft candle light -mmmmm can't wait!!!
Angela


Wednesday, 3 December 2014

Snow Princess


At Christmas we observe all those time honoured traditions and clichés which is one of the many things I love about the season.  

I love to cook and fiddle about with recipes and ingredients, my kitchen can resemble a mad scientists lab at times and some experiments are more successful than others as I'm sure my long-suffering family will confirm. Christmas day however, is not a time to go messing about with a successful formula although I'm still striving to create the perfect roast potato (any hints/tips are welcome!).

The Christmas gift is another part of the season steeped in tradition..... socks for Dad, smellies and deodorant for the teenage boys, school photo for Mum/Gran etc.

One tradition which I started myself (and as my birthday falls on Christmas day I have special dispensation to do as I please!) is to create an embellished photo frame for my Mum featuring a photo of my daughter Poppy. This year will be no exception so I'm using this blog to work through a couple of ideas.

I wanted to use a slightly less predictable colour palette than the usual Christmas/winter combinations and I threw in a little mustard (the colour not the condiment....that would just be silly!)

The dies I used are listed below, click on each one to bring up a link for more information.
I also used a little gesso and Distress Glitter, a combination which I am trying to wean myself off but it just seems to work so well with the current Christmas collections.

I started by choosing my photo and colour palette assembling a collection of plain and pattern card and paper from my ever growing stash. I die-cut two pieces of the foliage and applied a thin layer of gesso to subdue the colour intensity, using gesso in this way helps everything blend together in the final piece. 


I die-cut two snowflakes giving them the same gesso treatment before die-cutting the 3D flowers. I used a sanding pad on the edges of the flower die-cuts to give a little distressed contrast although I used a light brown Distress Ink (Old Paper) on the ivory flower. Next, I assembled the flowers and matted the snowflakes together adding an adhesive gem to the snowflakes' centre. I also added a little Distress Glitter to the tips of the foliage and snowflakes.

I chose my photograph and printed three copies in black and white. I carefully cut around two of the figures and used one as a mask which I placed directly over the main photo before applying spray glue. After removing the mask I sprinkled the photo with Distress Glitter giving the entire background a magical frosting. It's quite hard to pick up in the images but it is quite spectacular (Honest!!!). Next I attached the other pre-cut figure in place using adhesive foam pads this gives a wonderful sense of dimension, especially when combined with the contrasting frosty background.

I took a wood effect picture frame and lightly distressed the edges using a fine sanding block  before inserting the spotty background and the assembled photo. Next I attached the foliage die-cuts together with some assorted flower stamen.

All that remains is to attach the snowflakes with adhesive foam pads before applying the flowers with my trusty glue gun.

Hopefully this will turn into a nice little collection of as the years go by, I have even bigger ideas for the final gift which sadly I can't share just now as my Mum reads this blog from time to time!

Why not start a creative Christmas tradition of your own.... you have my permission!


Tuesday, 2 December 2014

Christmas week 4: Gift wrapping idea with Lilith


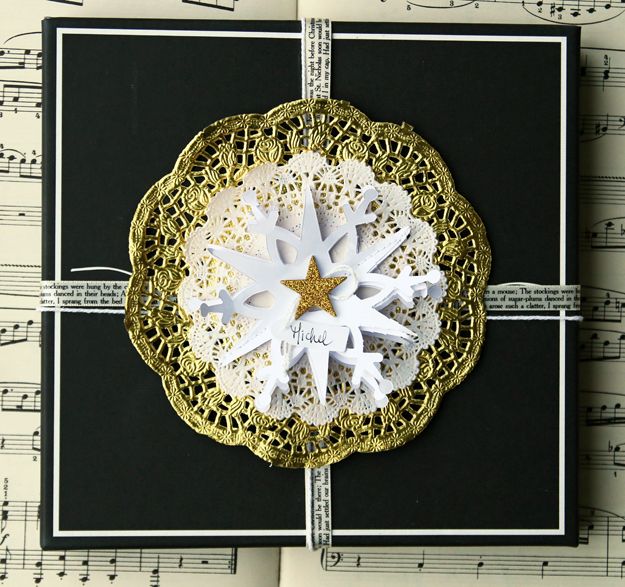
Welcome to the last week of the Sizzix Christmas Challenge. This week is all about gift ideas. These last years my family has tried to cut down on the gifts. I love just spending time together and not getting into a spending frenzy and just buying things that don't get used. We do make each other gifts or give each other vouchers. Now just giving an envelope isn't that exciting so I decided to reuse some chique black boxes.

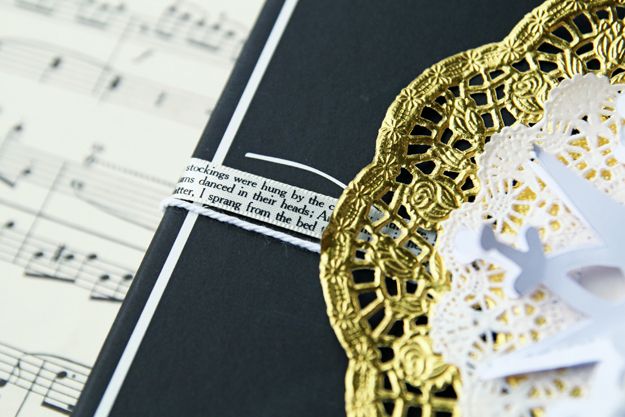
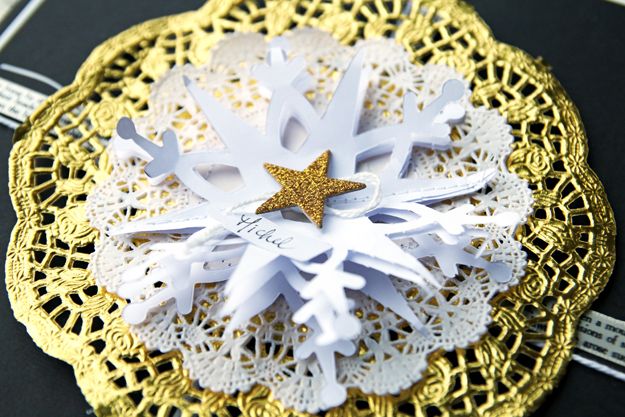
 I grabbed a gold and a white doily and then cut out some snowflakes using the Sizzix Bigz Die - Snowflakes #3 . I sewed the snowflakes together and then adhered them to th doilies. 
A bit of ribbon to hold the box together and I have a pretty box to put under the tree. I just added a tiny tag so that I can add a name to it. 
Easy and it instantly makes the gift so much more fun. 


Supplies:
Sizzix Bigz Die - Snowflakes #3   , Big Shot Starter Kit, Other: Gold and white doily, Studio Calico star, American Crafts premium ribbon, twine.  

Sunday, 30 November 2014

Bentes Christmas tree decorations for week 3.


 Hi, I am back this Sunday to share some decorations I made for my tree using the beautiful free download papers and a few of my favourite dies.


De dies I used were the scalloped circle , the oval and  and the snowflake from the Winter borders & rosette set.


 I added pop dots between the layers to add some more interest to my ornaments.

I hope you like my ornaments and will try making them. It's a nice thing to do in family with in the kids as they are pretty straight forward to make and the design can be varied to make different styles.

The supplies I used were:
Free downloadable papers
657900 Sizzix Big Shot Machine Only (Powder Blue & Teal)
Sizzix Framelits Die Set 7PK - Circles, Scallop
Sizzix Thinlits Die Set 9PK - Winter Borders & Rosette
Sizzix Framelits Die Set 7PK - Ovals

Thursday, 20 November 2014

Christmas Week 2 with Karine


Hello!


It is the Christmas tag’s week at Sizzix! Here is what I have done. I chose a glittery and natural combo which makes me think of the end-of-the-year celebrations :-)

Supply list:

Kraft bag
Cardstock: American Crafts
Glitter paper: American Crafts
Note paper
Embellishments: Teresa Collins, Freckled Fawn
Stars: Studio Calico
Ink: Distress Vintage Photo

Dies:

658300:  Sizzix Big Shot Starter Kit
659958:  Sizzix Bigz Die-Banners and hearts
659994:  Sizzix Bigz Die-Snowflakes #3
660058 : Sizzix Thinlits Die Set 17pk-Holiday Words Script

I didn’t want to create a classic tag for a change. So I selected a kraft bag and I had fun decorating it :-)
I started by cutting out large banners out of note paper (with the die Banners).

The beautiful large snowflake is cut out of white cardstock and shaded with Distress Vintage Photo ink to give it an aged aspect.

The various elements are assembled and glued with double-sided tape.
Small hearts are added as a finishing touch. They bring sparkle to the creation. They are cut out of American Crafts glitter paper; I just can’t stop using this paper these days!

So here is my small tag (not that much small, isn’t it?) realized in a New-York’s minute!

Have a lovely day,

Karine


Bonjour !

C'est la semaine des tags de NOEL sur Sizzix cette semaine ! Voici ma contribution, je reste dans un combo naturel et pailleté évocateur pour moi des fêtes :)

Matériel :

Sachet kraft
Cardstock : American Crafts
Papier paillettes : American Crafts
Papier partition musique
Embellissements Teresa Collins, Freckled Fawn
Etoiles : Studio Calico
Encre : Distress Vintage Photo

Dies utilisés :

658300 Sizzix Big Shot Starter Kit
659958:  Sizzix Bigz Die-Banners and hearts
659994 Sizzix Bigz Die-Snowflakes #3
660058 : Sizzix Thinlits Die Set 17pk-Holiday Words Script

Pour changer et ne pas partir sur un tag classique, j'ai opté pour une pochette en kraft que je me suis amusée à décorer :)
J'ai d'abord découpé des larges bannières avec le die Banners dans du papier musique.

Le grand et beau flocon est découpé dans du cardstock blanc, il est ensuite ombré à l'encre Distress Vintage Photo pour lui donner un aspect vieilli.

Les divers éléments sont ensuite assemblés et collés au double face.
Des petits coeurs sont ajoutés en touche finale et ajoutent une touche de brillance, ils sont découpés dans du papier paillettes American Crafts dont je ne peux me passer !

Et voilà un petit tag pas si petit que ça réalisé en quelques minutes !

Bonne journée

Karine

Sunday, 16 November 2014

Bente's card using the free paper downloads.


This week we have seen so much gorgeous inspiration from my fellow bloggers!
Today I am rounding off the first week of Christmas inspiration where we have all shared our cards made with some beautiful seasonal free paper downloads.

Here is mine:


If you would like to download the free papers the link is HERE. 
All you have to do is write your email address in the box on the downloadpage.

Here are a couple of close ups:


I used these products:
Sizzix Big Shot Starter Kit (Powder Blue & Teal)
Thanks for looking!!


----------------------------------------------


Denna veckan har ni sett så mycket snygg nspiration från mina bloggar kollegor här på Sizzix. I dag rundar jag av den första veckan med kortinspiration där vi använder de härliga papprena som finns att ladda ner gratis på Sizzix hemsida HÄR.
Allt du behöver göra för att ladda hem de fina mönstren är att skriva in din email adress i boxen på sidan. Sedan får du tillgång till pappren.