Showing posts with label bunting. Show all posts

Sunday, 11 October 2015

Paper Bunting Banner


A theme for most of my craft projects is positivity. I like to create prints, cards and banners to hang in my home studio to put me in a good mood. So today's project is a quick DIY paper banner for your craft space!

I started with some pretty mint coloured scrapbooking paper and the Bunting Framelits Plus Die Set. The bunting die set is really good as it includes so many different sizes and can be used as a stencil if preferred.


Once I had cut out my paper bunting flags on the Sizzix Big Shot Plus, I used a length of white cotton yarn and some washi tape to fix the flags on. Washi tape is great for quick projects because it is repositionable and doesn't leave a residue.


I then used some gold thickers stickers to spell out the word YAY! on the flags.


It looks really cute don't you think? A super quick project to brighten your space and bring some positivity. 


I also made a banner for my kitty so everyone knows her name is Tammy! 


Thursday, 13 August 2015

Wedding bunting


 I hope you all enjoyed the Festival of Quilts - it was lovely meeting some of you for the first time and renewing acquaintance with others. I have to admit that I saw very little of the quilts because by the end of each day I was very tired, but I loved those that I did see.
So back to normal life now - and I have some friends getting married later this month - so I am making bunting for them - I love making bunting - it's so easy especially when using the Bigz Equilateral Triangle die - 660119 - http://www.sizzix.co.uk/product/660119/sizzix-bigz-l-die-triangle-equilateral-4-3-4-h-x-5-1-2-w-unfinished and the Big Shot Plus Machine - 660020 - http://www.sizzix.co.uk/product/660020/sizzix-big-shot-plus-machine-only-white-gray .
I used the Plus machine because I could fold spare fabric by the side of the die, and not have to cut strips from the fabric
I can cut 10 triangles from the width of 112 cm fabric, which will make 5 pennants, so you will need 14cm by width of fabric for every 5 pennants you want to make. 
Here is my selection of fabrics - I have 6 prints and plains, and a plain cream that I have cut double the amount of to make sure that I have enough pennants as I am making 12 m of bunting. I have calculated that I need 7 pennants for each metre.

Here I have stitch the pennants, R.S. together, leaving the top edge open. I have turned them R.S. out and then pressed a 6 mm seam to the inside, and stitched across. 
Here they are with the top corners stitches to string - I have quite a few more to stitch but a good film and a glass of wine this evening should see it complete.
Until next time - keep stitching
Angela 


Sunday, 5 April 2015

Floral Paper Banner


Happy Easter friends! I hope you are enjoying the holidays by taking some time with your family and of course having some crafting time too. We usually spend Easter having a nice lunch and lots of treats. I am sure we will watch some movies and I'll get some knitting done too.

Today I'm sharing a very simple DIY for this Floral Paper Banner. Perfect for Easter home decor.


I used the following supplies:


Using the Big Shot Plus, I cut out 4 flowers and 4 flags for each colour of card stock, I used pink and blue.


I arranged the die cuts along the lace trim to work out the positioning before stitching.


Using a sewing machine on a straight stitch (and on a fairly low speed), I stitched the card stock pieces along the top edge of the lace trim. Stitching through card stock can blunt your needle, so it always good to change it regularly if you are alternating between sewing fabric and card.


Once I had sewn all of the flowers and flags, I trimmed any stray threads and hung my banner. Very Spring like don't you think?


We're having some white chocolate rice crispy cakes with marshmallows as a treat today, they're really tasty! I'll be back next week with some cake toppers for those treats above.

Claire

Monday, 19 January 2015

PARTY BUNTING AND PAPER CUPS


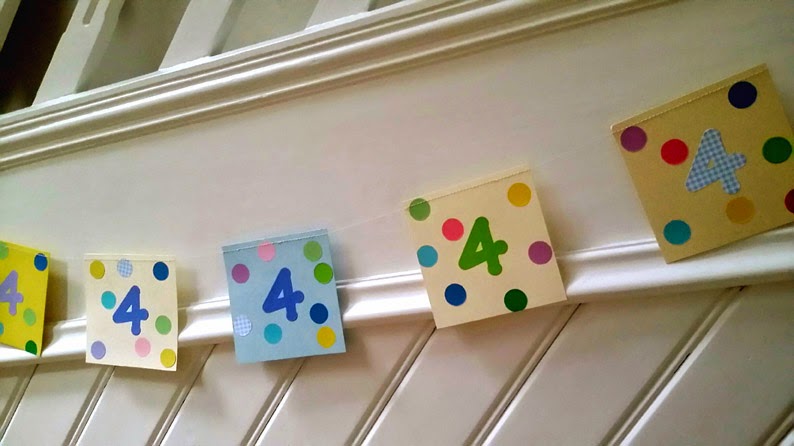
It's my youngest sons' 4th birthday next month and so plans are being made for his party at the moment, which of course include a few crafty touches.

It was a certainty that the Lollipop Shadow Numbers die would see some use, it was just a case of deciding what to do with all of the number 4's I was planning on cutting. For a change I decided that instead of using my Big Shot to cut fabric I'd have a go with paper and card instead.

First up was some quick and easy card and paper bunting, with square flags cut using the Square, 4in Finished (4 1/2in Unfinished) die. From some thin multicoloured paper I cut a stack of spots using the Circles, 3/4in die and some 4's with the Lollipop Shadow Numbers die. I used a glue-stick to stick the 4 in the centre and then the spots around it for some extra colour and detail.


Once all of the square flags were decorated, using some upholstery thread to make the bunting a little stronger, I chain pieced them together (in a similar way to the circle garlands from a couple of months ago) using a wider than usual stitch length.


So simple but effective. The boys really like it and want to get going with a glue-stick and help me decorate more flags later this week.

As I thought about hanging the bunting behind the party table I suddenly remembered the pack of leftover paper cups that were tucked away in a kitchen cupboard that would be perfect to decorate in the same way.


Easy peasy!


I will need to buy another couple of packs of paper cups now though to have enough for all of the party guests. There will be no chance to forget how old he is!

Saturday, 8 November 2014

A baby bunting


Hi everyone! This week was specially creative because I had to do a gift for a friend of mine who was a mummy to a beautiful and loved baby girl waited for long time.
It was difficult to choose her name but finally Sara was the perfect name for the parents.
So , I decided I wanted to do a nice and cute bunting.


As I  have done before, I cut out fabric from more than one die by Sizzix.
This time I have used an  alphabet  die and  one of the new flowers dies.


657892


Before  using the Big Shot I ironed some fusible web to the fabrics for letters , flowers and leaves.
The last ones ( flowers and leaves) are double side with fabric.
I stitched some decorative stitches around the flowers after I cut out.


I cut six triangles for top fabrics and six more for the backing.Ironed each letter and  I used the applique or blanket stitch on my machine for letters on the top of the triangles .Turned the triangle pieces to face right sides together and sew all around, then turn .

I chose a beautiful petal ribbon and a bias on it like you see in the pics and finished by hand.


My backing  is a nice white fabric  with embroidered stars.


Some details ......... with flowers  and leaves sewed and some buttons.


I´m very happy with my first bunting sewed. I want to do a new one for my teenager daughter with other style.

Hope you  have a wonderful week.
 See you next Saturday!!
Love
Mercedes

..................................................***************..................................................


¡Hola a todo el mundo !Esta  semana ha sido especialmente creativa porque tenía  que hacer un regalo para una amiga que ha sido sido mamá de una preciosa  y esperada niña.
Fue difícil hasta que decidieron el nombre pero finalmente Sara fue el que más convenció. Por esto decidí hacerles un bonito banderín con su nombre y tenerlo para decorar su dormitorio.

Como ya he hecho otras veces, he usado varios troqueles de Sizzix, Uno ha sido para las letras y otro para las flores y  hojas, uno de los últimos  diseñado por Stephanie Ackerman.


657892


Antes de usar la troqueladora Big Shot, planché  entretela de doble cara sobre el revés de las telas para las letras, hojas y flores. En estas últimas volví a planchar tela , de tal manera que se quedaron dobles. Entonces corté todas las telitas con los troqueles .
Bordé con puntada decorativa alrededor de las hojas  y las hojas ,usando la máquina de coser.

Corté seis triángulos para la parte de  delante y otros seis para las traseras. Planché las letras sobre cuatro de ello y las dejé pegadas. Hice una puntada alrededor de cada una. Luego coloqué el triángulo de la parte trasera y cosí por el revés. Di la vuelta y planché. Para unir todos los triángulos elegí un bonita cinta con pétalos y sobre ella un biés que cosí a máquina. Echa un vistazo a las fotos.
Luego acabé a mano por el revés.
Los detalles y la tela para la trasera , una bonita batista blanca con estrellas bordadas, puedes verlos también en las fotos. 

Para ser el primer banderín , estoy muy contenta cómo ha quedado y ya estoy pensando en hacer otro para mi hija adolescente ,pero claro, con otro estilo.
Espero que tengáis una semana estupenda.
Nos vemos el próximo sábado.
Cariños.
Mercedes