Showing posts with label Christmas Phrase Cards. Show all posts

Monday, 8 December 2014

Christmas Box decoration using Sizzix dies


Christmas is only a few days away. But I like to make small decorations each year during the month of December. This time I have made a box for an artificial tea light candle.

I used the Thinlits Christmas Phrase Cards 659973, card, vellum and adhesives.


I took a piece of red card that measure 6 x 12".
I started with the smaller of the two outer cards included in the set as a guideline on where to make the score lines, top, bottom and side always on the outside of the die.
then I scored those long horizontal lines.


By placing the same die over I ensured that it was the right size each time. You see that die create a thin border but with the added metal on the side creates a perfect size panel as you can see on the right.


I kept making marks and scoring each panel.


The final one creates a tiny 5th panel which is brilliant to close the box.


Before starting to die cut I made a few marks. Left, you can see the two arrows on the little strip to make sure that I die cut the Phrase cards all in the right direction (as you can see I did the same with the die with a permanent marker after I did a mistake). I also wrote Back on the left panel to make sure I did not die cut it.


Because this die has a lot of detail and you have to die cut it for the box laid horizontally every time I die cut it I turned it over to make sure all the words are die cut. I secure the die each time with low tack tape to make sure the die is in the correct position all the time, even if I had to run it through the machine a second time.


Once finished die cutting it should look like this.


I used the same die to die cut a shiny mirri gold card to add more reflection to the light and attached it to the back panel.


I also die cut three vellum cards to attach from the inside so that the light would be more diffused.


To assemble the box I trimmed the tabs to make the folds better, as well as the bottom to become thinner so that I could place the battery operated tea light. I glue the little 5th panel o the back using wet adhesive for a strong hold.


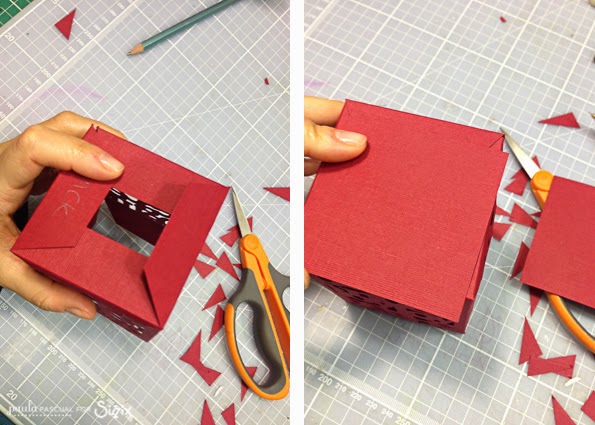
I then glue the tabs together and place a square card to make it look prettier.


And here it is, lighted and with the lights of the room on.


You can do this one in so many diferent ways, I hope you give it a try.


Monday, 24 November 2014

Christmas tree decorations! Christmas Challenge week 3!


It's week three of the Sizzix Christmas Challenge 2014! And it is Tree Decorations! So I decided to do a large bubble with a decorated inside.

For this third Christmas Challenged I used:

Thinlits™ Die Set 9PK - Winter Borders & Rosette by Paula Pascual 659978
Thinlits™ Die Set 9PK - Christmas Phrase Cards by Paula Pascual 659973
Framelits Die Set 8PK - Circles #2 658604
Bigz Die - Ribbon, 3-D 658978

And I used the free downloadable papers from Sizzix, click here for the link.


I started by die cutting the rosette from the Winter Borders & Rosette set. I die cut two strips and covered the back with washi tape to make sure that the perforating lines don't brake. (They usually don't, but if you live in a very dry place or have the heating up as I do, the fibers are more brittle and tend to break much easily than they should.)
I cut the strips to be five pointers each amd making sure that one of the ends ended in a W and the other on a M. Then I linked those to create a lampshade sort of shape.


I die cut two circles using the medium circle die included in the set. I placed a bop of  hot glue in the center of one and pressed down on the rosette. then I used another circle to secure it in place.


I used a double sided adhesive sheet from Stix2 on white paper and die cut it using the larger circle die from the Winter Borders & Rosette set. I removed the backing of and placed the white paper die cut snowflake (also from the Winter Borders & Rosette). Then I dumped in my gold flake tub and rub any excess off - To see more of this technique click here.


I finished it off layering it with circles die cut from the Circles #2 set. On the opposite side I die cut the word peace from the Christmas Phrase Cards and snowflakes. Then I placed it on a plastic bubble and pour chunky matte glitter. Finally I added a die cut bow, embellishments from the Hobby House and a ribbon loop.


And there it is...
Soft Christmas Tree Decoration!


Wednesday, 12 November 2014

Set of Christmas Phrase cards


This week we have the pleasure of showing you multiple ways to use the Free Festive Paper Download to create your own Christmas cards. I often find myself drawn towards wintery colours for my Christmas crafting so these new papers are just up my alley.


I decided to create a set of three cards that are to a large degree alike but different enough for it to still be fun to create all three of them in one sitting.
 
 
I build the focus for the cards up by diecutting pieces from Thinlits Die Set 9PK - Christmas Phrase Cards. Since I used the blue striped paper for the bottom part of my focus piece, I decided to line the diecut with the words with some vellum to tone the patterned paper down a bit.
 
 
On each card I highlighted one of the words by diecutting it in a patterned paper using one of the word dies that are included in Thinlits Die Set 9PK - Christmas Phrase Cards. To give the word some added height I diecut it twice and glued the two diecuts together before I adhered them to the card.
 
 
Using a small die from Triplits Die Set 15PK - Tags I diecut silver foil ornaments to dress each card with. Because the words have different lenghts, I needed to move the ornaments around to fit them in on each card. So this also makes each card stand out from the other two.
 
 
By creating a set of cards like this, you can easily get a lot of your Christmas cards done in time to send them out to friends and family.

 
Supply list:
Sizzix Big Shot Starter Kit (Powder Blue & Teal)
Sizzix Accessory - Magnetic Platform for Wafer-Thin Dies
Free Festive Paper Download
Thinlits Die Set 9PK - Christmas Phrase Cards
Triplits Die Set 15PK - Tags
Silver foil cardstock
Kraft cardstock (Bazzill)
Vellum (Panduro Hobby) 
Baker's twine (Lawn Fawn)
 
---o---
 
I denne uge har vi fornøjelse af at vise dig forskellige måder, du kan bruge Free Festive Paper Download til at lave dine julekort. Jeg er ofte tiltrukket af vinterfarver, når jeg skal lave mine julekort, så disse papirer er helt perfekte til mine kort.
 
I besluttede mig for at lave et sæt af tre kort, som designmæssigt er ens, men som har lidt forskelle, der gør, at det stadig var sjovt at lave de her tre kort på én gang.
 
Jeg byggede mit primære fokus op med udstansninger fra Thinlits Die Set 9PK - Christmas Phrase Cards. Da jeg brugte det blå stribede papir som det nederste led, besluttede jeg mig for at sætte vellum bagpå ord-udstansningen. Dette toner det mønstrede papir lidt ned, og lader de andre dele af mit motiv stå tydligere frem.
 
På hvert af de tre kort fremhævede jeg ét af ordene ved at udstanse det i et andet mønstret papir. For at give ordene yderligere dimension, udstansede jeg to eksemplarer af hvert ord, limede dem ovenpå hinanden og limede dem derefter på kortet.
 
Med en lille die fra Triplits Die Set 15PK - Tags udstansede jeg små juleophæng i sølvfoliekarton. Dette ophæng sidder forskellige steder på hvert kort, fordi de fremhævede ord har forskellige længder og placeringer. Men det betyder jo bare, at hvert kort får sit eget udseende.
 
Ved at lave kort i sæt som dette, gør det nemt og hurtigt at få lavet julekortene klar til at sende ud til familie og venner.
 
Ingredienser:
Sizzix Big Shot Starter Kit (Powder Blue & Teal)
Sizzix Accessory - Magnetic Platform for Wafer-Thin Dies
Baker's twine (Lawn Fawn)

Wednesday, 22 October 2014

Noel candy cane


Back to Christmas card again this week and I've gone with one of my favourite colour combinations for Christmas: Kraft, white, red and gold. Love the way those colours come together and instantly remind me of Christmas. This week's card features the new Thinlits Die Set 9PK - Christmas Phrase Cards as well as the new Thinlits Die Set 9PK - Winter Borders & Rosette.
 
 
I kept the card relatively simple and let the card feature a rather large slice of white space.
 
 
On the left most side of the white cardstock, I diecut one of the borders from Thinlits Die Set 9PK - Winter Borders & Rosette. Then I used the same border to cut red cardstock to fill in the empty spaces in the white cardstock and thereby achieving the candy cane look. The second border, also from Thinlits Die Set 9PK - Winter Borders & Rosette, was diecut in a gold paper. I made sure to reserve the stars from the border to use as a detail near the sentiment.
 
 
To create the sentiment for the card I diecut four (and ended up only using three) "noels" using one of the dies from Thinlits Die Set 9PK - Christmas Phrase Cards. Glueing the three diecuts on top of one another will give your diecut dimension as well as stability.
 

Once I had mounted three "noels" on top of one another I added the sentiment to my card. I then strung the baker's twine around the card and tied a bow just above the sentiment. To make sure that the ends of the bow remained arranged in a nice way, I put a little glue under each end. The final touch was to add three of the little gold stars above the sentiment.
 
Supply list:
Sizzix Big Shot Starter Kit (Powder Blue & Teal)
Sizzix Accessory - Magnetic Platform for Wafer-Thin Dies
Thinlits Die Set 9PK - Christmas Phrase Cards
Cardstock
Gold paper
Baker's twine
 
---o---
 
Jeg er tilbage til julekortene i denne uge, og jeg har arbejdet med en af mine favorit farvekombinationer til julekort: kraft, hvid, rød og guld. Jeg elsker den måde, de farver arbejder sammen og umiddelbart minder en om jul. Denne uges kort er lavet med dies fra Thinlits Die Set 9PK - Christmas Phrase Cards og Thinlits Die Set 9PK - Winter Borders & Rosette.
 
Kortet er hold enkelt og med et relativt stort white space område.
 
På den venstre side af det hvide karton udstansede jeg en af strimlerne fra Thinlits Die Set 9PK - Winter Borders & Rosette. Jeg brugte den samme die til at udstanse rødt karton til at fylde i hullerne i det hvide karton, hvorved jeg fik candy cane looket frem. Den anden strimmel, også fra Thinlits Die Set 9PK - Winter Borders & Rosette, udstansede jeg i guldfarvet papir. Jeg sørgede for at gemme de små stjerner, så jeg kunne bruge dem et andet sted på kortet.
 
For at lave teksten på kortet udstansede jeg fire "noel" (jeg endte med kun at bruge tre af dem) med en die fra Thinlits Die Set 9PK - Christmas Phrase Cards. Når man limer flere udstansede motiver ovenpå hinanden, får man et stabilt og dimensionelt motiv uden at bruge 3d-puder.
 
Da jeg havde limet de tre "noel" ovenpå hinanden, limede jeg dem på det kortet. Herefter vandt jeg baker's twine om kortet, og bandt sløjfen lige over teksten. For at være sikker på at sløjfens ender blev siddende på en pæn måde, limede jeg dem fast med en lille klat lim. Det sidste touch var at montere tre af guldstjernerne over højre side af hilsnen.
 
Ingredienser:
Sizzix Big Shot Starter Kit (Powder Blue & Teal)
Sizzix Accessory - Magnetic Platform for Wafer-Thin Dies
Thinlits Die Set 9PK - Christmas Phrase Cards
Karton
Guldfarvet papir
Baker's twine