Friday 28 February 2014

Birthday card: Doily and Garden Greens


Hi Everyone! This is Anna.
Hope you all had a great week. I'm back with some more inspiration for you... and I hope you will like it :)
I've got another little card to share with you today.
 
cafe creativo - Anna Draicchio - sizzix big shot - card - doily (1)
 
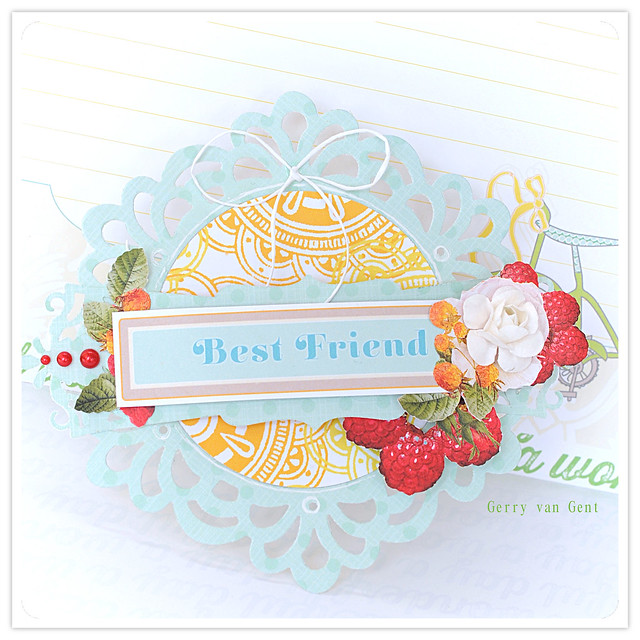
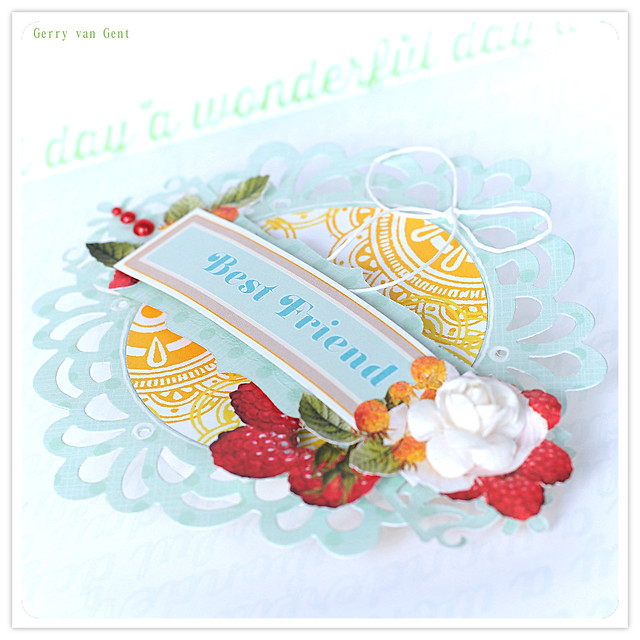
This one's a square card (white) that was layered with another patterned paper. Next up, came a turquoise doily that I die cut with the Sizzix Bigz Die - Doily, Classical Lace, positioned right in the center of the card.
 
cafe creativo - Anna Draicchio - sizzix big shot - card - doily (2)
 
Then came a cluster of leaves die cut with Sizzix Bigz Die - Garden Greens.
Lastly, I added a pink flag. And to finish things off, I added a flower and a banner sentiment.
 
cafe creativo - Anna Draicchio - sizzix big shot - card - doily (3)
 
I wish you all crazy creative weekend - see you soon on the blog!
 
Items used:
cardstock
patterned paper
scrap of pink felt
paper flower (Prima)
twine
wooden skewer
sequins
hot glue, glue

**************************************
Flag_of_Italy Per le amiche italiane! :)
Ciao! Ecco un nuovo appuntamento con Anna.
Spero abbiate passato una bella settimana. Eccomi con una nuova ispirazione... e spero tanto che vi piaccia :)
Oggi ho un'altra card da condividere con voi, ultimamente mi piace proprio fare le card e con Sizzix è tutto più facile ;)
Questa è un biglietto quadrato (bianco) su cui ho sovrapposto un altro quadrato di carta fantasia a righe rosa.
Poi c'è un centrino turchese, che ho fustellato con la Sizzix Bigz Die - Doily, Classical Lace, posizionato proprio al centro della card.
Quindi ho aggiunto il ramo di foglie fustellato con la bellissima fustella Sizzix Bigz Die - Garden Greens. Ho provato ad usarla anche con il feltro ed è fantastica! 
Infine, ho aggiunto una bandierina rosa incollata su uno stecchino di legno, su cui ho arrotolato un fiore. E per finire, ho aggiunto un banner di feltro con l'augurio.
Come avete visto è abbastanza semplice da rifare questa card ;)
 
Auguro a tutti voi un divertente e creativo week-end con la vostra Big Shot. Grazie per essere passati di qui!
Arrivederci a presto su questo blog.
 
Materiali:
cartoncini tinta unita
carte fantasia
ritaglio di feltro
fiore di carta (Prima)
spago bicolore
spiedino di legno
paillettes
colla a caldo, colla

Thursday 27 February 2014

Oh Sew Sweet.....


Now I can reveal that it was my grand daughter Eve's 5th birthday on Tuesday and the fabrics were part of her birthday present -

and here she is checking out the fabrics - I also added a selection of cotton threads for her to use - we now just need to make a date to make the cushion - photos to follow.

 On Wednesday I had a lovely drive from the office to visit the Oh Sew Sweet Shop in Mapplewell, nr Barnsley.
I had a beautiful drive across with sun shining across the moor, and then a delightful  afternoon at the shop.
I was there to demonstrate the Big Shot and Bigz dies and met some lovely of Lorrayne's lovely customers -

I really enjoy introducing customers to the benefits of using the machine and dies - speed, precision cutting being 2 of them.
Here is Lorrayne - busy cutting fabrics for me at the end of the day - because of course it would be rude to visit a shop and not buy any fabric wouldn't it -

and here is a glimpse of some of her lovely fabrics -
The shop is a delight, and with the added bonus of a sweet counter by the door - where you can buy your old favourites!
I managed to justify a small selection of fabric -

 to make quillows for grandchildren - I know I have plenty of fabric at home, but these I will have 5 quillows made, one for each grandchild, ready for Easter - watch this space to see if I manage it!
Well that's all for now - I'm going to plan the blocks for these fabrics and then go and raid my stash for fabrics for the other 3 quillows.
Have fun sewing.
Angela

Travel Layout


Hello,

Today let’s get a ride on the most mythical road in the world: the Road 66! Having travelled on this road last year, I couldn’t resist the urge to use the Tim Holtz set dedicated to this monument!

Supply list:

Cardstock: American Crafts
Papers: Studio Tekturek
Alphabets: American Crafts
Stickers: Studio Calico, Ephéméria
Stamps: Craft Origine, Paper Artsy
Inks: Adirondack, Viva Colour, Chalk Prima
Watercolour pens: Stabilo Pen68
Others: Masking Tape, wood embellishments

Die:

658579: Sizzix Texture Fades Embossing Folders 4PK-Travel Signs Set

Start by embossing twice some white or light-coloured paper with your embossing folder. If you travel in the US or do a road trip on Road 66, this Tim Holtz set is just the obvious choice!

Once embossed, use a spray ink, diluted paint, watercolour paint or inks like Adirondack to colour entirely your paper. I selected three colours: green, orange and yellow. Let it dry in the open.

Then build your page starting by choosing a neutral background. Multiply the pattern papers and masking tape strips.

Work on your background with stamps, make splashes with a watercolour pen, add your title with alphabets and here you are!

I hope my layout will make you feel like plunging into your last holidays pictures!


Have a lovely day,

Karine

Bonjour,

Aujourd'hui je vous emmène avec moi sur la route la plus mythique au monde, la route 66 ! Ayant effectué ce voyage l'an dernier je ne pouvais résister à l'envie d'utiliser la plaque Tim Holtz dédié à ce monument !

Matériel :

Cardstock : American Crafts
Papiers : Studio Tekturek
Alphabets : American Crafts
Stickers : Studio Calico, Ephéméria
Tampons : Craft Origine, Paper Artsy
Encres : Adirondack, Viva Colour, Chalk Prima
Feutres aquarellables : Stabilo Pen68
Divers : Masking Tape, embellissements bois

Die utilisé :

658579: Sizzix Texture Fades Embossing Folders 4PK-Travel Signs Set

Commencez par embosser deux fois votre plaque à embosser dans un papier blanc ou clair. Avec un voyage aux USA et un road trip sur la Route 66, cette plaque Tim Holtz était juste évidente !

Une fois embossée, utilisez une encre en spray, de la peinture diluée,de l'aquarelle ou encore des encres telles les Adirondack pour teinter entièrement votre papier. J'ai opté pour 3 couleurs : vert, orange et jaune. Laissez sécher à l'air libre.

Composez ensuite votre page en choisissant un fond neutre mais en multipliant les imprimés et les bandes de masking tape.

Travaillez votre fond avec des tampons, éclaboussez avec un feutre aquarellable, ajoutez votre titre à l'aide d'alphabets et le tour est joué !

J'espère que ma page vous donnera envie de vous plonger dans vos dernières vacances !

Bonne journée à vous

Karine

Wednesday 26 February 2014

My Heart will go on....


A couple of weeks ago I said that I would feature some more ideas using basic shapes in a funky, creative way. I stumbled across a sight called mykidcraft.com (great site for kids craft ideas, big kids too!) which featured a great way of using heart shapes to create a wonderful lion so I played around with the idea until I came up with this weeks blog.

It seems like a good time to use all those heart dies left over from the Valentines frenzy so I dug out my favourite, and ever popular Framelits die set set namely Hearts 657561 and got to work.

For the Lion I started by die cutting all the separate hearts, before cutting little nicks in the edges at strategic points. Next I assembled the face before attaching to the mane using 3D foam pads, the eyes are black adhesive pearl gems, how easy is that?


I attached the assembled lion to a square card measuring 13 x 13cm  withe the legend 'You're Grrrrrrreat' printed on the base using my PC ( the font is called 'no color' and you can download it for free at dafont.com)


I couldn't stop at one (I'm up to 6 so far!) so here's another animal using the same Hearts die set. This time a bunny rabbit.

I die cut all the parts to make the head and cut two of the hearts down the centre to form the ears.


Next, I attached the nose and teeth with 3D foam pads before attaching the ears. the eyes are black pearl gems.


I die cut all the parts of the body and cut all but the small white heart in half using a craft knife. Next I started to assemble the body using 3D foam pads to add depth.


Finally, to make the carrot, I used half an orange heart with some trimmed green card attached to the top before attaching to the body together with the paws.


I assembled the bunny on the front of a 15 x 15cm base card onto which is printed the legend '24 Carat Birthday Wishes'.


I hope you like these ideas as I have more to share next week?


Tuesday 25 February 2014

White and grey card

Hi everyone
I hope you all had a beautiful week, Here in Denmark the weather be like spring. Today i will show you a white/ grey card using different sorts of beautiful Sizzix dies
Items used.
Sizzix Bigz Die Garden Greens 659436
Sizzix Framelits Die Set 5 PK Labels, Funky 658362
Sizzix Sizzlits decorative  Strip Die Mini Paper Rosettes ( 2 sizes9 657177
Sizzix Sizzlits Die Vintage Doily 658506
Supply list:
Paper: Till the End of the Night/Galleriapaper
Half Pearls,3 d foam and brads
How to make:
Make a cardbase using white cardstock 12x13,5 cm. Cut out patterned paper 11,5x 13  cm
Die cut the different sorts og sizzix die glue to the cardbase using 3D foam
 

Thanks for stopping by,see you next Tuesday
Wish you a great week
Pia

Hej alle
Jeg håber I har haft en dejlig uge og nyder det skønne forårsvejr vi har her i Danmark. I dag vil jeg vise et grå/ hvidt kort hvor jeg har brugt forskellige af de skønne Sizzix dies.
Dies jeg har brugt:
Sizzix Bigz Die Garden Greens 659436
Sizzix Framelits Die Set 5 PK Labels, Funky 658362
Sizzix Sizzlits decorative  Strip Die Mini Paper Rosettes ( 2 sizes9 657177
Sizzix Sizzlits Die Vintage Doily 658506
Andre materialer:
Papir: Till the End of the Night/Galleriapaper
Halv Perler,3 d foam og brads
Sådan gør du:
Lav en kortbase i hvidt karton på 12x13,5 cm. Skær et stykke mønstret papir på 11,5x 13 cm og lim til kortbasen. Udstans de forskellige die og lim dem på med 3 D foam
Tak fordi du kiggede forbi, vi ses næste tirsdag
Ønsker dig en dejlig uge
Pia
 

Pocket Watch Mini Wall Hanger


Hi everyone...hope you had a great week.... today I have a mini wall hanger to show you.

 Supply list:
657900 Sizzix Big Shot machine
659573 Sizzix Sizzlits Decorative Strip Die - Spring Greenery
659441 Sizzix Bigz XL Die - Jumbo Tattered Florals
658175 Sizzix Movers & Shapers Die - Pocket Watch Frame
658566 Sizzix Movers & Shapers Magnetic Die Set 3PK - Sized Circles

Papers: Pion Design - A Day in May, Tissue Paper, chipboard
Inks: Distress ink Pad - Walnut Stain, Distress Crackle Paint - Picket Fence
Other: Feather, Seam Binding Ribbon, button, pearls

How to do:
Die cut the Pocket Watch in chipboard with Sizzix Movers & Shapers Die - Pocket Watch Frame
and  Sizzix Movers & Shapers Magnetic Die Set 3PK - Sized Circles
Paint it with  Distress Crackle Paint - Picket Fence, let it dry. Distress the edges with Distress ink Pas - Walnut Stain.
Die cut layers of flower in patterned paper and Tissue Paper with Sizzix Bigz XL Die - Jumbo Tattered Florals
Die cut greenery in patterned paper with  Sizzix Sizzlits Decorative Strip Die - Spring Greenery
Print out image and glue it under the Pocket Watch. Glue greenery, feather and flower in front.


Thanks for stopping by....wish you a great day.
Anne Kristine

♥♥♥♥♥♥

Heisann...håper du har hatt en fin uke...idag har jeg et mini veggbilde å vise deg.

Materialer som er brukt:
657900 Sizzix Big Shot machine
659573 Sizzix Sizzlits Decorative Strip Die - Spring Greenery
659441 Sizzix Bigz XL Die - Jumbo Tattered Florals
658175 Sizzix Movers & Shapers Die - Pocket Watch Frame
658566 Sizzix Movers & Shapers Magnetic Die Set 3PK - Sized Circles

Papir: Pion Design - A Day in May, Tissue Paper, chipboard
Inks: Distress ink Pad - Walnut Stain, Distress Crackle Paint - Picket Fence
Annet: Fjær, Seam Binding bånd, knapp, perler

Beskrivelse:
Stans ut klokken i chipboard med Sizzix Movers & Shapers Die - Pocket Watch Frame
og  Sizzix Movers & Shapers Magnetic Die Set 3PK - Sized Circles
Mal over med Distress Crackle Paint - Picket Fence, la det tørke. Distress kantene med Distress ink Pas - Walnut Stain.
Stans ut lag med blomster i mønsterark og Tissue Paper med Sizzix Bigz XL Die - Jumbo Tattered Florals
Stans ut grener i mønsterark med  Sizzix Sizzlits Decorative Strip Die - Spring Greenery
Print ut motiv eller et bilde og lim dette under klokken. Lim grener, fjær og blomst i front.

Takk for at du stikker innom her og ha en herlig dag.
Anne Kristine

Monday 24 February 2014

Mixing dies in my new notebook

Hi everybody!

The past three weeks I have put into practice one of my year goals and I have retaken my French classes, which I have been procrastinating for years, Yay for me!

I needed a new notebook for my classes and, of course, I have decorated it with my Big Shot and Sizzix dies :)


Supply list:

This time I have used a variety of dies from different ranges. I love how versatile they are and how you can mix and match different collections in the same project. Here I have used dies from Paula pascual, Tim Holtz, and karen Burniston and they all coordinate perfectly!

And you? Do you like to combine dies from different ranges? 

Happy Monday!

........................

¡Hola a todos!

Durante las últimas tres semanas he estado poniendo en práctica uno de mis propósitos del año y he retomado mis clases de francés, cosa que he estado posponiendo durante años. ¡Bien por mí!

Para ello necesitaba una libreta nueva y, por supuesto, la he decorado utilizando mi Big Shot y los troqueles de Sizzix.

En esta ocasión he utilizado una variedad de troqueles de diferentes colecciones. me encanta lo versátiles que son y cómo es muy fácil mezclarlos y utilizar troqueles de diferentes estilos en un solo proyecto. En esta ocasión he utilizado troqueles de Paula Pascual, Tim Holtz y Karen Burniston y ¡todos combinan a la perfección!

¿Y vosotros? ¿Os gusta también combinar troqueles de diferentes colecciones?

¡Feliz lunes!

charm pack cherry quilt


Fat Quarter Shop is one of my absolute favourite quilt shops online. I use them a lot and I absolutely love the free quilt patterns they provide for using pre-cuts.

The latest in the series is the charm pack cherry quilt, which uses 5" squares. You can buy pre-cut charm packs, or make your own using the 5" square die!


Watch the video tutorial or download the free pattern and get making some quilts!


Sunday 23 February 2014

Everyday card by Gerry van Gent


Hello Sizzix friends!
It`s Sunday and I am ready to share with you my latest 
 card created with two of the recently released Thinlits dies.
If you need to make a quick surprise card for
your best friend all you need is .... two awesome dies :-)
Best Friend
657900 Sizzix Big Shot machine
659127 Sizzix Thinlits Dies Frame Layers & Flower #2
659131 Sizzix Thinlits Dies Labels, Long

*    *    *

As a base of my card I used a double round card from white cardstock
which has almost the same diameter as the inner (yellow-white) die-cut circle.
I left the round double card 1/2 cm bigger so I can adhere 
round the edges the scallop die-cut circle.
I die cut the Frame Layers & Flower #2 twice using 
two different pattern papers. 
Best Friend 1
The Long label was die cut from the same pattern paper as 
the scallop circle. On top I added the phrase - I used foam squares 
for more dimension. Then I fussy cut a few patterns.
Pearls and twine were added for decoration.
Best Friend 2
OTHER PRODUCTS I USED:
Webster's Pages - "Party Time!" paper collection

I hope you enjoyed my card today!
Have a beautiful Sunday!

Saturday 22 February 2014

A fabric card using the Big Shot Starter Kit


Last weekend was a busy one as Stitches, the UK Craft Trade show, took place in Birmingham. I had a blast as usual and I must say that the Sizzix stand was the most impressive one. Pete, Debi and Angela did an outstanding job with all the areas and samples, as well as the rest of the marketing team who made it all come together.

On thursday I attended a "Love your Sewing Machine" workshop because I really needed to get to grips with my sewing machine. It inspired to use it more, including with some paper projects. I got also some small fabric bundles, perfect for die cutting using the Bigz die that comes in the Starter Kit.


I die cut the circles using the large and small circle dies on the Bigz die. I then layered them on white card and sew them on the machine making inverted L shapes.


To create a frame on the card I created a template using the framelits from Rectangles 2 and some heavyweight card. Then I placed it on the card centred and with a 0.3 pen I traced round. 


I did a dot in each corner. Then I die cut a black circle using the larger Framelit from the Starter Kit. Then I layered on top one of the Craftwork Cards Messages In circles. Finally I added a circle of self adhesive rhinestones.


I just love the texture of the fabric mixed with the card and the rhinestones. I hope you like it too!

Caged Bird Artist Trading Card


 Hi, it's Rachel here today to share a fabulous way Sizzix Dies and Embossing Folders can be used with Darkroom Door stamps. Every month on the Darkroom Door blog we host an Artist Trading Card swap. Each month has a different theme and recently the theme was 'Sizzix & Darkroom Door'! This means that all artists needed to use a Darkroom Door stamp with a Sizzix die or embossing folder. It was such a fun swap and the ATC's that were created were amazing!

Today I want to share one of the ATC's that was created by Godelieve Tijskens who lives in Belgium.


Godelieve started by making the heat emboss resist background, using Darkroom Door's Flourish Background stamp, WOW embossing powder and Dylusions Ink Spray.


Two different birds from the Darkroom Door Carved Birds Vol 2 set were stamped with Archival Ink #Vermillion, 5 times each, then cut out.  Words from the Darkroom Door Wildflowers Vol 1 stamp set were stamped with Archival Ink #Jet Black.


Godelieve used the Sizzix Bigz Caged Bird Die. She cut the cages and assembled the ATCs.  After everything was glued in place, Godelieve embossed an acetate cover for each ATC, using the Sizzix Notebook embossing folder. The Tim Holtz Tiny Attacher was used to secure the embossed acetate to the ATC's.


The corners were then rounded with a corner rounder punch. 


Darkroom Door has 2 sets with stamps to use on the back of your ATCs.  Godelieve used the Artist stamp set to fill out all her details.


Once they were all completed, Godelieve put the ATCs in a 9 pocket sleeve, ready to send in to the Darkroom Door headquarters to be swapped out with other artists! 


Supplies used:
Sizzix Bigz Die: Caged Bird 656634
Sizzix Texture Fades Embossing Folder: Notebook 656647
Darkroom Door stamps: Flourish Background, Carved Birds Vol 2  stamp set, Wildflowers Vol 1 stamp set, Artist stamp set
Dylusions Ink Spray: Calypso Teal, Pure Sunshine
Archival Inkpads:  Vermillion & Jet Black
Versamark inkpad
WOW embossing powder
Tim Holtz Tiny Attacher
Acetate
WeRMemoryKeepers Corner Chomper
ATC - 9 Pocket Sleeve

Stay tuned for my next blog post on 8th March where I'll share all of the ATC's that were sent in for this swap :)  If you'd like more information on how you can take part in these swaps, you can read all Darkroom Door Swap details HERE. It's a great way to 'meet' other artists and share your creativity!

Thanks so much for stopping by today!

Rachel