Showing posts with label stencil. Show all posts

Wednesday, 12 August 2015

Talking Bigz


When we mention the Sizzix brand what springs to mind, The Big Shot machine closely followed by Bigz dies perhaps? 

Sizzix kicked off the die-cutting revolution some 15 years ago and as many of you remember, all the dies were steel rule (deep steel blade). We have come a long way since then but the Bigz dies are still as popular as ever.

I have used this blog to highlight the versatility of Bigz days many times down the years, not just the vast range of materials that they cope with but the amount of different applications they can be used for.

Today I want to share with you a few pieces made with one such Bigz die and old favourite of mine namely Flower Layers & Leaves (657690). This die contains seven separate elements and as well as being incredibly gorgeous it's also very, very versatile.


Cardmaking is as good a place to start as any, not only can cut card up to and including mount board but you can cut multiples in one pass through the Big Shot, up to 100 layers of tissue paper!!!


Die-cutting was developed for the scrapbooking market originally and it's still a must have tool for any serious scrapbooker.


Fashion applications are many and varied. The Big Shot has a growing fanbase all over Europe amongst the textile fraternity. Some people use it for textiles exclusively!


I cut dozens of small flowers from gold lame  (I knew it would come in handy one day!!) and folded each one into quarters before attaching them to this plain white t-shirt in the shape of a heart.


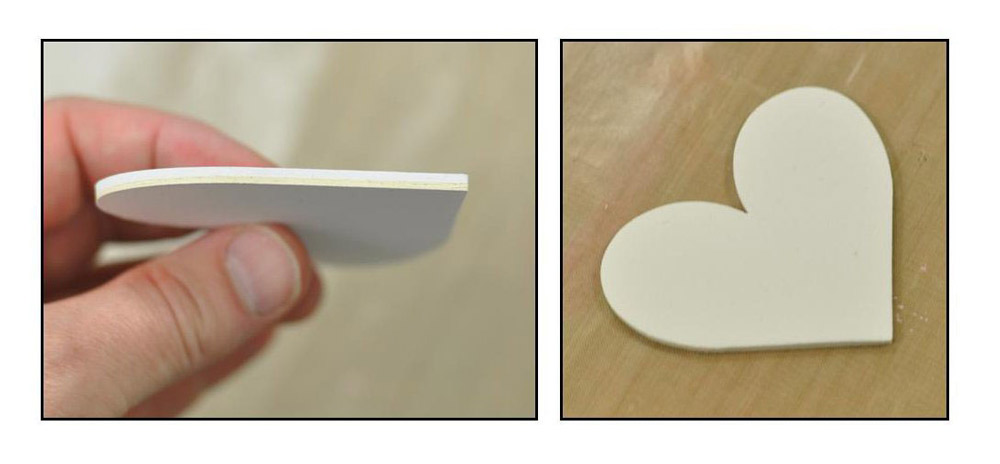
Here I have die-cut the flowers from craft foam backed onto mount board to make our very own disposable stamps.


Alternatively, you could use the negative shapes as stencils as shown below.


The quality of cut that you get using felt is fabulous, here's a little layered embellishment added to a beanie hat which just happens to be the right size for my daughter!


The flowers on this hair band were cut from voile, up to 10 layers at a time. the flowers were folded and stapled before the edge was run over the flame of a candle (this takes a little practise!)


this brooch is die-cut from very thick felt and the edges are finished with blanket stitch which I find very therapeutic!


Shrink plastic is an amazing material for creating jewellery, charms, bespoke buttons etc. I die-cut all the elements before punching a hole in the top of each. After inking and stamping I shrank them to size using a heat tool.


For the 3-D flowers Simply die-cut the large flower in several shades of red/pink felt and cut from the edge to the centre in a spiral before rolling them into shape with my tweezers.


This is a work in progress and I have another half dozen ideas to go but I thought I would share the story so far. Why not take out your Big Shot and stretch your creative muscles too?


Wednesday, 15 July 2015

Stamp n' Stencil


They say that we only use 10% of our brains, or 5% in my case as many would argue! Sometimes I feel the same about die-cutting. There is so much potential which remains untapped so I thought It would be nice to share a couple of techniques which I haven't used for ages.

I am using  the Bigz Heart Trio die. This is one of eight fabulous Bigz dies that have been designed for Sizzix by Echo Park which are perfect for a huge range of applications, I know that Angela, our textile guru is very excited about them!

I love the shapes of these hearts and they are so big and bold offering a blank canvas ready to be explored. I am using a selection of Distress inks as shown below and at this point I only have a sketchy idea of how they will turn out.


I attached some self adhesive foam to a square of mount board and Die-cut my shape... Aren't Bigz dies great!!!
I applied the ink pads directly onto the foam side of the die-cut shape before gently spritzing with clean water using a mister. Next, I pressed the shape face down onto a square of white card as one would do with a stamp.
 For my next technique I die-cut the same heart from paper and used the negative as a stencil. I placed the stencil onto white card and applied the same inks using foam applicators.
 I removed the stencil and lightly spritzed with clean water before drying with a heat tool. Next, I replaced the stencil and used a text stamp to add a little detail.
Finally, I die-cut a 3-D flower and some leafy foliage from white card before forming the flower and curling the leaves to add a little dimension. Click on the highlighted text to see the dies used.


Here are the finished cards. As you can see I have distressed the edges of the white card and attached each to a kraft base card secured with some suitably wonky stitching very kindly provided by our Angela although I feel I should point out that the 'wonky' stitching was by my request!

I applied PVA to the foliage and dipped it in gold glitter and I used a postmark sentiment stamp from the good people at Lily of the Valley (great set, very versatile!)

One card is for a wedding and the other for a special birthday girl. Hope they like 'em?


Wednesday, 9 July 2014

in-flight entertainment


Tiny, huge, plain, intricate?.... it doesn't really matter when we are talking about butterflies. They are such a versatile shape and on many occasions provide the perfect finishing touch to lots of papercraft projects.

Today, I am proud to introduce a new die/embossing folder combo from that creative bottomless pit that is Mr Tim Holtz. I am sure that this will become a huge favourite for many of you as it is for me. I had the privilege to work with this die last December in preparation for our impending trade shows and the resulting projects drew quite a crowd. I have had to wait until now to finally use it again, Hurrah!!!

The sizzix products I'm going to be using today are:

I also used some of my favourite Distress Inks namely Mustard Seed, Wild Honey and Walnut Stain (if I added Crushed Olive, another favourite of mine, they would make a great salad dressing!)


I started with an A6 sized Base card made from stiff ivory card stock and applied the inks with a foam applicator starting from the top down from the light colour (Mustard Seed) to the dark (Walnut Stain). I stood the card up and gently spritzed the top of the card with water allowing it to run down before drying with my heat tool.

I die-cut a strip of paper (thin copier paper is fine) just long enough for my card using the confetti die, this is another die which will prove a useful tool whether as a stencil or for the tiny circles which are so useful. Here I'm using it as a stencil through which to create the pattern using my inks.

I die-cut the butterfly from the same ivory card that I used before and placed the butterfly into the Texture Fades embossing folder which accompanies the Bigz die. As you can see from the image on the right, the detail is superb, but the magic really starts to happen when I start to apply the inks....

 I started with the Mustard Seed (yellow) ink before inking the centre using good ol' Walnut Stain (dark brown). Next, I applied Wild Honey (orange) blending from the tips of the wings inward before adding a little depth around the edges with the Walnut Stain again. If you loved the Block Talk alphabet die then you will love the lowercase version which is a perfect companion. I love the fact that it's a Bigz die which means Heavy weight materials like mount board, leather, textiles, balsa wood etc. can be cut with no fuss or bother whatsoever. I used the die to cut the word 'hello' from mount board covered with a sheet of the ivory card...easy-peasy!


 And here is the finished card, I gently curled the butterflies wings to add a little dimension and sprayed it with a dusting of silver Spray and Sparkle from Crafter's Companion which gives it a light gloss. I always feel that butterflies should be breaking free of a card/layout, they should give the impression that they have just stopped by for a fleeting moment and will be off the minute your back is turned.... or is it just me?


Before I forget, Check out the Prima Blog this week where I am featured with a couple of cards to celebrate the launch of the new range of Sizzix dies designed in conjunction with Prima Marketing Inc. Here is a sneak preview below.


Wednesday, 2 April 2014

My first post


It is hard to believe that this is my very first blog post as a Creative Blogger here at Sizzix.co.uk It is a thrill to be part of the team and I look forward to spreading and receiving inspiration.

I've been a card maker for more than 15 years and a scrapbooker for 9 years. At the moment I am probably more of a card maker than I am a scrapbooker but thankfully they aren't mutually exclusice so I might very well return to scrapbooking soon. To me working with paper, dies, embellishments and glue is not only a hobby it is an outlet for creativity as well as a source of joy and excitement.
 
When I am not creating I live a life as a stay at home wife to my husband, Kristian who works with the United Nations in Bonn, Germany. That means that we live outside of our home country Denmark and have done so for the past five years. I have a masters in History with a minor in English but living in Germany has meant that I haven't been able to use my education. So I do a lot of crafting instead.
 
 
For my first blog post I've created a card where I've used the Sizzix Frameworks Die - Courtyard as a stencil in order to create my patterned paper using Inka Gold: I simply diecut one of the Sizzix Frameworks Die - Courtyard and used my fingers to apply the Inka Gold through the openings in the diecut image. Since these new Framework dies have repeating patterns is was really easy to continue the stencilling across the paper.


Supply list:
 
Cardstock
Inka Gold: Silver
Ribbon
Stamp: Papertrey Ink
Ink: Memento Tuxedo Black
---o---
 
Det er svært at begribe, at jeg skriver min første blogpost som Creative Blogger her hos Sizzix. Det er en fornøjelse at være en del af teamet, og jeg glæder mig til at sprede og suge til mig af den inspiration, der flyder her.
 
Jeg har været kortmager i mere end 15 år og scrapbooker i 9 år. For tiden er jeg nok mere kortmager end jeg er scrapbooker, men heldigvis udelukker det ene ikke det andet, og det kan ikke udelukkes, at jeg snart vender tilbage til scrapbøgerne. For mig er det at arbejde med papir, dies, pynt og lim ikke bare en hobby; det er også et sted hvor kreativiteten for frit løb og hvor jeg henter fornøjelse og glæde.
 
Når jeg ikke er i gang med at skabe, lever jeg et liv som hjemmegående hustru. Min mand, Kristian arbejder for FN i Bonn. Det betyder altså, at vi bor udenfor Danmark, hvilket vi har gjort i de seneste fem år. Jeg har en kandidatgrad i historie med et bifag i engelsk, men desværre har livet i Tyskland gjort, at jeg ikke har kunnet bruge min uddannelse. Så jeg dyrker min kreative side i stedet.
 
Til min første blogpost har jeg lavet et kort, hvor jeg har brugt Sizzix Frameworks Die - Courtyard som stencil, så jeg kunne skabe mit mønstrede papir ved at bruge Inka Gold. Jeg udstansede en enkelt Sizzix Frameworks Die - Courtyard og brugte så fingrene til at smøre Inka Gold i hullerne i diecuttets mønster. De nye Framework dies har gentagende mønstre, så det er nemt at lade motivet sprede sig udover hele arket.
 
Ingredienser:
 
Karton
Inka Gold: Silver
Bånd
Stempler: Papertrey Ink
Sværte: Memento Tuxedo Black

Wednesday, 5 February 2014

For You Card

Hi All,

Today I would like to show you a mixed-media card. I used different paints, stencils, sprays and etc. to create this card. And of course Sizzix dies help me to make my card more beauty.

Items:
Big Shot Machine (657900)
Sizzix Movers & Shapers Magnetic Die Set 2PK - Mini Butterflies Set (657209)


Have a nice day!

Daria.


Всем привет!

Сегодня я хочу показать микс-медиа открытку. Я сделала ее с использованием различных красок, спреев, трафаретов и т.д. И конечно не обошлось без ножей Sizzix.

Материалы Sizzix:
Big Shot Machine (657900)
Sizzix Movers & Shapers Magnetic Die Set 2PK - Mini Butterflies Set (657209)

Всем хорошего дня!

Wednesday, 18 September 2013

Art Journal


Hi Everyone!

Daria is here.

Today I would like to show you a new art journal. I made it for one of my scrap-friends. I hope she will love this art journal and will create a lot of gorgeous mixed media projects.

Items used:
Big Shot Machine (657900)
Sizzix Movers & Shapers Magnetic Die Set 2PK - Mini Butterflies Set (657209)
Sizzix Bigz Die - Flower #2 (657711)

I made the inner sheets from watercolor papers. Сover I made using cotton fabric. To add different shapes on the cover, I cut these shapes using dies (also from cotton fabric). I sewed them onto the cover using a sewing machine. Then I used white acrylic paint and different sprays with stencils. After paint dried, I outline the edges of the shapes using PITT Artist Pens.


This is back side of art journal.

Have a nice day!

Daria.


Всем привет!

Сегодня я хочу показать новый арт-журнал, который я сделала в подарок одной из своих скрап-подруг. Его размер А5. 
Арт-журнал сделан с нуля, внутренние листы у него из бумаги для черчения, мягкая обложка. Разные интересные формы для обложки я вырезала с помощью ножей Sizzix. Так же я использовала краску, трафареты и спреи для придания законченного вида обложке.

Материалы:
Big Shot Machine (657900)
Sizzix Movers & Shapers Magnetic Die Set 2PK - Mini Butterflies Set (657209)
Sizzix Bigz Die - Flower #2 (657711)

Всем хорошего дня!

Дарья.

Wednesday, 11 September 2013

Notebook


Hi Everyone!

Daria is here. And today I would like to show you a notebook which I made using Sizzix dies.

Items used:
Big Shot Machine (657900)
Sizzix Sizzlits Die - Frame, Renaissance (657736)
Sizzix Framelits Die Set 6PK - Banners, Fancy (658601)
Sizzix Sizzlits Decorative Strip Alphabet Die - Inside Out (657827)

I used beautiful Renaissance Frame and Banners dies to make a base more layered. Also I used canvas, gesso and different mists to make the cover of my notebook more interesting.


I used Inside Out alphabet die to make the title.


Have a nice day!

Daria.


Всем привет!

Сегодня я с блокнотиком. Его формат А6, он не большой, но очень милый. Я сделала его с использованием холста, гессо, спреев. И конечно использовала чудесные ножи от Sizzix, чтобы сделать фон более интересным, а так же чтобы создать надпись на блокнотике.

Материалы:
Big Shot Machine (657900)
Sizzix Sizzlits Die - Frame, Renaissance (657736)
Sizzix Framelits Die Set 6PK - Banners, Fancy (658601)
Sizzix Sizzlits Decorative Strip Alphabet Die - Inside Out (657827)

Дарья.

Wednesday, 4 September 2013

Mixed-media collage "Butterflies"


Hi All!

Daria is here. And today I would like to show you a mixed-media collage which I  made using one of my favorite die.

Items used:
Big Shot Machine (657900)
Sizzix Sizzlits Die - Flights of Fancy (658334)

I used both butterflies to make my collage more interesting and airy.


Have a nice day!


Daria.


Всем привет!

Сегодня я хочу показать вам один из своих последних коллажей на создание которого меня вдохновил новый нож с бабочками. Они такие ажурные, изящные и красивые, что я не могла их не применить в своей работе.

Материалы Sizzix:
Big Shot Machine (657900)
Sizzix Sizzlits Die - Flights of Fancy (658334)

Всем хорошего дня!