Showing posts with label summer. Show all posts

Sunday, 1 November 2015

Summer Layout by Gerry van Gent


Happy Sunday Sizzix friends!

I am sharing today with you a summer layout I created using 
as always gorgeous Sizzix products. I totally love the NEW 
Big Shot Starter Kit and for my post today I used the pretty
butterfly thinlits/bigz die from the kit - Love it!

Did you know that you can win this Starter kit?
You still have time until Friday 6th November 2015!!!
Check out this LINK and who knows maybe you'll be our winner!
660210 Thinlits Die Set 102PK Alphanumeric (1" Tall)
660222 Sizzix Thinlits Die Set Scribbles & Splat
660804 Sizzix Thinlits Die Set Happiness Phrases
658521 Sizzix Sizzlits Decorative Strip Die Venice
*        *        *

Don't you just love that cute butterfly from the Big Shot Starter Kit?
I decorated each butterfly with an Alphanumeric letter.


"Hello" word from Happiness Phrases dies set was
die cut twice - once from white cardstock and once
from pattern paper. I used the white die-cut word as a shadow.

For the middle butterfly I used the butterfly die from the bigz die
which is included in this amazing Big Shot Starter Kit,
combined of course with the matching Butterfly thinlits.
OTHER PRODUCTS I USED:
Glitz Design Pattern papers
Prima Marketing flowers, SIIC, embolus, mask
The Scrapbook Diaries Clear stamps
Tattered Angels Clear Stamps
*        *       *

Thank you for visiting us today!

Thursday, 17 September 2015

New exotic mini album by Karine


Hello!

Here is a new mini book with Sizzix dies. I will teach it in classes next month! If you attend the Syros cropping party, you will create this album! This project reminds us of summertime, the not-so-far-away holidays and of sunny memories!

Supply list:

Papers: Simple Stories, Scrap Plaisir, Pebbles
Alphabets: American Crafts
Cardstock: Ephéméria
Embellishments: Ephéméria, American Crafts
Stickers words: Heidi Swapp, American Crafts
Stamps: Florilèges Design, Bloomini Studio
Inks: Studio Calico

Dies:

650515 :  Sizzix Big Shot Plus Starter Kit
660320 :  Sizzix Precision Base Plate for Intricate Thinlits Dies
659573 :  Sizzix Sizzlits Decorative Strip Die-Spring Greenery
660804 :  Sizzix Thinlits Die Set 3PK-happiness-phrases

As I usually do when creating my mini books, I use my Sizzix dies here and there as finishing touches either to add some text (like here with the Thinlits Die Set 3PK-happiness-phrases dies) or to decorate with shapes.

Once all my pages are created, I cut various shapes in pattern papers or cardstock scraps!

I really like the “happiness-phrases” die set; it is perfect for a summery album. The thin words are easily cut with the precision base plate! This is a tool I particularly recommend! Then glue your words with liquid glue.

The words “Be Happy” have double purpose! You can use the letters as is or the scooped-out letters part as well! :-)

You cannot have a summery mini book without some foliage, right? Here is a tone-on-tone die cut out of sea green cardstock.

And now time for pictures to make you feel like testing these dies!


Have a lovely day,

Karine

Bonjour !

Un nouveau mini book avec des dies Sizzix avec lequel je vais partir en tournée le mois prochain ! Participantes des ateliers à Syros cet album est pour vous ! Un projet qui sent bon l'été, les vacances qui ne sont pas si loin que ça et les souvenirs ensoleillés !

Matériel :

Papiers : Simple Stories, Scrap Plaisir, Pebbles
Alphabets : American Crafts
Cardstock : Ephéméria
Embellissements : Ephéméria, American Crafts
Stickers mots : Heidi Swapp, American Crafts
Tampons : Florilèges Design, Bloomini Studio
Encres : Studio Calico

Dies :

650515 :  Sizzix Big Shot Plus Starter Kit
660320 :  Sizzix Precision Base Plate for Intricate Thinlits Dies
659573 :  Sizzix Sizzlits Decorative Strip Die-Spring Greenery
660804 :  Sizzix Thinlits Die Set 3PK-happiness-phrases

Comme toujours lorsque je confectionne mes albums, j'utilise mes Dies Sizzix ici et là en petite touche finale soit pour ajouter du texte comme ici avec les dies Thinlits Die Set 3PK-happiness-phrases soit pour décorer avec des formes.

Les différentes découpes sont réalisées dans des chutes de papiers imprimés ou de cardstock une fois toutes les pages confectionnées !

J'aime énormément ce set de die “happiness-phrases” juste idéal pour un album estival. Les mots très fins se découpent très facilement avec la plaque de précision ! Un outil que je recommande vivement ! Collez ensuite vos mots avec de la colle liquide.

Le texte “be happy” fait double usage ! Vous pouvez utiliser les lettres comme le bloc avec les lettres évidées :)

Pas de mini d'été sans feuillage, voici une découpe ton sur ton dans une chute de cardstock vert eau.

Voici maintenant quelques visuels pour vous donner envie de tester tout cela !

Bonne journée

Karine

Sunday, 30 August 2015

"Carefree Holidays" Layout by gerry van gent

Happy Sunday Sizzix friends!

Hope you are all well and enjoying the weekend with your loved ones. 
For my post today I prepared a layout where I am combining
fussy cut flowers with gorgeous Sizzix dies.

660515 Sizzix Big Shot Plus Starter Kit
660159 Sizzix Paper Punch Large Butterfly
660500 Sizzix Thinlits Die Set Intricate Tribal Florals
660220 Sizzix Thinlits Die Set Mixed Media
659573 Sizzix Sizzlits Decorative Strip Die Spring Greenery
*          *          * 

Two of the butterflies have 4 layers of punched butterflies.


Instead of masking I used one of the Mixed Media dies to decorate the background.
I simply die cut it 4 times and adhered pieces behind the photos.

One small piece was used in the middle of the stamped circle.


OTHER PRODUCTS I USED:
Graphic 45 pattern papers
KaiserCraft pattern papers
The Scrapbook Diaries clear stamps
Glitz Design Giant rhinestone 
*        *        *

Thank you for visiting us today!
Have a creative Sunday!

Wednesday, 12 August 2015

The nicest sandwich box


Hi everybody!

Now in summer is fancy eating fresh sandwiches, and why can't be prepared in a nice way?


I created a tiny box-packaging to put our favorite sandwich and eat in a fun way (I'm using one of the free Sizzix printable you can have subscribing to the newsletter). 

Here you have a step by step tutorial.
Here's the nicest box for you summer favorite sandwich (mine is with seed bread, ham, goat cheese and tomato)


This sandwich and some lemon ice tea is perfect for a summer evening


And if you want to do your own and nice sandwich box, here is a printable template


This are the Sizzix products used in this project:

Be Happy!!

-----------------------

¡Hola a todo el mundo!

Ahora en verano es de lujo comer sándwichs fresquitos ¿y por qué no se pueden preparar de una manera bonita?

He creado una pequeña caja-packaging muy cuqui para poner nuestro sándwich favorito y poderlo comer de una manera divertida (estoy usando uno de los imprimibles gratuitos de Sizzix que puedes tener si estas suscrito al newsletter).

Arriba tienes un tutorial paso a paso

Tinenes una cajita bonita para tu sándwich veraniego favorito (el mío es con pan de semillas, jamón york, queso de cabra y tomate)

Este sándwich y un poco de té helado de limón es perfecto para una tarde de verano

Y si quieres hacer tu propia y bonita caja de sándwich, tienes una plantilla para imprimir.

Estos son los productos Sizzix que he usado en este proyecto:

Sed muy felices!!


Saturday, 8 August 2015

A vintage bounting for Summer Time


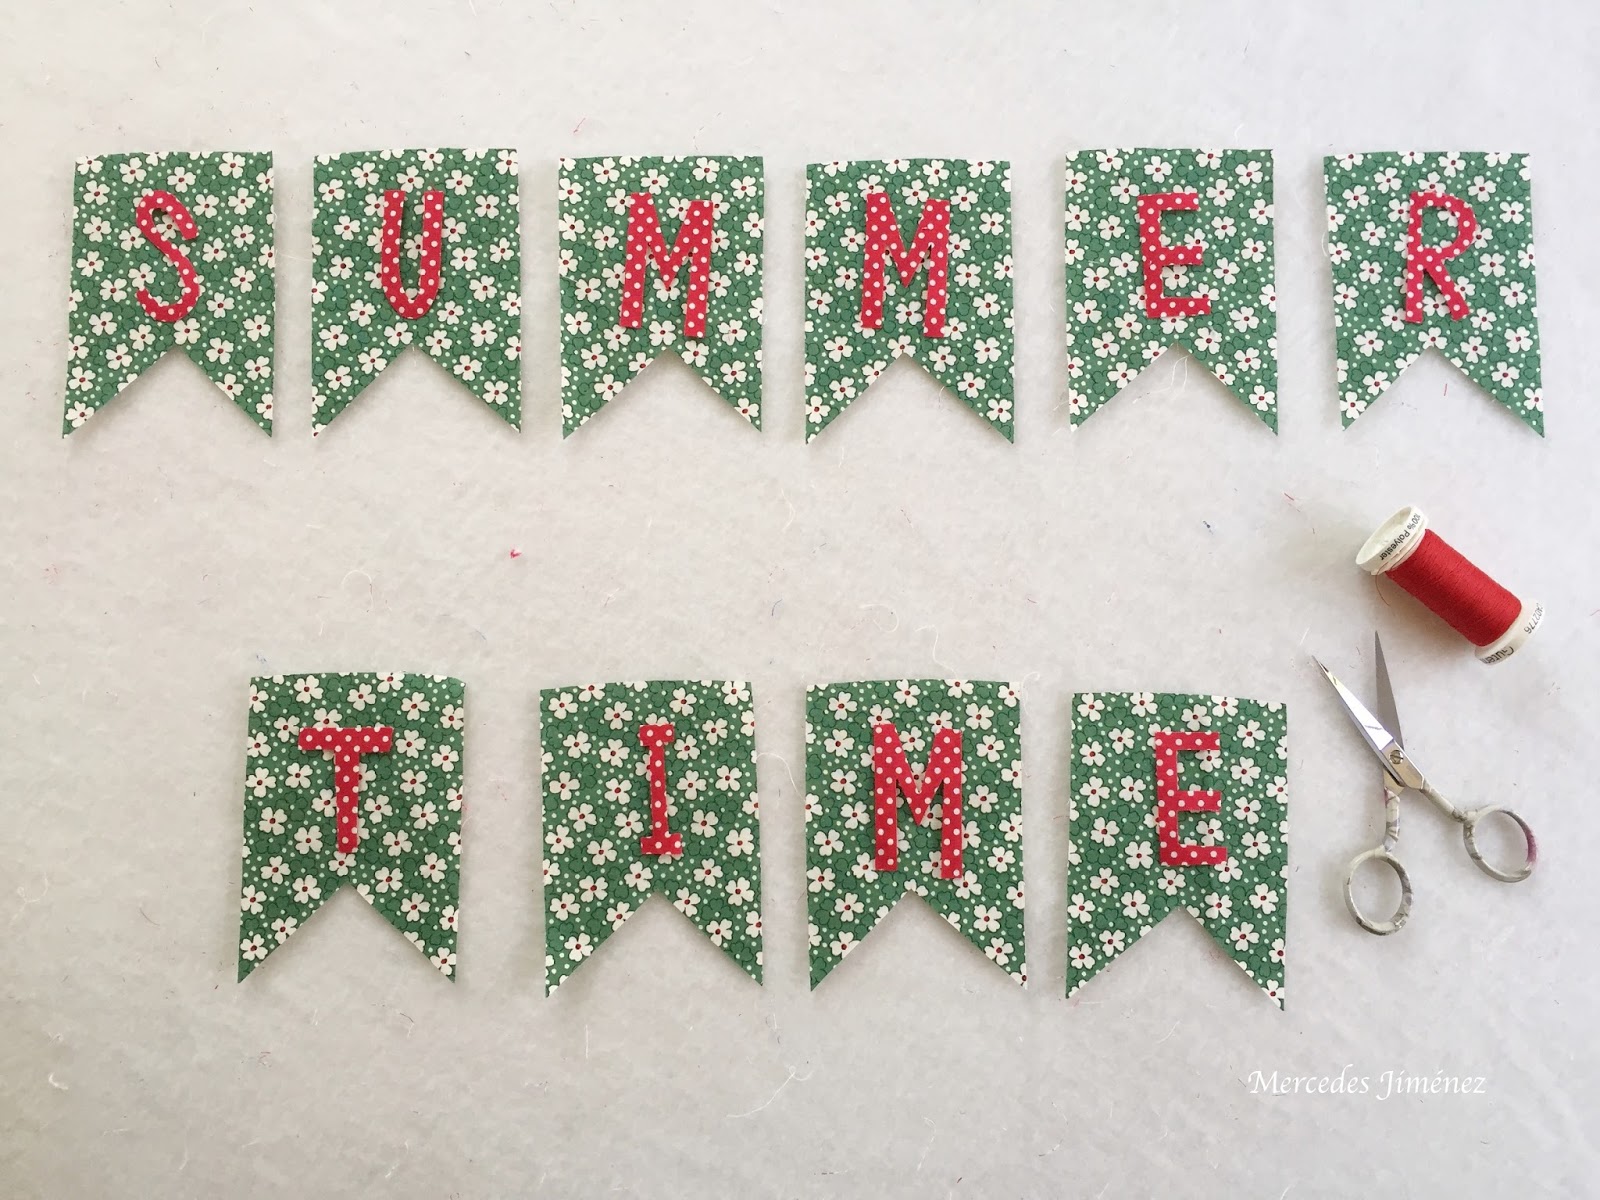
Hi everyone! How is going your summer ? Great and creative ? Of course mine is full of free time to enjoy with my Sizzix dies and  trying a new project. Today I come with a Summer Bounting , although I could say this one finally  looks like a Christmas project in July, lol.

Well, I wanted to sew some decorations for home or even our caravan, and here it is. I love bounting and I used some Sizzix Dies.


This is a very easy protect.
Supplies :
98" bias ( mine is bought)
98" pom poms ribbon
Fabric for your letters
Fabric printed  for your banner  and fabric backing
Double side fusible web 
Thread for applique


First you must to iron  your fusible web as instructions are said for yours on the wrong side of the fabric.  Cut out each letter with the alphabet dies
Them cut out ten banners top, and back ( 10 each one ) I cut out the hearts too for using in other opportunity.
Press your letters on the printed banner and sew around  with straight stitches mating the same color thread.


Now you have all the letters sewn.


Lay the backing fabric wrong side together and sew around too with the same color thread you used. 


Finally add the pom poms and bias. I sew all together at the same time. 
And you have do it !!!


I have to say I love inside my caravan  giving some vintage style as I like. 


Now , it matches with the cute vintage caravan kitchen cloth I showed before.


 I am enjoying it in my patio   too   and getting  a summer decoration  with the Vintage Dresden Table Topper  and my Easter basket  . Just go there  if you want to see the tutorials.


Hope you are having fantastic holidays!
Have a good weekend!
See you in two weeks with something new!
Love
Mercedes

............................................................**********************...........................................................


¡Hola a todo el mundo! ¿ Qué tal está  yendo el verano? ¿ Está siendo estupendo y creativo? El mío desde luego y sobre todo disfrutando con los troqueles de Sizzix y probando cosas nuevas.
Hoy os traigo un banderín de verano aunque bien podría decir que se trata de un proyecto de navidad en julio, por los colores , ¿ verdad ?

Hacía tiempo que quería una de estas decoraciones para casa o incluso para nuestra caravana y aquí está por fin. ¡Me encantan los banderines y además he usado los troqueles así que objetivo cubierto!

Este proyecto muy fácil de hacer lleva los siguientes materiales:

2.50 m de bies ( el mío es comprado)
2.50 m de cinta de pom pom
Tela para las letras
Tela estampada para cada banderín y otra lisa para la trasera de cada uno.
Entretela termo adhesiva de doble cara  para aplicar las letras.
Hilo para la aplicación del color de la tela de cada una de ellas.


Lo primero es  planchar el termo adhesivo por el revés como indiquen las instrucciones. Cortar cada letra con la Big Shot y los troqueles.
Luego cortar cada banderín  y sus traseras ( 10 de cada uno).
He aprovechado también para dejar unos corazones cortados que ya usaré en otra ocasión. 
Planchar las letras centradas sobre el top del banderín y coser con puntada recta alrededor. Mirando las fotos te haces una idea.

Coloca debajo la trasera del banderín , revés con revés y cose alrededor también con el mismo hilo y clase de puntada.
Finalmente añade  el bies y el pompón , cosidos a la misma vez ¡ Y ya lo tienes!

Tengo que decir que me encanta dentro de la caravana y que le da el estilo vintage que yo quería.
Además hace  juego conel tapete vintage de caravana que os enseñé no hace mucho.

También va genial  en el patio dando una decoración veraniega y vintage junto con el tapete dresden y la cesta que hice en Pascua y que ahora tengo de macetero.


Espero que estés teniendo unas estupendas vacaciones.
Que pases un buen fin de semana y nos vemos en quince días.
Cariños
Mercedes