Showing posts with label border. Show all posts

Wednesday, 8 January 2014

Simple Card


Hi All!

Daria is here. And today I would like to show you a simple but beauty card. I used two dies which helped me to create my card more interesting.

Items:
Big Shot Machine (657900)
Sizzix On the Edge Die - Distressed Doily (657496)
Sizzix Sizzlits Decorative Strip Die - Flower Garden w/Scallops (657708)


Have a nice day!

Daria.

Всем привет!

Сегодня я с очень простой, но милой открыткой, которую можно подарить по любому поводу, если сделать соответствующую надпись. Для создания этой открытки мне понадобилось 2 ножа и немного бумаги.

Материалы Sizzix:
Big Shot Machine (657900)
Sizzix On the Edge Die - Distressed Doily (657496)
Sizzix Sizzlits Decorative Strip Die - Flower Garden w/Scallops (657708)

Всем хорошего дня!

Дарья.

Tuesday, 10 September 2013

Happy birthday


Hi Everyone
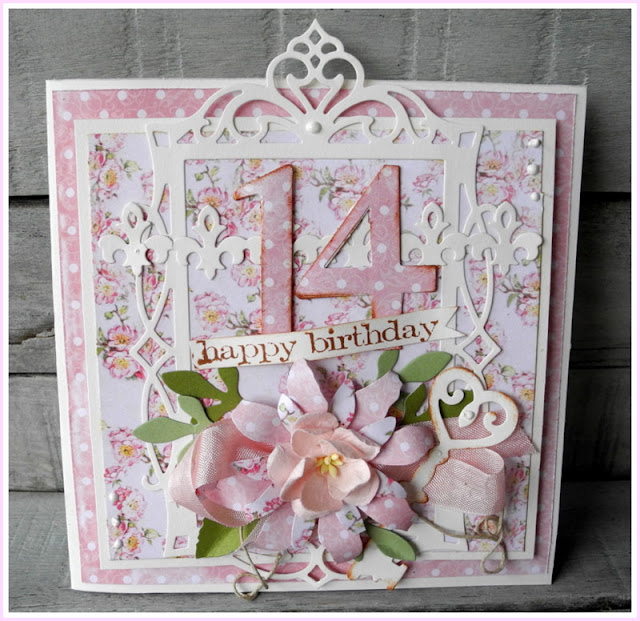
Now  it's Tuesday again. Today i will show you a birthday card using a lots of the beautiful Sizzix dies

Items used:
Sizzix Bigz Flower-black eyed Susan ( 658422)
Sizzix Bigz Gullian ( 658529)
Sizzix bigz Alphabeth set Serif Essentials Numbers 2 dies ( 656616)
Frame fancy rectangle ( 658948)
Sizzix thinlits Leaves garden by Susan Garden ( 658413)
Sixxiz thinlits dies set  Border, Label,medallion,Key ( 658953)
Supply list:
Paper: Inkido-Beautiful Memories-, off White cardstock
Stamp: Stampers Anonymous- simple saying- Tim Holtz Collection
Ink: Distress ink - Vintage Photo- 
Flower, Pountura paint - white- and ribbon
How to make:
1. Make a cardbase 14,5x14,5 cm using off white cardstock
2. Cut out patterned paper 14x14 cm and glue to the center of the card base
3.Cut out off white cardstock 13,5x13,5 cm and one in patterned paper 12x 12 cm, glue to the center of the card base
4.Die cut the different sorts of Sizzix dies and decorate the card


I hope it gave  you some inspiration, wish you a great week
See you next Tuesday
Pia
Hej igen
Så er det allerede tirsdag igen. I dag vil jeg vise et fødselsdags kort hvor jeg har brugt mange af de skønne Sizzix dies
Dies jeg har brugt:
Sizzix Bigz Flower-black eyed Susan ( 658422)
Sizzix Bigz Gullian ( 658529)
Sizzix bigz Alphabeth set Serif Essentials Numbers 2 dies ( 656616)
Frame fancy rectangle ( 658948)
Sizzix thinlits Leaves garden by Susan Garden ( 658413)
Sixxiz thinlits dies set  Border, Label,medallion,Key ( 658953)
Andre materialer:
Papir: Inkido-Beautiful Memories-, off White karton
Stempler: Stampers Anonymous- simple saying- Tim Holtz Collection
Ink: Distress ink - Vintage Photo- 
Blomst, Pountura paint - white- og forskellige bånd
1. lav en kort base14,5x14,5 cm ved at bruge off white karton
2. skær i mønstret papirpaper 14x14 cm og lim til midten af kort basen
3.Skær ud  off white karton 13,5x13,5 cm og et stykke mønstret papir12x 12 cm, lim til midten af kortet
4.Udstands de forskellige Sizzix dies og dekorer kortet
Jeg håber dette gav dig lidt inspiration. Ønsker dig en dejlig uge
Vi ses næste tirsdag
Pia

Sunday, 19 May 2013

Frames, flowers and leaves


Hello!

Here is a new layout made by me. I hope you like it.
Sizzix makes some wonderful frame dies and I have used two on top of each other for this page.


You can see both frames here. I have stamped the background.


The leaves are from the Card Edges die. I have cut it to pieces to fit the flowers.


And the butterfly is from the new starter kit.


Products used:

657413 Sizzix Sizzlits Decorative Strip Die – Vintage Lace Edging

Have a wonderful week! See you next Sunday!

Camilla

***********************************


Hej!

Här kommer en ny layout från mig. Jag hoppas att du gillar den.
Sizzix gör verkligen fina ramdies och jag har använt två uppe på varandra på denna layout. 
Du kan se båda två på den första närbilden.
Jag har stämplat på bakgrundspappret.
Bladen är från Card Edges die. Jag har klippt den i bitar för att få bladen att passa till blommorna.
Och fjärilen är från det nya Starter kit.

Products used:

657413 Sizzix Sizzlits Decorative Strip Die – Vintage Lace Edging


Ha en fantastisk vecka! Vi ses nästa söndag!

Camilla

Wednesday, 15 May 2013

Cases for Phones


Hi all!

Daria is here.

Recently, I bought a new cell phone. I love handmade  things. So I decided to make case for my phone by myself. And Sizzix dies helped me to decorate it.

Items used:
Big Shot Machine (655268)
Sizzix Originals Die - Hearts, Primitive #3 (657021)
Sizzix Bigz Die - Flower Layers & Leaves (657690)
Cotton Fabric
Felt
Buttons

This is case for my phone. I used Hearts, Primitive #3 die to decorate it.

And this is case for my little daughter's phone. I used Flower Layers & Leaves and  Borders & Hydrangeas  dies to decorate it.
 
Have a nice day!

Daria.

Всем привет!
Сегодня я с двумя чехольчиками для телефонов. Недавно я купила себе новый телефон, и мне для него понадобился чехол. И я подумала, а почему бы мне сшить его самой. А когда дочка увидела мой чехольчик, она захотела, чтобы я сшила и ей тоже. И вот что у меня получилось.

Для декорирования я использовала вот эти ножи Sizzix:
Big Shot Machine (655268)
Sizzix Originals Die - Hearts, Primitive #3 (657021)
Sizzix Bigz Die - Flower Layers & Leaves (657690)
Sizzix Bigz Die - Borders & Hydrangeas (657721)

Так же мне понадобились:
- ткань хлопок;
- фетр;
- разные пуговицы;
- синтепон (для моего чехла)

Всем хорошего дня.

Дарья.

Tuesday, 2 April 2013

Vintage card


Hello Sizzix friends
I hope you all had a Happy Easter. Today I will show you a card.
Items used:
Supply list:
Paper: Prima-Divine 6x6 paper pad, off white and green cardstock
Ink: Archival ink-Coffee- from Ranger
Prima's -Say it in crystals-
half pearls, 3D foam
How to make:
1.Cut out off white cardstock 14,5x 29 cm, fold in half to create a base card of 14,5x14,5 cm
2. Cut out patterned paper 14x14 cm, glue it to the center of the card.
3. Die cut the frame using border ,label,medallion & key( 658953) ,die cut again using Sizzix ovals (658567)
4. Die cut some flowers using  flowers,lovely(658291)
5.Distress the edges using Archival ink.
6. Glue the frame to the card using 3 D foam
7. Decorate using half pearls and prima's crystals , banner is cut out of Prima's Divine paper 


Thanks for stopping by, Wish you a nice day
Pia
Hej alle Sizzix venner
Jeg håber i alle har haft en god påske. I dag vil jeg vise et kort jeg har lavet
Dies jeg har brugt:
Sizzix Ovals ( 658567)
Andre materialer:
Papir: Prima-Divine 6x6 paper pad, off white and green cardstock
sværte: Archival ink-Coffee- from Ranger
Prima's -Say it in crystals-halv perler, 3D puder
Sådan gør du:
1.Skær ud off white cardstock 14,5x 29 cm, fold på midten så du får en kort base på  14,5x14,5 cm
2. Skær ud i mønstret  papir 14x14 cm, lim til midten af kortet
3. skær rammen ud ved at bruge border ,label,medallion & key( 658953) ,skær igen ved at bruge Sizzix ovals (658567)
4. Skær blomster ud ved at bruge flowers,lovely(658291)
5.Distress the edges using Archival ink.
6. Lim rammen på kortet ved at bruge 3 D puder
7. Dekorer med halv perler og prima's crystals , banner er klippet ud af Prima's Divine papiret
Tak fordi du kiggede forbi, vi ses næste tirsdag
Du må have en dejlig dag
Pia


Tuesday, 26 February 2013

Saying THANK YOU!


Hello everyone!
Today is my last day of posting on this gorgeous blog, but you won't get rid of me that easily! :)
It's been an incredible year creating and blogging for Sizzix and I can't thank them enough for the trust and kindness - it's been fantastic working for them the last year!

But I won't stop using Sizzix products, of course, how can I?

You'll be able to find my layouts, mini albums and cards made with the latest Sizzix products on my blog : www.celinenavarro.com 

In the meantime, here are some cards I made during Stitches, where I was demoing for Sizzix  such a fun and great experience!

Here's a list of products I used for these cards : 


I hope you will like those! :)
Feel free to visit my blog for more Sizzix projects in the upcoming days, weeks and months :)

Thank you again for making this place such a happy and creative one :)

Yours,
Céline

Thursday, 21 February 2013

Love cards from Janna Werner


Hello everyone, my name is Janna Werner. I am a 34 year old full-time artist from Germany and this is my first post on the Sizzix blog. I am very excited to be here and hope to inspire you with my modern-experimental (scrapbooking) style.

Today I´d like to share three cards that I created with patterned paper and emebellishments from Crate Paper, as well as with some of my favorite Sizzix dies.


supply list:
655268 Sizzix Big Shot machine
656624 Sizzix On The Edge Die - Scrollwork
656638 Sizzix Bigz Die - Heart Wings
656641 Sizzix  Movers & Shapers Die - Ornamental
657188 Sizzix Bigz Die - Tiny Tabs & Tags
paper: Crate Paper
embellishments: Crate Paper
other: sewing machine, adhesive, white Cardstock (American Crafts)


Here you can see each of the cards:

On this card I used the Heart Wings and the Tiny Tabs & Tags dies, definitely two of my favorite dies. Instead of using the posisitve of the Heart Wings die, I took the negative shape and adhered a piece of patterned paper in the back.

For this card I used the Movers & Shapers Die - Ornamental, cut it in two part and put those on top of each other, using a sewing machine to adhere them.

The last card was made by using the On The Edge Die - Scrollwork and, again, adding stitching for highlightening that part.

Have a great and crafty day, everyone!
Janna

******

Hallo ihr Lieben! Mein Name ist Janna Werner, ich bin eine 34jährige Vollzeit-Künstlerin aus Deutschland. Dies ist mein erster Post auf dem Sizzix Blog. Ich freue mich sehr, hier zu sein und hoffe, euch auf die eine oder andere Weise mit meinem modern-experimentellen (Scrapbooking) Stil inspirieren zu können.

Heute möchte ich euch drei Karten zeigen, die ich mit Patterned Paper und Embellishments von Crate Paper und einige meiner Lieblingsdies von Sizzix hergestellt habe.

Materialliste:
655268 Sizzix Big Shot machine
656624 Sizzix On The Edge Die - Scrollwork
656638 Sizzix Bigz Die - Heart Wings
656641 Sizzix  Movers & Shapers Die - Ornamental
657188 Sizzix Bigz Die - Tiny Tabs & Tags
Papier: Crate Paper
Embellishments: Crate Paper
Anderes: Nähmaschine, Kleber, weißer Cardstock (American Crafts)

Oben seht ihr die drei Karten. Bei der ersten Karte habe ich die Heart Wings und Tiny Tabs & Tags Dies verwendet. Unbedingt zwei meiner liebsten Dies. Anstatt das Positiv der Heart Wings Die zu nutzen, habe ich die negative Form genommen und ein Stück Patterned Paper dahinter befestigt.

Für die zweite Karte habe ich die Movers & Shapers - Ornamental Die verwendet. Die Form habe ich in zwei Teile geschnitten, aufeinandergelegt und dann mithilfe der Nähmaschine befestigt.

Die letzte Karte ist mit der On The Edge - Scrollwork Die entstanden. Auch hier habe ich die Nähmaschine eingesetzt, um die Teile zu befestigen und zu highlighten.


Habt einen schönen Tag!
Janna


Wednesday, 30 January 2013

Small Mixed-Media Love-Notebook


Hi!

I love to create a mixed-media projects, and thus work with paints, stamps, spray, stencils, etc. And Sizzix helps me to create interesting backgrounds. Also I often use the resulting figures as key elements of collage. This is very convenient, because I do not need to suffer and cut with scissors.

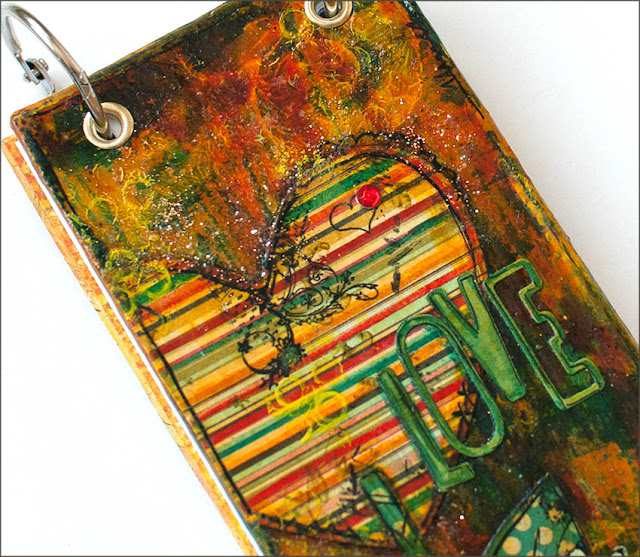
So today I want to show you a small notebook, which was made with mixed-media techniques.

Items used:
Craft paper
My Mind's Eye paper – Stella&Rose (6x6 pad)
Acrylic Paint – Yellow, Turquoise
Decoupage Glue – Art Potch
Adirondack Color Wash – Sunset Orange
Glitter Making Memory – Buttercup
Crystals
Different Stamps and Rub-Ons

1. I used the Curly die to make more textural background. I cut out of the paper curl, and then used it as a mask with yellow paint.

2. I sprinkled orange spray and smeared it across the collage to change a shade. And then I used the spray to created drips.

3. I cut a flower-heart using Heart, Stem & Leaves  die.

4. I glued the parts of the flower-heart on the collage with decoupage glue.

5. Then I added shadows using paints and a permanent marker. Then I added decorative elements (rub-ons, stamps).
6. I cut a text using Inside Out die. Then I glued it using decoupage glue.
7. I covered the entire surface of the collage by decoupage glue, added glitter around the heart and in the middle of the flowers.

And notebook cover is ready. The notebook size is 6.5x15,5 cm.

Have a nice day,

Daria.

Всем привет! 

Я очень люблю создавать миксд-медиа проекты, а значит работать с красками, штампами, спреями, трафаретами и т.д. И продукция Sizzix очень часто помогает мне создать интересные фоны (например, я использую получившиеся вырубки в качестве масок). Так же я часто использую получившиеся фигуры в качестве основных элементов коллажа. Это очень удобно, т.к. не нужно мучиться и вырезать ножницами.


Итак, сегодня я хочу показать вам небольшой блокнот, у которого обложка сделана в коллажной технике.

Материалы:
Крафт-бумага
Бумага My Mind's Eye – коллекция Stella&Rose (набор 15*15 см)
Акриловая краска – желтая и бирюзовая
Декупажный клей – Art Potch
Спрей Adirondack Color Wash – цвет Sunset Orange
Глиттер Making Memory – цвет Buttercup
Стразы
Различные штампы и натирки

  1. Для придания большей фактурности фону я использовала нож с завитками. Для этого вырезала из бумаги завиток, а затем использовала его как маску с желтой краской.
  2. Побрызгала оранжевым спреем и размазала его по поверхности коллажа, чтобы изменить немного оттенок. А затем этим же спреем создала потеки.
  3. С помощью ножа вырезала цветок-сердце, подбирая бумажки, подходящие под цвет фона. Сердце из одной бумаги, стебель и листья из другой.
  4. С помощью декупажного клея, приклеила детали цветка-сердца. От декупажного клея спрей может размазаться, поэтому наносим клей аккуратно. И даже если он размажется и попадет на ваш цветок, то ничего страшного в этом нет. Цветок просто еще лучше впишется в общую цветовую гамму коллажа.
  5. Добавила тени с помощью краски, обрисовала контуры тонким перманентным маркером. Добавила декоративные элементы (такие как штампы и натирки).
  6. Вырезала надпись, используя нож с алфавитом, и приклеила ее на декупажный клей.
  7. Промазала всю поверхность коллажа клеем. Добавила глиттер вокруг сердечка и в серединки цветочков. Дождалась пока всё высохнет и обвела буквы.

Обложка для блокнота готова. Размер блокнота 6,5х15 см.


Хорошего дня!

Дарья.

Tuesday, 15 January 2013

Keep laughing! Layout


Hello everyone!

How are you doing today?!

Here I am with a brand new layout full of wintery colors again! I told you I've been inspired by these color combos lately!

Today, I would like to show you this layout on which I played with two different Sizzix dies, and show you that these dies can be used such as pure embellishments, and bring extra contrasts and texture to your layout!

First of all, this is what you'll need to create this layout : 


Choose the paper you want as a background. Add some mists here and there.

Then cut two strips off of two different patterned papers and glue those two at the top and at the bottom of your background.

Cut your Card Decorative insert die into a double-sided patterned paper : glue the frame and add the inside after turning it upside down - you'll get a full frame with two different designs!


Do the same with the Frame Fancy die and mount it with 3D foam tabs.

 
Add some embellishments here and there, still sticking to the same color combo.


Hope you liked it!
Take care
Céline