Showing posts with label Framelits Die - Circles. Show all posts

Wednesday, 4 November 2015

Do you want to build a snowman?


If you have a child or grandchild of a certain age you will immediately recognise the title of this blog as the title of a song from the movie Frozen which to which I know all the words which have seeped in through osmosis over time.

I realised that it has been some time since I made any cards with my beloved Framelits circle dies which are always popular whenever I take them to a demonstration or workshop because it shows what can be achieved using the simplest shape and a sprinkling of imaginative fairy dust!

Most of these cards feature complete circles but below is a diagram which shows how to unlock the creative potential of circle dies by simply placing the die back onto a die-cut circle to create two separate shapes namely a crescent and leaf. By clever positioning the die you can create thin or fat leaves and crescents depending on what you need for any particular project.


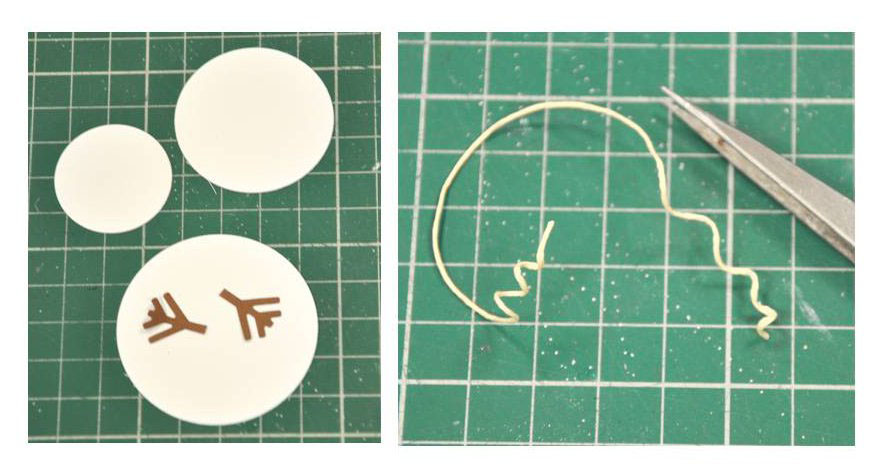
Let's get on to the fun stuff! I have combined two sets of Framelits circles to give me a little more choice, the only other die used in this project is a is a snowflake from the fabulous Thinlits Paper Snowflakes Set by Tim Holtz. I started by die-cutting two white circles and a brown snowflake.


 Next, I stamped a sentiment onto a strip of cream card before tearing along both edges. I am using a stamp set from my stash and I haven't got a clue where it comes from, believe me, I've trawled the Internet to try and find it but the good news is that there are many similar options available!

After adding the stamped strip to the top of my kraft base card I attached the larger circle in the bottom right hand corner before trimming away the over hang with a craft knife. Next I added the smaller circle using adhesive foam pads before adding a triangle of orange card cut with a pair of scissors. Can you see where this is going?


 I used my scissors to cut a couple of asymmetric strips of red spotty card (Double Dot by BoBunny) before snipping into the ends to represent the tassells on a scarf. 

Remember our die-cut snowflake? I cut away two pieces to represent the snowman's arms before gently curling both halves of the scarf to add a little dimension.


 Here is the finished card complete with a few black adhesive pearl gems strategically placed to create the eyes,mouth and buttons. Really simple but great fun!


I have been using the Framelits Holiday Knit die set quite a bit lately and today I am using it to create a stencil. I then die-cut a blue circle before cropping it using a larger Framelits circle die. I cut a couple of asymmetric rectangles of the same blue card for 'sleeves' before applying white gesso through my home made stencil using a sponge applicator.


I die-cut a white circle for the head before adding the nose and eyes as before and I used my scissors to cut a tiny tag, accuracy isn't important for this! I punched a hole in the tag, threaded it with twine and attached a red die-cut heart.


This is the final card. The background was decorated with white gesso applied through the Tim Holtz Speckles stencil and  I added the stamped sentiment near the top before assembling my snowman using the 'Snowflake' hands.


For the next card I started by die-cutting two circles to make the head and body of the snowman. To create the mouth I used the technique outlined at the start of the post. The result is this small brown crescent.


 I attached the snowman to the bottom of my base card (there is a blue strip added in the final card OOPS!) and cut a strip of blue spotty card to make the scarf. I used my tweezers to add folds to the scarf before applying under the snowman's chin.

For the sentiment I used this alphabet stamp set (Hobbycraft if I remember!) stamping onto Kraft card.


You can see where I added the blue strip before mounting the snowman. I trimmed the words to size before attaching to the base card using adhesive foam pads.

The finishing touch is the white die-cut snowflake taken from one of my all-time favourite Decorative Strip dies namely Winter Elements by my good buddy, and fellow Christmas baby Paula Pascual.


Last but not least I die-cut three different white circles and a pair of snowflake arms before assembling my snowman. I then cut a length of thin twine and curled both ends by wrapping them around my tweezers.


I added the twine to the snowman with a glue gun before die-cutting a selection of tiny stars using a Christmas Stocking die from Debi Potter's Festive Paper Arts Range. To create the mouth I made a die-cut crescent and cut away a small rectangle which when added to the die-cut snowman looks like a lone tooth!


Here is the finished card with the stars added to the twine forming a festive garland. The background is simply two stamps creating a pattern by stamping repeatedly with pale colours.


I had so much fun making these cards and if you like them I may make a few more for next weeks blog. Sadly I ran out of time before running out of ideas, I wish every day could be like that!


Tuesday, 1 September 2015

Back to school with Sizzix


Welcome back Crafter!
How was your holiday ??

I'm ready for a new year to spend among paper, scissors, glue, big shot and a lot of new punches to try.

Today I want to share with you a project I'm working on my brand, but you can also make your own if you have a good manual.

My daughter Eleonora always complains that his copybooks for school does not like, does not like the cover, designs, patterns, and then I tried to revisit them, adding some applications and creating various shapes with dies.


NECESSARY:
- a copybook
- color cardstock
- pencil
- white pencil
- marker pen
- ruler
- stick glue
- scissors
- paper puncher (different sizes)


I enjoyed a lot!
You can try to move the eyes of the image in different directions and you will realize how many different animals can give life to your copybook.


And now create!
next Tuesday with a new project!
Manuela 
Pasticci di Carta


*per i lettori italiani*

Bentornati crafter!
Come sono andate le vacanze??
Io sono pronta e carica per un nuovo anno in mezzo a carta, forbici, colla, big shot e tantissime nuove fustelle da provare.

Oggi voglio condividere con voi un progetto su cui sto lavorando per il mio brand, ma che potete realizzare anche da soli se avete una buona manualità.

Mia figlia Eleonora si lamenta sempre che suoi quaderni per la scuola non le piacciono, non le piace la copertina, i disegni, le fantasie, e allora ho provato a rivisitare il suo quaderno, aggiungendo qualche applicazione e creando varie forme con le fustelle.

Mi sono divertita tantissimo!
Provate anche a voi a muovere gli occhi dell'immagine in diverse direzioni e vi accorgerete di quanti animali differenti possono dare vita al quaderno.

E adesso sbizzarritevi!

OCCORRENTE:
- un quaderno
- cartoncino colorato
- matita
- matita bianca
- tratto pen
- righello
- colla stick
- forbici
- perforatore per carta (varie misure)


al prossimo martedì con un nuovo progetto!
Manuela
Pasticci di carta


Tuesday, 23 June 2015

lovely jar


Hi crafter!

In these summer days, I'm enjoying a lot to fill and empty jars, especially the glass ones.
I love decorating them and give a touch of originality, using paper, wires and colours.
So even a messy person like me can find an order nice to see ... and to create!


The decorations on glass jars are also ideas for a wedding, as wedding favor, place cards or small gifts.

So,let's start working!
Every thing will have its tag!

NECESSARY:


Cardstock or paper scrap (black or grey)
Tissue paper
Scissors
Stick glue
Scotch bi-adhesive
Glass jar
Twinery
White pencil

Have a lovely day
Manuela
Pasticci di carta


*per i lettori italiani*
Ciao crafter!

In questi primi giorni d'estate mi diverto molto a riempire e svuotare barattoli, specialmente quelli di vetro.
Amo decorarli e dargli un tocco di originalità, usando carta, fili e colori.
Così anche una disordinata come me riesce a trovare un ordine bello da vedere..e da creare!

Le decorazioni sui barattoli di vetro sono anche idee per un matrimonio, come bomboniera, segnaposto o piccolo regalo.

Allora tutti all'opera
Ad ogni cosa la sua targhetta Sizzix!

OCCORRENTE:
Cartoncini o carta scrap (nera o grigia)
Carta velina
Forbici
Colla stick
Scotch biadesivo
Barattolo di vetro
Filo bicolore
Matita bianca

A presto!
Manuela
Pasticci di carta


Wednesday, 3 June 2015

Foxy Lady!


I am a big fan of the late, great Jimi Hendrix and I am particularly fond of the song Foxy Lady which I once played in a band 'back in the day!'

The song was used to good effect in the movie Wayne's World in a scene which never fails to make my wife and I laugh. With that in mind I thought I'd create a card in her honour.

I have made a few animal cards using the hearts dies alone and I couldn't come up with a convincing fox until I turned my attention to my beloved Framelits Circle dies. My circles are made up from two sets as well as a couple from the Big Shot starter kit so I've got about 14 different sizes to choose from, don't worry, you won't need that many today!

I'm using a rusty orange bazzill card and some plain ivory/cream card to make my fox and to make it a little easier for the instructions I will refer to the circles dies in sizes from 1 to 10. One being the smallest and ten the largest just to give you a better idea

I drew two lines perpendicular to one another on a square of the orange card and placed a circle die (4) as shown before cutting. This will be reversed and used as the foxes face.

 Next, I used a larger circle die (8) and cut away each side of the foxes face as indicated by the white dashed lines below.
Once the orange face was trimmed to size I used the same (4) circle die to cut an ivory circle and attached the face over the top.


To Make the ears I die-cut an orange (7) and ivory (4) circle before placing the same dies back onto the die-cuts thereby cutting two leaf shapes which I matted together before cutting in half using my scissors. Keep the rest of the orange circle as you can use it for the body later.

At this point I thought it best to reach for one of my scalloped Framelits (2) and I die-cut a scalloped circle from ivory card before attaching it to a square of Orange card. I placed my Circle die (4) onto the card as shown and die-cut the circle. Next, I placed the same die onto the circle and cut as shown to create the tail. Now I have all my bits I can start putting them together. I attached the ears behind the head before adding three black adhesive pearls to the face for the eyes and nose.

And here she is! I added a rectangle of patterned paper at the back and created the text using a trusty old Dymo. In truth there are several ways of composing the body/head/tail combo, I just like the graphic simplicity of this one 


Wednesday, 18 February 2015

Having fun with Balsa wood!


Hi everybody!

Have you ever wondered how you can die cut wood with Big Shot?

Today I want to tell how I like to do; I use balsa wood with Bigz dies. But there’s another surprise: also is possible to texture it with the embossing folders with fantastic results (And I love that!).


With all of this, I created three handmade cards that can be used on many occasions. Want to know how I done?


First I created a background with the Distress Ink and water technique you’ve often seen, but in this occasion I’m using Archival Ink, and alcohol.

I'm using the Bigz die with Texture Fades Buttterfly duo, it's beautiful! And in this case (the card in the center) I'm applying Rusty Hinge Distress Ink and Mustard Seed Distress Stickles.

Some details of my die cut balsa wood cards 

As you saw in the step by step, Sizzix products I'm using in this projects are:


be happy!!

---------------

hola a todas/os!

¿Te has preguntado alguna vez cómo se puede troquelar madera con la Big Shot?

Hoy quiero contaros cómo me gusta hacerlo a mi; yo uso la madera de balsa con los troqueles Bigz. Pero hay otra sorpresa: también es posible darle textura con las carpetas de embossing con resultados fantásticos (y me encanta eso!). 

Con todo esto, he diseñado tres tarjetas que se pueden utilizar en muchas ocasiones ¿Quieres saber como las he hecho?

Primero he creado un fondo con la técnica que muchas veces habrás visto hacer con las tintas distress y agua, pero esta vez usando tinta Archival y alcohol.

He usado el troquel Bigz con carpeta de embossing Buttterfly duo, que es precioso! Y en este caso (para la tarjeta del centro) le he aplicado tinta Distress Rusty Hinge y Distress Stickies Mustard Seed.

Como habéis visto en el paso a paso, los productos Sizzix utilizados para este proyecto son:


Sed muy felices!!