Showing posts with label gold. Show all posts

Friday, 30 October 2015

50th wedding anniversary card


Hi Sizzix friends!!!

Some days ago a couple celebrated their 50th wedding anniversary. It’s an important milestone in their lives that they wanted to celebrate so I created a greeting card with an inside pocket for the present.


I’ve played with white and gold colour because in my country this anniversary is called “the gold wedding” and of course with lots of Sizzix dies !!!


It’s a big card sized 13,5 x 19,5 cm. To create it I’ve used the round circles Framelits, the leaves 660821 and 660822, Heartfelt and the Alphanumeric Thinlits. For the background I’ve used the embossing folder Plus Happy Texture.


Some pictures of the details with some explanations:


First I’ve die-cut the circle on the background white cardstock (that is 5mm smaller than the card size) creating a round hole on the cardstock and then I’ve made the embossment.  


Then I’ve die-cut the round sparkly frame using two sizes of circle dies. The flowery paper is between the card and the white embossed cardstock. 


I’ve die-cut two hearts in white cardstock and then I’ve repeated the same process that I’ve used for the frame to create the rings.


I’ve also die-cut a pair of leaves in white cardstock to give volume.


When you open the card there is a pocket that contains an envelope. To decorate the pocket I’ve die-cut the names of the couple in sparkly paper using the alphanumeric die.

Here are the envelope details:


I’ve die-cut this white heart and made the embossment so I can use it as the closure of the envelope.


I’ve created this envelope using vellum paper. 


Here is the top view of the wedding card I’ve created for the celebration: 


I have used the following Sizzix products:


Other supplies:
  • White cardstock
  • Scrapbooking paper
  • Sparkly paper
  • Vellum paper
  • Gold chipboard numbers
  • Gold string


I hope you have enjoyed this clean and simple wedding anniversary card and that it has given you a bit of inspiration. Thank you for your visit!


Have a creative and happy Friday!


------------------------♥------------------------♥--------------------------♥------------------------

Hola a todos!
Hace unos días una pareja celebraba sus 50 años de casados. Es una fecha muy importante para ellos y querían celebrarlo, así que preparé una tarjeta para felicitarlos con un bolsillo interior donde añadir el regalo.

He jugado con el blanco y el dorado pues se trata de las "Bodas de oro" y, por supuesto, con varios troqueles de Sizzix!!!

Se trata de una tarjeta de 13,5 x 19,5 cm. Para realizarla he utilizado los círculos de  Framelits, las hojas 660821 y 660822, Heartfelt y el Alphanumeric Thinlits. Para el fondo he utilizado la carpeta de embossing Plus Happy Texture.

Algunas imágenes de los detalles y sus explicaciones:
Primero he troquelado un círculo en la cartulina blanca de fondo (que es 5mm más pequeña que la tarjeta) creando un agujero en la cartulina y entonces he realizado el embossing.

Después he troquelado un marco circular papel purpurina utilizando dos medidas de troqueles de círculo. El papel de flores está entre la tarjeta y la cartulina con embossing.
He troquelado dos corazones en cartulina blanca y he repetido el mismo proceso que en el marco anterior para crear los anillos.
He troquelado un par de hojas en cartulina blanca para darle volumen.
Cuando abrimos la tarjeta está el bolsillo que contiene un sobre. Para decorar el bolsillo he troquelado los nombres de la pareja en cartulina de purpurina usando el troquel alphanumeric.
Aquí os muestro algunos detalles del sobre:
He troquelado el corazón en blanco y le he realizado el embossing. Utilizando este elemento como cierre del sobre.
He creado el sobre utilizando papel vegetal.

Y aquí una vista superior de la tarjeta que he creado para esta celebración: 


He utilizado los siguientes productos Sizzix:


Otros materiales:
  • White cardstock
  • Scrapbooking paper
  • Sparkly paper
  • Vellum paper
  • Gold chipboard numbers
  • Gold string

Espero que os haya gustado esta tarjeta "clean and simple y que os sirva de inspiración. ¡Gracias por la visita!

Feliz y creativo viernes

Saturday, 20 June 2015

Gold Glitter and Watercolor Card - perfect for a Wedding


Hello everybody,
it´s time for some pretty wedding cards. :) So many people are going to get married the next months and weeks, so I had to make my first card for this theme. Of course with my die cutting supplies from Sizzix, because it´s so super easy. ;)

So here is my list of supplies for this card:
blank card and white cardstock, gold glitter and watercolors, sentiment stamp


Butterflies, you can never have enought butterflies. ;) And I think they are perfect for wedding themed cards, decoration and gift wrapping. I combined a lot of white with some details in gold glitter with a bit of watercolor on my butterfly. I like that he looks like he want to fly away in the next seconds. :)


Do you like watercoloring? Have you added it to your die cutting projects so far? If not, give it a try. :) Have a nice day, xo Julia

------------------------------------------------------------

Hallo ihr Lieben,
wieder mal ein Kärtchen. Heute für eine Hochzeit oder einen weiteren festlichen Anlass. Meine Big Shot glüht momentan und steht kaum still. Es macht einfach viel zu viel Spaß. :)

Hier die Materialliste für die Karte:
Kartenrohling und weißer Cardstock, Wasserfarben, goldenen Glitter und einen Spruchstempel

Schmetterlinge sind einfach perfekt für so viele Karten oder? Vor allem eben zur Hochzeit machen sie sich super wie ich finde. Egal ob auf Glückwunschkarten, Verpackungen oder der Tischdeko. Schmetterlinge sind eben ein beliebtes Motiv! ;)

Neben dem sehr cleanen Look habe ich mit Wasserfarben und dem Goldglitter der Karte noch einen lieblichen Touch verpasst. Mögt ihr Aquarellfarben auch so gerne wie ich? Nutzt ihr das auf euren Projekten oder eher nicht? Habt einen tollen Tag, xo Julia :)


Wednesday, 3 June 2015

Beautiful fake gold engraved notebook


Hi everybody!

I wanted a notebook with gold engraved texture ... In recent months, I only see gold on kraft, and I love it! But I want a handmade one, my own fake gold engraved notebook


I bought a notebook with kraft cardboard covers, take my Craft Asylum embossing folder (Botany Decoration) and a few more elements (a gold acrylic marker, Archival ink, and a nice stamp), and in a very easy way I could make my exclusive gold and kraft plain notebook.

Here you have a step by step tutorial:


Some details of my beautiful notebook:


I carry it with me everywhere and everyone who sees it is amazed with how lovely it is! Sure you want to do one for you!


This are the Sizzix products used in this project:

Be Happy!

-----------

Hola a todo el mundo!

Yo quería un cuaderno grabado en oro ... En los últimos meses, sólo veo dorado sobre kraft, y me encanta! Pero quiero uno hecho a mano, mi propio cuaderno de falso grabado en oro.

Compré un cuaderno con tapas de cartón kraft, cogí mi carpeta de repujado de Craft Asylum (Botány Decoratión) y algunos elementos más (un rotulador acrílico, tinta Archival y un bonito sello), y de una manera muy fácil he podido hacer mi exclusivo cuaderno de oro grabado en kraft.

Mas arriba tienes un tutorial paso a paso y algunos detalles de mi hermoso cuaderno.
Lo llevo conmigo a todas partes y todo el que lo ve se sorprende con lo bonito que es! Seguro que quieres hacer uno para ti!

Estos son los productos Sizzix usados en este proyecto:

Sed muy felices!!


Wednesday, 18 March 2015

The brightest Butterfly


Hi everybody!

I'm really in love with the Bigz Die with texture fades Butterfly duo! and I want to share with you the brightest butterfly you can do.


I use a double sided foil (in this case a gold and silver one), a kraft cardboard and white glue.

The result is a very bright butterfly, which is also very easy to mold in the position that we like (really great!!)


Here, you have 2 ideas with this bright butterflies. First a beautiful tag:


some details of this tag
And a colorful layout:


here, some details of the layout


The Sizzix products I used


Be Happy!

----------

¡Hola a todo el mundo!

Estoy enamorado del troquel Bigz Die with texture fades Butterfly duo! y quiero compartir con vosotras/os la mariposa más brillante que se puede hacer.

He usado una hoja foil de doble cara (en este caso una oro y plata),  cartulina kraft y cola blanca.

El resultado es una mariposa muy brillante, que también es muy fácil de moldear en la posición que más nos guste (realmente genial!!)

Aquí, tenéis 2 ideas con estas brillantes mariposas.

En primer lugar un bonito tag 

Y una página con mucho color

Los productos Sizzix que he usado:


Sed muy felices!

Wednesday, 25 February 2015

Gold Selfie


Hi Everybody


I love gold! (I like it very much combined with white!)

I love doing tags! And I really love a selfie I did in the Railway Museum a few months ago in Madrid!

And why not put it all together? A gold and white tag with that photo I don’t want to have lost in my mobile phone.


In this step by step you can see how I do it:


The truth is that I love how it looks, has a very distinguished and elegant look, goes wonderful with the photo.

here you can see some beautiful details:
I'm sure that If you choose your favorite selfie and use it in a tag, you’re gonna enjoy it a lot!

As you saw in the step by step, Sizzix products I'm using in this project are:

657900 Sizzix Big Shot machine
656938 Sizzix Movers & Shapers L Die - Tag & Bookplates
660220 Sizzix Thinlits Die Set 4PK - Mixed Media
660815 Sizzix Thinlits Die Set 3PK - Woodland Leaves


Be happy!

----------------

Hola a todo el mundo.

Me encanta el dorado!  (Como mas me gusta es combinado con blanco!)

Me encanta hacer tags! Y me gusta mucho un selfie que me hice en el museo del Ferrocarril de Madrid hace unos meses!

¿Y porque no ponerlo todo junto? Un tag en dorado y blanco con esa foto que no quiero que se quede perdida en mi móvil.

En el  paso a paso puedes ver como lo hago:

La verdad es que me encanta como ha quedado, tiene un aire muy distinguido y elegante, envuelve muy bien esta foto que tanto me gusta.

Estoy seguro que si escogéis vuestro selfie preferido y lo usáis en un tag, lo vais a disfrutar un montón. Anímate!

como podéis ver en el paso a paso, los productos Sizzix que uso en este proyecto son:

657900 Sizzix Big Shot machine
656938 Sizzix Movers & Shapers L Die - Tag & Bookplates
660220 Sizzix Thinlits Die Set 4PK - Mixed Media
660815 Sizzix Thinlits Die Set 3PK - Woodland Leaves

Sed muy felices!

Wednesday, 22 October 2014

Noel candy cane


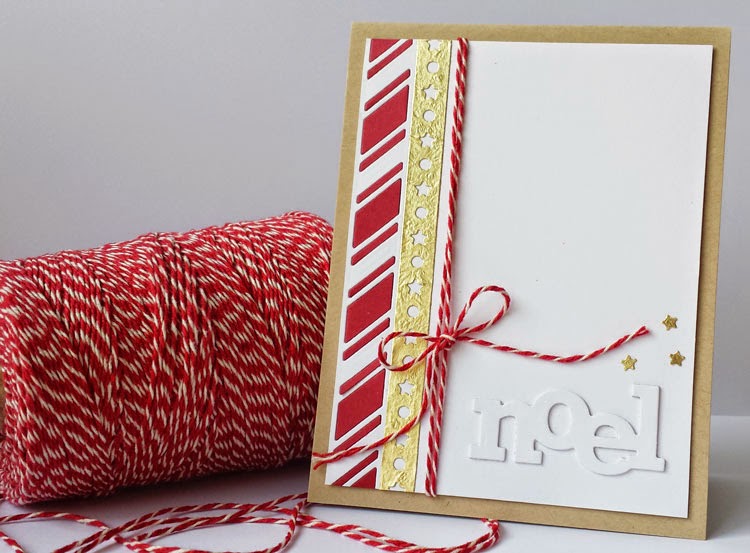
Back to Christmas card again this week and I've gone with one of my favourite colour combinations for Christmas: Kraft, white, red and gold. Love the way those colours come together and instantly remind me of Christmas. This week's card features the new Thinlits Die Set 9PK - Christmas Phrase Cards as well as the new Thinlits Die Set 9PK - Winter Borders & Rosette.
 
 
I kept the card relatively simple and let the card feature a rather large slice of white space.
 
 
On the left most side of the white cardstock, I diecut one of the borders from Thinlits Die Set 9PK - Winter Borders & Rosette. Then I used the same border to cut red cardstock to fill in the empty spaces in the white cardstock and thereby achieving the candy cane look. The second border, also from Thinlits Die Set 9PK - Winter Borders & Rosette, was diecut in a gold paper. I made sure to reserve the stars from the border to use as a detail near the sentiment.
 
 
To create the sentiment for the card I diecut four (and ended up only using three) "noels" using one of the dies from Thinlits Die Set 9PK - Christmas Phrase Cards. Glueing the three diecuts on top of one another will give your diecut dimension as well as stability.
 

Once I had mounted three "noels" on top of one another I added the sentiment to my card. I then strung the baker's twine around the card and tied a bow just above the sentiment. To make sure that the ends of the bow remained arranged in a nice way, I put a little glue under each end. The final touch was to add three of the little gold stars above the sentiment.
 
Supply list:
Sizzix Big Shot Starter Kit (Powder Blue & Teal)
Sizzix Accessory - Magnetic Platform for Wafer-Thin Dies
Thinlits Die Set 9PK - Christmas Phrase Cards
Cardstock
Gold paper
Baker's twine
 
---o---
 
Jeg er tilbage til julekortene i denne uge, og jeg har arbejdet med en af mine favorit farvekombinationer til julekort: kraft, hvid, rød og guld. Jeg elsker den måde, de farver arbejder sammen og umiddelbart minder en om jul. Denne uges kort er lavet med dies fra Thinlits Die Set 9PK - Christmas Phrase Cards og Thinlits Die Set 9PK - Winter Borders & Rosette.
 
Kortet er hold enkelt og med et relativt stort white space område.
 
På den venstre side af det hvide karton udstansede jeg en af strimlerne fra Thinlits Die Set 9PK - Winter Borders & Rosette. Jeg brugte den samme die til at udstanse rødt karton til at fylde i hullerne i det hvide karton, hvorved jeg fik candy cane looket frem. Den anden strimmel, også fra Thinlits Die Set 9PK - Winter Borders & Rosette, udstansede jeg i guldfarvet papir. Jeg sørgede for at gemme de små stjerner, så jeg kunne bruge dem et andet sted på kortet.
 
For at lave teksten på kortet udstansede jeg fire "noel" (jeg endte med kun at bruge tre af dem) med en die fra Thinlits Die Set 9PK - Christmas Phrase Cards. Når man limer flere udstansede motiver ovenpå hinanden, får man et stabilt og dimensionelt motiv uden at bruge 3d-puder.
 
Da jeg havde limet de tre "noel" ovenpå hinanden, limede jeg dem på det kortet. Herefter vandt jeg baker's twine om kortet, og bandt sløjfen lige over teksten. For at være sikker på at sløjfens ender blev siddende på en pæn måde, limede jeg dem fast med en lille klat lim. Det sidste touch var at montere tre af guldstjernerne over højre side af hilsnen.
 
Ingredienser:
Sizzix Big Shot Starter Kit (Powder Blue & Teal)
Sizzix Accessory - Magnetic Platform for Wafer-Thin Dies
Thinlits Die Set 9PK - Christmas Phrase Cards
Karton
Guldfarvet papir
Baker's twine
 

Thursday, 30 May 2013

card inspiration with Janna Werner.


Hello everyone, this is Janna. Today I would like to share two cards that I created for today´s inspirational post. As you can see, I am still drawn to the gold/white/silver color combination :-)


Material list:
658300 Sizzix Big Shot Starter Kit (including BS machine and dies)
657691 Sizzix Bigz Die - Heart, Stem & Leaves
658613 Sizzix Framelits Die Set - Wrappers, Circle
658356 Sizzix Textured Impressions - Rose Vines & Trellis
cardstock, doily, twine, vellum, rhinestones, pearls: Stampin´Up
journaling card: Skipping5
spray: Studio Calico
crepe paper: Dear Lizzy
glitter: American Crafts
other: sewing machine, liquid pearls (Ranger Ink), glue, scissors


I have to admit that the real beauty of these cards is hard to catch on photos. That is because both cards include elements of a golden journaling card. When the sun hits those parts, they glimmer, sparkle and shine - you can get an idea on the photo below.


I created both cards at the same time. I used a piece of kraft cardstock and cut it in two, each card base measures 14.5 cm x 21 cm (unfolded). After folding the card bases in the middle, I added spritzers with white spray. While the spray was drying, I used the Framelits Die Set - Wrappers, Circle to cut the heart out of the journaling card and embossed the vellum with the two embossing dies that come with the Textured Impressions - Rose Vines & Trellis set.


The butterfly was cut out of crepe paper, using one of the many dies that are included in the Big Shot Starter Kit. I sewed the butterfly on top of an embossed vellum heart and adhered both on top of the journaling card.


I like to add twine on the spine of cards as it lets them appear lighter and more interesting. As I did not want the twine to distract from the card itself, I chose kraft twine as well.

I hope you enjoyed today´s inspiration. Please click here, if you would like to see more of my scrapbooking and papercrafts projects. See you next thursday,

Janna


*****

Hallo ihr Lieben, hier ist Janna. Ich möchte euch zwei Karten zeigen, die ich für den heutigen Inspirationspost hergestellt habe. Wie ihr seht, fühle ich mich immer noch zu der Gold/Weiß/Silber Farbkombination hingezogen :-)

Materialliste:
658300 Sizzix Big Shot Starter Kit (including BS machine and dies)
657691 Sizzix Bigz Die - Heart, Stem & Leaves
658613 Sizzix Framelits Die Set - Wrappers, Circle
658356 Sizzix Textured Impressions - Rose Vines & Trellis
Cardstock, Doily, Twine, Vellum, Glitzersteine, Perlen: Stampin´Up
Journaling Card: Skipping5
Spray: Studio Calico
Krepppapier: Dear Lizzy
Glitter: American Crafts
Sonstiges: Nähmaschine, liquid pearls (Ranger Ink), Kleber, Schere

Ich muss gestehen, dass die wahre Schönheit dieser Karten nicht gut auf Fotos einzufangen ist. Das liegt daran, dass ich auf beiden Karten Teile einer goldenen Journaling Karte benutzt habe. Sobald die Sonne auf diese Elemente fällt, schimmern, scheinen und glitzern sie. Ein wenig ist das auf den Nahaufnahmen zu erahnen.

Ich habe die Karten gleichzeitig erstellt. Dafür habe ich einen kraftfarbenen Cardstock zweigeteilt, jeder Kartenrohling hatte ungefaltet eine Größe von 14.5 cm x 21 cm. Nachdem ich die Karten mittig gefaltet hatte, habe ich mit weißem Spray Kleckse aufgetragen. Während diese trockneten habe ich mit dem Framelits Die Set - Wrappers, Circle das Herz aus der Journaling Karte ausgestanzt und das Vellum mit den beiden Foldern embossed, die im Textured Impressions - Rose Vines & Trellis Set enthalten sind.

Den Schmetterling habe ich aus Krepppapier ausgestanzt und zwar mit einer der vielen Dies, die zum
Big Shot Starter Kit gehören. Den Schmetterling habe ich dann auf das embosste Vellum-Herz genäht und beides zusammen auf der Journaling Karte befestigt.

Ich wickle gerne Twine um den Kartenrücken, da dies die Karte leichter und interessanter erscheinen lässt. Da ich verhindern wollte, dass der Twine von der Karte ablenkt, habe ich mich ebenfalls für kraftfarbenen Twine entschieden.

Ich hoffe, euch hat die heutige Inspiration gefallen. Bitte klickt hier, wenn ihr weitere meiner
Scrapbooking- und Papier-Projekte sehen möchtet. Bis nächsten Donnerstag,

Janna