Showing posts with label Baby. Show all posts

Monday, 7 September 2015

Circles Baby Quilt: Finished!


Dies used: Drunkard's Path Quarter Circle
                 Drunkard's Path & Fan Background


Hello again!

The little man that is set to receive this baby quilt has yet to make an appearance but it is now all ready when he is!


I've loved making this quilt. Sewing curves made a nice change, they weren't too tricky to handle and work so well on a small quilt like this one (approximately 32" x 32"). The circles are a really good size for quilting in that they are big enough to contain a specific pattern/design but not too big so that it's awkward to keep track of the design during quilting. I used 4 different quilting patterns and had 4 circles of each design.


The brushed cotton backing is super-soft and is lovely to touch especially with the ridges formed by the quilting.


All that's left now is to wrap it up and wait!


Happy sewing :)


Monday, 24 August 2015

Circles Baby Quilt


Dies used: Drunkard's Path Quarter Circle
                 Drunkard's Path & Fan Background


Last time I posted about the baby quilt I had just begun for my friend's baby that is due in a couple of weeks time. Having made the first four circles as a test run it was time to work out how the rest of the quilt was going to come together. After going through my entire stash of blue fabrics I opted to use some blenders to bring out some of the more detailed prints and not to repeat any as I'd originally intended and instead use 16 different fabrics.

I have to say that I'm not sure I'd have managed a quilt even as small as this if I had to cut all of those curves by hand! Here are all 16 circle blocks ready to be sewn together.


I always photograph my final intended layout and use the photo as a guide to work from as once sewing them all together gets under way I always lose track of what goes where! They were sewn together into four 2 x 2 blocks and then joined in pairs and then together to give the final quilt top.

The quilt is now basted and the backing is some super soft organic brushed cotton with a clouds design, perfect for snuggling a newborn under.


Quilting has begun and the plan is to have 4 different quilting designs for the circles, so there will be 4 of each style. One down, 15 to go.


As it's only small it's easy to manoeuvre on the sewing machine and fun to quilt. Next time I post there may be a little baby tucked up in it!

Happy sewing!


Thursday, 6 August 2015

Bird and bear bibs


 I have some new favourite dies -
I think these look good on little bibs, but I also have other ideas for Christmas!
I love the simple shapes - they are ideal for applique - although for the bear I have embroidered the eyes and nose as the pieces are so small.
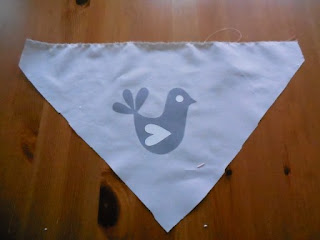
To make the bib I cut a triangle 42cm across and 24cm to the point -
and I cut off the points on the top corners.
I fused Heat and Bond to the wrong side of mid grey and aqua coloured plain fabrics and, using the die and the Big Shot, cut out the bird in grey and the heart/wing and the eye in aqua
I fused it in place and then stitched around the shape so that it will withstand multiple washes.
 
 The backing was cut in towelling, the 2 pieces were stitched, right sides together, leaving an opening in one side -
When the bib is turned right side out the opening is slip stitched together.
To complete 2 small pieces of Velcro were stitched on the corners of the bib -
remember that one piece will be on the right side and the other will be on the wrong side.
The bear bib is made in the same way, but I fused the pieces on in stages to make the stitching easier -
If-the scarf is stitched a piece at a time you don't need to keep stopping and starting and securing the ends of the threads
and I stitched French knots for the eyes, and a few satin stitches for the nose -
then the bib is put together in the same way as the bird bib.
I've given one with a bear on it to my daughter for her little boy, and I think I might be making a few more. You can make then personal by adding the baby's name, using one of our alphabet dies - http://www.sizzix.co.uk/product/657837/sizzix-bigz-xl-alphabet-die-word-play is a good size and quite fun because it's irregular.
That's all for this week - I hope I'll see you at the Festival of Quilts - I have lots of dies to demonstrate - so come and say hello to me on Lady Sew and Sew, or Beth on Cotton Patch, and Mandy on Abakhan.
Enjoy the show if you're coming, or enjoy some sun and sewing.
Angela


Thursday, 30 July 2015

Turbulence of butterflies - part 2


 Hello again, I'm starting to get excited about the Festival of Quilts - I hope you are too.
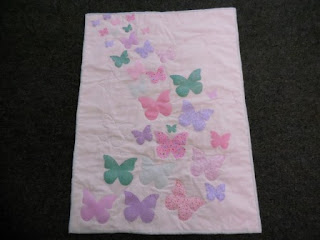
I have finished the little butterfly quilt that I started last week -
 
First of all I hand stitched the butterflies - because I had 5 hours travelling in one day so thought I would put the time to good use.
I wasn't sure what to do for the quilting - which is done by machine (as I don't have anymore long journeys planned), and then I thought of using the butterfly as a template to draw around to quilt -
 blue butterfly is the template, and I used an air erasable pen to draw around it -
 
I only used the large and medium butterflies as templates, and I spaced them in the blank areas of the quilt, and then shadow quilted around some of the fabric butterflies as well.
I like the back of the quilt too -
 and think I might make some cushions with just quilted butterflies.
I have started making another butterfly quilt and this time I'm going to fuse the butterflies in place, and then layer up the quilt and stitch around the butterflies as the quilting.
Meanwhile - I thought the butterfly die would make a nice decoration on a hairband for a baby - so with some white stretch lace, and my trusty Big Shot machine - http://www.sizzix.co.uk/product/660200/sizzix-big-shot-machine-only-white-gray  and the Echo Park Butterfly Trio Bigz die -http://www.sizzix.co.uk/product/660448/sizzix-bigz-die-butterfly-trio
I cut out 1 small and 1 medium butterfly from double sided fabric (I did this by fusing 2 layers of fabric together with heat and bond).
Then it's really easy to cut the stretch lace to the correct length - and pleat the ends, and overlap and then stitch -
Pin and then sittch the butterfly in place to conceal the join -

I stitched initially with back stitch and then added French knots to add texture to the centre.
I think I'm going to be making quite a few of these!
So that's all for this week - hope to see you next week at the Festival of Quilts -
there will be 3 of us demonstrating the Big Shot machines and Bigz dies -
I will be demonstrating with Lady Sew and Sew,
Beth will be with Cotton Patch and
Mandy will be with Abakhan
Hope to see you next week.
Angela


Saturday, 25 July 2015

Elephant Parade - Part 2/2


Hey everyone,
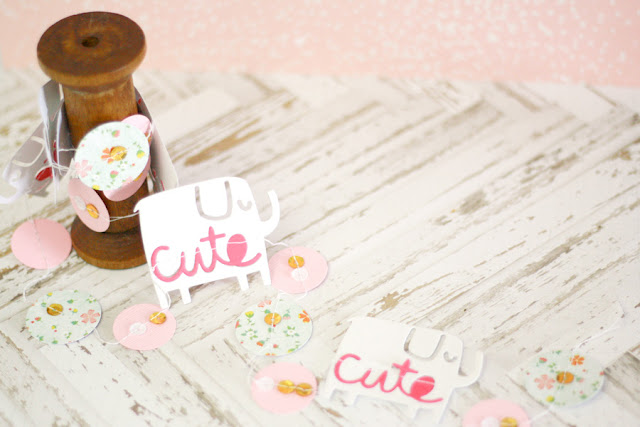
do you remember my project from last week? Yes, this is the second part of it. I love the elephants! That´s a fact. ;) I am always looking for pretty gift wrapping ideas, especially things that I can make by myself. When I saw the elephant dies I had the idea to make my own garland for birthday gifts, maybe for a little baby girl or a little girl who loves pink. :) 


I die cutted a lot of circles in a light pink and a cardstock with a floral pattern. For the elephants I choose a white and a pink cardstock. Believe me, the pink elephants are a blast! :) Need to make a project with them very soon. :) 


Of course I needed a sparkling detail on my gift-wrapping-garland, so I took some sequins in white and gold to sew them onto the circles. :)

List of Supplies:

Do you like it? I think I have to make some more… Sewing with paper is so much fun! Can´t wait to wrap it around a beautiful gift. :)

Have a nice weekend, xo Julia

Thursday, 23 July 2015

A turbulence of butterflies - baby quilt


 I'm not sure this is a correct name for a collection of butterflies but it got stuck in my head!
A friend has just had a baby girl, and so I thought I'd make a little quilt for her and, as I really like the new Echo Park range of dies, I decided to applique butterflies on it - and this view is where I started - and where the name turbulence originated.
Here is an image of the die that I have been using - Bigz die 660448
 
 I decided not to use the butterfly body's to keep the design simple.
 I used Heat and Bond on the wrong side of the fabrics - which I liberated from my stash - which I applied before cutting out.
I then cut outs of all three sizes of butterflies, and just scattered them over the background fabric, which is a cream print, also from my stash.
then came the job of trying to arrange them - but not too much so that it remained quite an informal arrangement -
This was just a bit too rigid - too much of a straight line -
this was closer - but seemed a bit too wide - so it became this -
I think I'm happy with this now - so I have to fuse the butterflies onto the background and stitch them! Yes that's all and I was hoping to finish it today - not really realistic but I'll have a go. So next week will follow on with the stitching and quilting of this quilt - hopefully.
Until then - enjoy the school holidays, and get ready for Festival of Quilts - 2 weeks today - see you there.
Angela


Wednesday, 10 June 2015

Fan(tashe)tic!


Terrible pun I know, but for once I'm not responsible. It is a word that I would use if I were trying to teach someone how to do a bad Sean Connery impersonation!

Moustaches will appear at some point in this blog even though we don't have any moustache dies.... you know what that means, it's Framelits time again!

Father's Day is just around the corner here in the UK so I thought I would create a nice vintage style card, in the sense that it has an abstracted art deco vibe.

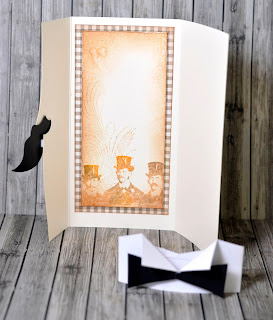
I started by making a tri-fold base card from heavy weight cream card. Below is a template with a rough guide on how it was made including the all important measurements.


After folding the card I sketched the face/nose profile onto the front (if you have any french curves they are a great help!). Next, I cut around the lines with my craft knife before Inking around the edges using Antique Linen Distress Ink and a foam applicator. This should be done with care as the effect needs to be quite subtle. Antique Linen imparts a lovely warmth when used with cream card.
To hold our card flat we are going to create a wrap with a difference and there is a diagram below with all the measurements etc.
The Wrap will not only hold the card flat, it will form a retro style wing collar.... very Downton! After cutting the shape from white card I creased and folded back the collar before wrapping around the bottom of the base card. We don't want it to stick to the base card so I removed it before securing at the back with a glue gun where it overlaps.

To create a bow tie, I folded a rectangle of black card in half and cut the shape with my scissors to create the perfect mirrored image. I gently curled the bow tie before attaching to the collar using adhesive foam pads.
In case you have forgotten, this is a Sizzix blog and you have probably noticed that we haven't been doing much die-cutting yet. I always save the best till last!

I am using two of my favourite Framelits die sets namely Labels, Fancy and Hearts. I die-cut a medium sized fancy label from black card before placing my large heart Framelits die over the die-cut as shown. One swift pass through my Big Shot later and we have a perfect moustache, Lord Kitchener would have been proud of that one! you can also use the Scalloped Hearts Framelits as we will see a little later

Next, I used my beloved circle Framelits (remember, I have combined two sets)  and I used two to create the silver ring before die-cutting a cream circle using the largest of the two. I inked around the cream circle using the Antique Linen pad before attaching the silver ring over the top to create a monocle. I curled the ends of the moustache before slipping it under the nose and attached the monocle using adhesive foam pads.


Now all I need to do is slip on the collar and there you have it, a card fit for a......Dad!


I didn't forget the centre, I stamped and inked a rectangle of cream card which was then matted onto a brown plaid background before mounting onto the centre panel all ready to write on.


Here are a few more styles of moustache that we could have chosen. The top one using two Framelits hearts, the centre using the Fancy labels and hearts and the bottom using hearts and scalloped hearts. I'm sure there is a lot more mileage in this idea. If you have any ideas why not pop them along?


Lastly but by no means least! Our friend and colleague Hannah gave birth to a beautiful baby daughter named Alyssa Ivy last week, she was a little early but Mum and baby are doing fine as is Dad Aaron, who will be receiving his first Father's day card in the not so distant future. 

But for now here's a little card I made. Hannah loves Tim Holtz dies and any excuse for me to revisit some old favourites!


Thursday, 28 May 2015

Little birds for a baby


The long anticipated baby has arrived - and it's a boy - James Arthur, brother to 3 beautiful girls!
So there will be a quilt for him - but I really must finish the quilts for two of his sisters and one of his cousins before I start his ( the good news is that all 3 tops are made - I just need to layer them up and quilt them!!)
So a quick gift is what I need - so here it is -
a little string of birds that can fix across his pram - I did think of adding some little bells to this but know that my daughter, Naomi, wouldn't appreciate it.
I used Bigz die 657685 http://www.sizzix.co.uk/product/657685/sizzix-bigz-die-birds-3 and the Big Shot http://www.sizzix.co.uk/product/660200/sizzix-big-shot-machine-only-white-gray  to cut the birds in felt - I chose grey and aqua - cutting 4 birds, 2 wings and 2 eyes in grey, and 2 birds, 4 wings and 4 eyes in aqua.
I started by stitching the eyes and wings in place, using a small running stitch, but this can also be stitched on a machine. ( remember to make pairs of birds)

Then I stitched 2 grey birds together, with a length of grey ric rac running through the middle, and adding a little toy stuffing before completing the stitching -
it just remained to complete the other 2 birds in the same way.
I now have a little gift to take when I visit again tomorrow.
An alternative would be to make the birds into a mobile - hanging the birds from ribbon attached to the back.
I could also make a little quilt to match - or even add a bird to a tiny t-shirt - I'm sure my granddaughters will help me decide on the next thing to make for him.
So that's all for this week, have fun sewing.
Angela