Showing posts with label Echo Park. Show all posts

Friday, 28 August 2015

Cards - Positive and Negative Die Cuts


Happy Friday everyone, It's Anna posting today.
I think we all need "Birthday" cards at all time of year and... How many times have you set aside a die-cut shape? Take a tip from this project: I made the positive and negative die cut sentiments using Big Shot Plus and alphabet Alphanumeric.
I used both the die cut image and the card it was cut from to created these two cards.
 
Sizzix big shot Plus cards-title-diecut-titolo-alfabeto-fustelle-by cafecreativo (7)
 
From one die cut, I end up with 2 cards and each one of them with a specific technique.
Here is the first card I made:
 
Sizzix big shot Plus cards-title-diecut-titolo-alfabeto-fustelle-by cafecreativo (1)
 
The first card uses the negative image, that I cut out from white cardstock.
 
Sizzix big shot Plus cards-title-diecut-titolo-alfabeto-fustelle-by cafecreativo (6)
 
I glued a strip of floral paper to highlight the word, on the inside card. I stamped the word "birthday" to complete the card. I embellished with a cute daisy that I cut out with two dies (Botanical Bloom collection by Craft Asylum).
Here is the detail of the front of the card:
 
Sizzix big shot Plus cards-title-diecut-titolo-alfabeto-fustelle-by cafecreativo (2)
 
I carefully saved the insides of the letters to make my second card...
 
Sizzix big shot Plus cards-title-diecut-titolo-alfabeto-fustelle-by cafecreativo (3)
 
I mounted it in acetate paper: using the positive of my die cut I glued them back into place, above acetate strip. I created a small window on the front of the card and I attached the acetate.
I completed the card with a big cupcake (Echo Park collection).
 
Sizzix big shot Plus cards-title-diecut-titolo-alfabeto-fustelle-by cafecreativo (4)
 
The use of the negative and the positive parts of your die cuts in these 2 cards is simple and fast!
 
Sizzix big shot Plus cards-title-diecut-titolo-alfabeto-fustelle-by cafecreativo (5)
 
Here are the supplies I used to make these cards:
cardstocks
acetate paper
patterned papers
spray ink
acrylic paint
ink pad
stamp
washi tape glitter
brad
enamel dots
button
pin
stapler
 
I hope you enjoyed my project today. Have a great week end, see you next Friday!
 
**************************************
Flag_of_Italy
italiano
 
Buon Venerdì a tutti, sono Anna e sono qui con un nuova idea per usare la Big Shot e le fustelle!
Credo che tutti abbiamo bisogno di biglietti di compleanno durante tutto l'anno e nei giorni di ferie è buona cosa cercare di portarsi avanti, prima che il tran tran quotidiano prenda il sopravvento.
Così oggi vi mostro un trucchetto per risparmiare tempo ;)
Prendete spunto da questo progetto, perchè ho cercato di fare due card al prezzo di una! Infatti, ho utilizzato la scritta fustellata con la Big Shot Plus e l'alfabeto Alphanumeric, usando sia il positivo che il negativo. Non si butta via nulla! :D
 
Da un solo taglio, ho ottenuto due card differenti, usando per ognuna una tecnica specifica.
 
La prima card utilizza l'immagine negativa, visto che i titoli traforati vanno tanto di moda. Ho fustellato la scritta “happy” posizionando le lettere sul biglietto bianco. Ho incollato una striscia di carta a fiori nell'interno, per evidenziare la parola. Ho timbrato la parola "birthday" per completare la scritta. Quindi ho abbellito con un po' di washi tape glitter, una striscia di carta e una deliziosa margherita che ho messo assieme grazie a due fustelle (collezione Botanical Bloom by Craft Asylum). I colori di questa card sono decisamente femminili :)
 
Come avrete intuito, ho messo da parte, con attenzione, le lettere fustellate precedentemente per realizzare la mia seconda card.
Per questo biglietto ho deciso di creare anche qui un effetto ottico “traforato”, per cui ho montato la scritta su acetato: utilizzando il “positivo” ho incollato le lettere sopra la striscia di acetato. Ho creato, quindi, una piccola finestra sul fronte della card, dove ho incollato con biadesivo l'acetato. Ho completato il biglietto di compleanno con una grande e meravigliosa cupcake (fustella della collezione Echo Park), che ho anche embossato e rifinito con un bottone rosso. I colori di questa card diciamo che vanno bene per tutti.
 
Ecco che ho già pronte due card per le prossime occasioni!
Come avete visto l'uso delle parti negative e positive della vostra fustellata, consente di creare due card in modo semplice e veloce. Provateci anche voi e poi fatemi sapere! ;)
 
Materiali:
cartoncini
acetato
carta da scrapbooking
inchiostro spray
colori acrilici
inchiostro per timbri
timbro
washi tape glitter
brad
enamel dot
bottone
spillo decorato
spillatrice
 
Spero che il mio progetto oggi vi sia piaciuto. Buon week end, ci vediamo qui venerdì prossimo!

Friday, 14 August 2015

Felt Ice Cream Keychain and Brooch


Hello there! I’m Anna from Café Creativo and I am so excited to share this project with you today!
This week I am bringing you a project that will help use the fabric and felt scraps ;)
I made these jewels textiles. I thought it would be lovely to share a tutorial to make a small last minute gift for this summer.
 
felt-keyring-brooch-ice cream-heart-dies-fustelle-sizzix (1)
 
I die-cut the bits and pieces using the new seasonal dies from Echo Park collection.
I chose ice cream to make a Keychain and some hearts to make a Brooch.
 
felt-keyring-ice cream-dies-fustelle-sizzix (1)
 
felt-brooch-heart-dies-fustelle-sizzix (1)
 
Make a textile brooch using leftover fabric and felt, it’s so perfect for a summer t-shirt!
 
Here’s how you do it:
Cut out one medium heart from felt, one small heart from your fabric.
Pin and sew the two hearts together.
Glue or sew on the back a strip of fabric and a piece of lace.
Add a button, a rhinestone and a decorated pin.
If you want to make a brooch sew a brooch bar onto the back. If you are making a keychain add the ribbon loop and keyring at the top and add a second heart on the back.
Blanket stitch around the edge of the heart with a contrasting thread colour.
Your brooch or keychain is finished!
 
felt-keyring-brooch-ice cream-heart-dies-fustelle-sizzix (2)
 
Happy Summer! ♥
 
Brooch - Items used:
Sizzix Big Shot Plus Machine Only (White & Gray) (660020)
Sizzix Bigz Die - Heart Trio (660452)
Other: scraps of fabric, scrap of felt, lace, button, rhinestone, pin, brooch bar, sewing machine, thread.
 
Keychain - Items used:
Sizzix Big Shot Plus Machine Only (White & Gray) (660020)
Sizzix Bigz Die - Ice Cream Cone & Scoops #2 (660453)
Other: scraps of fabric, felt, piece of thin ribbon, keyring, pom pon, pom pon yarn, pom pon trim, lace, sewing machine, thread.
 
**************************************
Flag_of_Italy
Per le amiche italiane! :)
 
Ciao, sono Anna di Café Creativo e sono felice di condividere anche oggi un nuovo progetto!
Questa settimana vi mostro un progetto che contribuirà all'utilizzo degli avanzi di stoffa e feltro, che si accumulano sempre.
Ho realizzato, infatti, dei bijoux tessili, molto simpatici ed adatti all'estate, che si possono realizzare con pochi materiali, anche in vacanza ;) Ho pensato, quindi, che sarebbe stato carino condividere un piccolo tutorial...

Ho tagliato i vari pezzi utilizzando le nuove fustelle della collezione Echo Park. Tra tutte le bellissime forme delle fustelle Bigz, oggi ho scelto il gelato per fare un portachiavi - grigri e i cuoricini per fare una spilla. Ma ci sono anche deliziose cupcake, farfalle e persino una macchina fotografica!!! Da collezionarle tutte! :D

Un progetto facile è quello della spilla, che è perfetta per ravvivare una semplice t-shirt estiva!
 
Ecco come si fa:
L'elenco materiali è in fondo ;)
Tagliare un cuore medio dal feltro, un cuore piccolo dal tessuto prescelto.
Spillare e cucire i due cuori insieme.
Incollare o cucire sul retro una striscia di tessuto e un pezzo di pizzo.
Aggiungere un bottoncino, uno strass e uno spillo decorato.
Se si vuole fare una spilla cucire sul retro un base per spilla. Se si si preferisce fare un portachiavi aggiungere il nastro e l'anello portachiavi in alto e posizionare un secondo cuore sul retro.
Eseguire poi un punto festone intorno al bordo del cuore con un filo di colore in contrasto.
Ecco fatto, la vostra spilla (o portachiavi) è pronta!
 
Buon Ferragosto! ♥
 
Spilla - Materiali:
Sizzix Big Shot Plus Machine Only (White & Gray) (660020)
Sizzix Bigz Die - Heart Trio (660452)
Altro: ritagli di stoffa, ritagli di feltro, pizzo, bottone, strass, spillo decorato, base per spilla, macchina da cucire, filo.
 
Portachiavi - IMateriali:
Sizzix Big Shot Plus Machine Only (White & Gray) (660020)
Sizzix Bigz Die - Ice Cream Cone & Scoops #2 (660453)
Altro: ritagli di stoffa, feltro, nastro, portachiavi, pom pon, lana pom pon, passamaneria pom pon, pizzo, macchina da cucire, filo.

Thursday, 30 July 2015

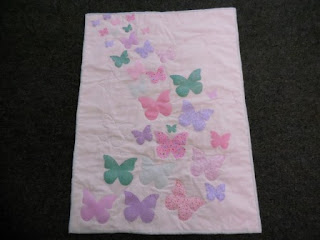
Turbulence of butterflies - part 2


 Hello again, I'm starting to get excited about the Festival of Quilts - I hope you are too.
I have finished the little butterfly quilt that I started last week -
 
First of all I hand stitched the butterflies - because I had 5 hours travelling in one day so thought I would put the time to good use.
I wasn't sure what to do for the quilting - which is done by machine (as I don't have anymore long journeys planned), and then I thought of using the butterfly as a template to draw around to quilt -
 blue butterfly is the template, and I used an air erasable pen to draw around it -
 
I only used the large and medium butterflies as templates, and I spaced them in the blank areas of the quilt, and then shadow quilted around some of the fabric butterflies as well.
I like the back of the quilt too -
 and think I might make some cushions with just quilted butterflies.
I have started making another butterfly quilt and this time I'm going to fuse the butterflies in place, and then layer up the quilt and stitch around the butterflies as the quilting.
Meanwhile - I thought the butterfly die would make a nice decoration on a hairband for a baby - so with some white stretch lace, and my trusty Big Shot machine - http://www.sizzix.co.uk/product/660200/sizzix-big-shot-machine-only-white-gray  and the Echo Park Butterfly Trio Bigz die -http://www.sizzix.co.uk/product/660448/sizzix-bigz-die-butterfly-trio
I cut out 1 small and 1 medium butterfly from double sided fabric (I did this by fusing 2 layers of fabric together with heat and bond).
Then it's really easy to cut the stretch lace to the correct length - and pleat the ends, and overlap and then stitch -
Pin and then sittch the butterfly in place to conceal the join -

I stitched initially with back stitch and then added French knots to add texture to the centre.
I think I'm going to be making quite a few of these!
So that's all for this week - hope to see you next week at the Festival of Quilts -
there will be 3 of us demonstrating the Big Shot machines and Bigz dies -
I will be demonstrating with Lady Sew and Sew,
Beth will be with Cotton Patch and
Mandy will be with Abakhan
Hope to see you next week.
Angela


Wednesday, 15 July 2015

Stamp n' Stencil


They say that we only use 10% of our brains, or 5% in my case as many would argue! Sometimes I feel the same about die-cutting. There is so much potential which remains untapped so I thought It would be nice to share a couple of techniques which I haven't used for ages.

I am using  the Bigz Heart Trio die. This is one of eight fabulous Bigz dies that have been designed for Sizzix by Echo Park which are perfect for a huge range of applications, I know that Angela, our textile guru is very excited about them!

I love the shapes of these hearts and they are so big and bold offering a blank canvas ready to be explored. I am using a selection of Distress inks as shown below and at this point I only have a sketchy idea of how they will turn out.


I attached some self adhesive foam to a square of mount board and Die-cut my shape... Aren't Bigz dies great!!!
I applied the ink pads directly onto the foam side of the die-cut shape before gently spritzing with clean water using a mister. Next, I pressed the shape face down onto a square of white card as one would do with a stamp.
 For my next technique I die-cut the same heart from paper and used the negative as a stencil. I placed the stencil onto white card and applied the same inks using foam applicators.
 I removed the stencil and lightly spritzed with clean water before drying with a heat tool. Next, I replaced the stencil and used a text stamp to add a little detail.
Finally, I die-cut a 3-D flower and some leafy foliage from white card before forming the flower and curling the leaves to add a little dimension. Click on the highlighted text to see the dies used.


Here are the finished cards. As you can see I have distressed the edges of the white card and attached each to a kraft base card secured with some suitably wonky stitching very kindly provided by our Angela although I feel I should point out that the 'wonky' stitching was by my request!

I applied PVA to the foliage and dipped it in gold glitter and I used a postmark sentiment stamp from the good people at Lily of the Valley (great set, very versatile!)

One card is for a wedding and the other for a special birthday girl. Hope they like 'em?


Wednesday, 1 July 2015

Smile!


I am not the world's greatest photographer, I do have a decent camera but it is always set on automatic. These days most of my snaps are taken using my phone and some of them are great. Its so important to compose your shot and get the light right  because without those two things being in place all the fancy equipment and Photoshop trickery is a waste of time.

Having said all that, I do love old cameras from the fifties and sixties. It's a time when photography was becoming accessible to all and companies were fighting for a share of the 'cheap and cheerful' market with ever more colourful plastic creations. 

Some of those cameras look fabulous today, I even have a private Pintrest board dedicated to 1950's consumer goods featuring many such cameras. It makes me smile!

And so to today's blog, Sizzix have just released a new collection of Bigz dies designed by the good people of Echo Park. I had so much fun with these big, bold shapes while making projects for our trade shows and they are perfect for appliqué too. But today is all about the camera die.

Today I have used the Bigz camera die, the Thinlits alphabet set Alphanumeric and the Textured Impressions Butterfly Lattice set. Click on the highlighted text to see the individual products.

I started by die-cutting all the elements to make up my camera, the main body and the focus ring are backed with mount board to add a little depth to the shapes. I love this dusty pink, it's one of those classic American 1950's colours which I love so much so I used it for the body of my camera. as you can see, I embossed the pale metallic gold card with my lattice folder, it gives the perfect gold anodised look so popular at the time.


I trimmed about 5mm from the top of the embossed rectangle and mounted it onto the brown rectangle before attaching to the main body of the camera.


Next, I added the other elements. I used a hole punch to pop out a tiny pink circle which I added to the lens to create a highlight effect. 


While I was taking the individual letters from the Alphanumeric die set I had a revelation! I saw a word within a word which changed my approach to the whole card. I cut a rectangle of the lovely retro green/blue card and rounded off the bottom corners with a punch before placing all the letter dies across the base spelling the word 'SMILE' before removing the letter 'M' and 'E' and passing it through my Big Shot machine.


I die-cut the letters 'M' and 'E' from the pink card and attached them to the rectangle using thin strips of adhesive foam to add dimension. Next, I used my trusty Dymo machine to print out the legend 'YOU MAKE...'  above the word 'SMILE'; the 'ME' of course is part of the word. 


Here's the finished card, I think the Dymo strip adds to the retro vibe? 
it makes me smile anyway!


Friday, 13 September 2013

Art Journal obsession - more journaling with Thinlits!


Hi, it's me again!
Last week I posted a page from my ongoing project - "Odyssey" vintage book which I keep filling with pages inspired by my old family photos. Well, the problem is I got so inspired after last time that I simply couldn't stop! so today I've got another journal page - this time dedicated to my beloved grandpa - Edward - who passed away way too early in 1993.


This time I also focused on Echo Park Paper skeleton flower die (aren't these shapes just amazing?) - Sizzix Thinlits Die Set 4PK - Springtime (659117) - and vintage papers and tickets from my home collection. I had so much fun creating it. Here you can see  more details!


Again- all the colours come from homemade tea stain, Vintaj Patina and sprays (Luminarte Primary Elements with water), there is a bit of gesso and some 3D Foams by Scrapbook Adhesives used as embellishments too ;) As finishing touches I used some metal elements such as paper clips, an iron plate I found on the street, piece of wire I got from one of my students, buttons and staples. The checked fabric is one of the Canvas Resist Sheets (my Elementals by Prima) and stamps are a choice of background patterns from my Prima Vintage Vanity collection.

See you soon - have a great week!
Finn

Friday, 6 September 2013

Art Journaling with Thinlits - vintage love...


Hi, I hope you had a great week!
Today I'm sharing one on the journal pages which is a part of my creative project inspired by my old family photos. From time to time I open the book I bought in the charity shop and add one or 2 pages inside... and because I use the photos of my beloved ones the book turns into a precious keepsake that I'd love to keep on my shelf forever.

The pages below are about my dad, Chris - I think he was about 30 when this photo was taken.

The pages are mostly created from leftovers and found papers - I love to create this way, including pieces I have somewhere in my stash. One of the most important parts of the composition was the Echo Park Paper skeleton flower cut-out from the white cardstock: Sizzix Thinlits Die Set 4PK - Springtime (659117).
 I love the beautiful pattern it made, I was so inspired by it I started co color the inside of the cut-out with a pencil to make it even more visible!


Of course - The color comes from homemade tea stain and sprays (Luminarte Primary Elements with water), there is a bit of gesso  and some 3D Foams by Scrapbook Adhesives - this time used as embellishments ;) As finishing touches I used some metal elements including two of the Vintage Centers (my Mechanicals by Prima), paper clips, buttons and staples. The checked fabric is one of the Canvas Resist Sheets (my Elementals by Prima) and stamps are a choice of background patterns from my Prima Vintage Vanity collection. 
Huge hugs from the Emerald Island and see you soon!
Finn

Thursday, 7 March 2013

Mum's the word


Last week's blog was entitled 'Keep it Simple', this week I'm keeping it even simpler! I have chosen a classic colour combination of black, white and pink with a dash of silver thrown in for good measure. Again I'm using some of the Thinlits from the Echo Park collection.

When you choose simple block colours as I have and a hand full of dies the next challenge is the composition. I usually cut out the elements and move them round the page until I find a pleasing arrangement.

This card is not really my cup of tea, but I'm not making it for me. There is a lady however who will love it, whose mantle piece it will grace for the next couple of weeks.

You can see the dies and card below and you will notice that two of them have paper inside them, this is standard kitchen greaseproof or wax paper as it is sometimes called. With the more complex Thinlits designs it is sometimes fiddly to remove the die cuts, this is the price we pay for that delicious detail.

When I make my first cut I place a sheet of greaseproof paper between the die and the card, the greaseproof remains embedded in the die and makes removing the die cut shape so much easier.

For more details, it is really well explained on the Tubo blog site by my good friend Patricia and here is a link.


The only thing used apart from the dies and card was adhesive and a few gems, The phrases were created on my PC and, as we are no doubt familiar, one of the advantages of Thinlits/Framelits is that you can place them over a stamped or printed phrase and cut with perfect precision. If when creating the phrase on screen you have your document at 100% you can literally hold your die against the screen to make sure it fits before printing.It's a great way to make your papercraft projects bespoke and personal.


Wednesday, 27 February 2013

Keep it Simple!


When people ask what I do, I sometimes half-jokingly reply 'I cut stuff out and stick it to other stuff'. I hope there is a bit more to it than that but the point is, I don't think about it to much. Different collections demand different approaches, techniques and materials. When I saw the new collection of dies designed by the good folks at Echo Park I knew instinctively how I wanted to use them.

Echo Park are based in California and they make some of my favourite paper collections, I particularly like their 6" x 6" paper pads and the colour pallets they chose are so inviting. I was really happy when I saw the new range of dies that they have designed together with Sizzix. They compliment their papers so well I couldn't wait to get started. If you want to know a bit more about the company follow this link

The dies are all Thinlits which means that they cut paper and card beautifully and offer exquisite detail to match. The dies come in a really cute plastic wallet which makes them easy to store away and keep tidy which is crucially important if your craft room is anything like mine!

Going back to the title of this blog, I wanted to use just the papers and dies, no fancy techniques or supplies with the exception of a few adhesive gems and a touch of Old Paper Distress Ink because that's how the collection spoke to me, basically, I just cut stuff out and stuck it to other stuff! easy when you have the right combination of dies and papers


For the card boat card I used:
  • Thinlits - Little Boy by Echo Park Paper Co. (659112)
  • Thinlits - For the Record by Echo Park Paper Co. (659108)
  • On the Edge Die - Scallops (656627)
  • 6" x 6" Paper Pad - Splash
  • 6" x 6" Paper Pad - Hello Summer


For the card star card I used:
  • Thinlits - Everyday Eclectic by Echo Park Paper Co. (659107)
  • 6" x 6" Paper Pad - Happy Days
  • 6" x 6" Paper Pad - Dots & Stripes (Metropolitan Collection)


For the card car card I used:
  • Thinlits - Little Boy by Echo Park Paper Co. (659112)
  • Thinlits - For the Record by Echo Park Paper Co. (659108)
  • 6" x 6" Paper Pad - Splash
  • 6" x 6" Paper Pad - Hello Summer