

Hello again everyone! I hope you all had a wonderful weekend and if you've had snow it is starting to thaw out!
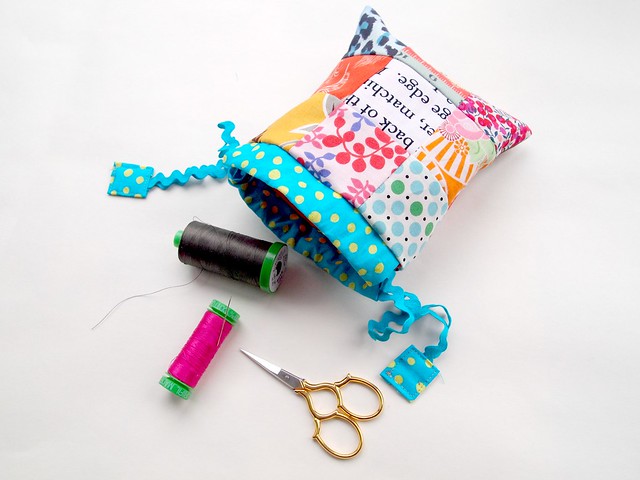
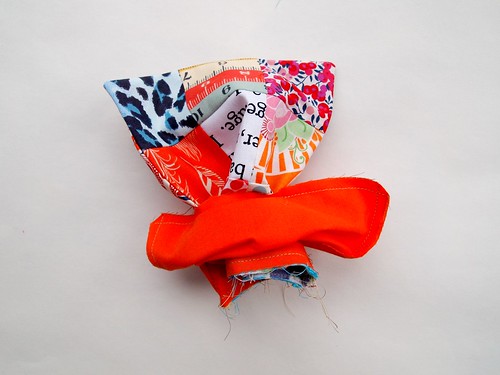
Today we're going to make a simple drawstring pouch using scrap fabrics. It's lovely little pocket sized project that won't take you more than about half an hour and once you've made one I'm sure you'll be itching to make more. They're ideal for keeping your sewing-on-the-go kit all together, or for handbag essentials like your keys, lipstick, a pack of tissues and so on. You can also fill them with little treats for birthday presents - try travel size toiletries for grown ups and sweets or small toys for children.
Dies used;
Sizzix Bigz Die - 2" finished (2 1/2" unfinished)
Sizzix Bigz XL 25" Die - strips 2 1/2" wide
If you have a Big Shot Pro you can also use;
Sizzix Bigz Pro Die - square, 6" finished (6 1/2" unfinished)
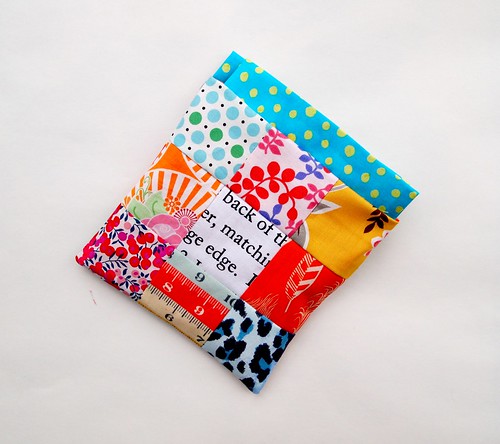
Finished size - approx. 6" square
Hello again everyone! I hope you all had a wonderful weekend and if you've had snow it is starting to thaw out!
Today we're going to make a simple drawstring pouch using scrap fabrics. It's lovely little pocket sized project that won't take you more than about half an hour and once you've made one I'm sure you'll be itching to make more. They're ideal for keeping your sewing-on-the-go kit all together, or for handbag essentials like your keys, lipstick, a pack of tissues and so on. You can also fill them with little treats for birthday presents - try travel size toiletries for grown ups and sweets or small toys for children.
Dies used;
Sizzix Bigz Die - 2" finished (2 1/2" unfinished)
Sizzix Bigz XL 25" Die - strips 2 1/2" wide
If you have a Big Shot Pro you can also use;
Sizzix Bigz Pro Die - square, 6" finished (6 1/2" unfinished)
Finished size - approx. 6" square
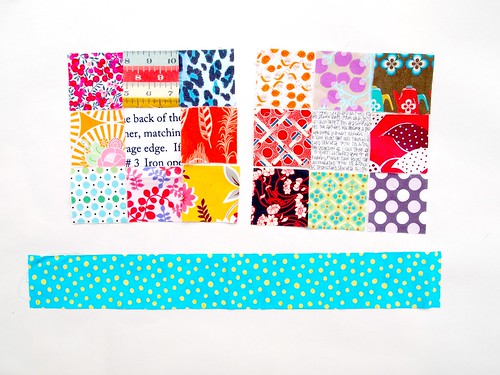
Use your 2" finished die to cut a total of 18 squares from a variety of fabrics. The more the merrier!
Cut 1 strip using the strip die 2.5" x at least 14"
Cut 2 x 6.5" squares for the pouch lining


Using scissors, cut the strip into 2 pieces, each measuring 6.5" in length. Fold the edges over by 1/4" or so, and press, and 1/4" or so again, and press. Then fold each strip in half along the length, wrong sides together, and press again. Set aside.
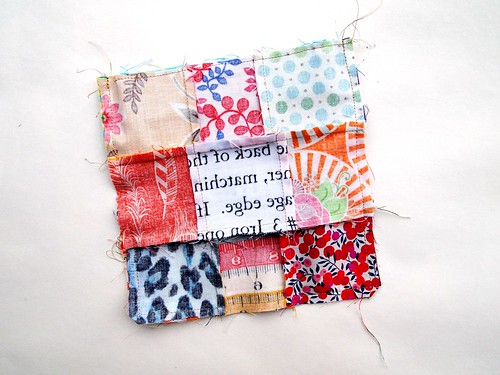
Assemble your patchwork pouch pieces by sewing 2 sets of 9 squares into 3 rows of 3 (a 9-patch!) Press well.
Pin a folded strip to the outside top of each 9-patch - aligning the raw edges together, and sew on using an 1/8" seam
With right sides together, and with the now attached folded strips at the top, pin and sew around the sides and bottom of the pouch. Leave the top unstitched - that's the opening! Once stitched, turn right side out and press.
Repeat with the lining pieces - right sides together, sew down each side and across the bottom - leaving an opening at least 2" wide for turning.
Now place the patchwork pouch inside the lining - right sides together, and lineup the raw edges at the top. Pin and sew all the way around the top using a 1/4" seam.

Turn right ways out - pulling the patchwork pouch out through the hole you left at the bottom of the lining. Close the opening in the lining, either by hand stitching or by sewing close to the edge with your machine.
Push the lining into the patchwork pouch.
Use 2 lengths of ribbon or cord, each one approximately 15" long and thread through the folded strips that have formed the drawstring channel (use a bodkin or safety pin to help you with this!), and either knot off each end, add a bead, or button or use a small scrap of fabric as a tab.
Stuff with your choice of essentials and you're done!

You can adapt this idea to make a pouch of any size. It's a great way to use up stray quilt blocks you may have made - simply change the measurements of the lining pieces and the strips for the drawstring channel accordingly. For example - 12.5" unfinished blocks would need 2 strips 2.5" x 12.5", and 2 squares for the lining each measuring 12.5" square.
Quick rule of thumb - your unfinished block size is the same as the lining squares size (cut 2) and the drawstring channel strips (width of unfinished block = length of each strip). You need 2 lengths of ribbon or cord for the drawstring that are approximately 2.5 x the width of the pouch (eg - for the 12" pouch, cut 2 lengths each 30" long)
Pretty xxx
ReplyDeleteMaking 6 for the kids teachers valentines! so cute! thanks!
ReplyDeleteThank you for sharing this. These are darling. I will be making some of these.
ReplyDeleteGoing to make some for mothers day
ReplyDelete